N04C-VL ENGINE MECHANICAL CYLINDER HEAD INSTALLATION
PROCEDURE

 13751
1.INSTALL VALVE LIFTER
- NOTICE:
-
Be sure to return the removed valve lifter to its original location.
11115
2.INSTALL CYLINDER HEAD GASKET
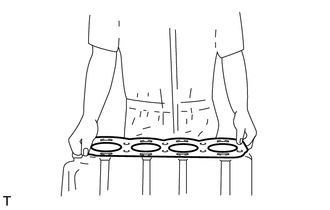
Install a new cylinder head gasket.
- NOTICE:
-
Always use a new cylinder head gasket after cleaning the surface of the cylinder head and cylinder block, and keep them free of dirt, water and grease.
11101
3.INSTALL CYLINDER HEAD SUB-ASSEMBLY
Install the cylinder head sub-assembly over the dowels on the cylinder block.
- HINT:
-
Since the cylinder head bolts are unique to this engine, do not substitute them with ordinary bolts.
Apply a light coat of engine oil to the thread and under the heads of the cylinder head bolts.
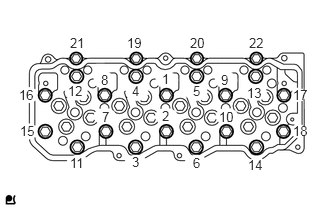
Uniformly install and tighten the cylinder head bolts (1 to 18) in the order shown in the illustration.
- Torque:
60 N*m (612 kgf*cm, 44 ft.*lbf)
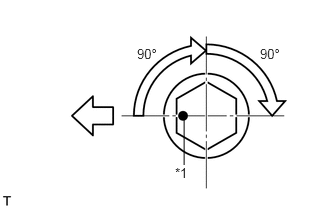
Mark the front side of each cylinder head bolt head with paint as shown in the illustration.
| *1 | Paint |

|
Front |
Retighten the cylinder head bolts by 90° in the same order as step (b).
Perform step (d) again.
Check that each painted mark is now at a 180° angle to the front.
Uniformly install and tighten the cylinder head bolts (19 to 22) in the order shown in the illustration.
- Torque:
55 N*m (561 kgf*cm, 41 ft.*lbf)
13819
4.INSTALL VALVE BRIDGE
- HINT:
-
Be sure to install the removed valve bridge to its original location.
13781
5.INSTALL VALVE PUSH ROD
- HINT:
-
Be sure to install the removed valve push rod to its original location.
13901
6.INSTALL NO. 1 VALVE ROCKER SHAFT SUB-ASSEMBLY
Install the No. 1 rocker shaft sub-assembly onto the cylinder head sub-assembly.
Apply engine oil to the rocker arm and valve push rod.
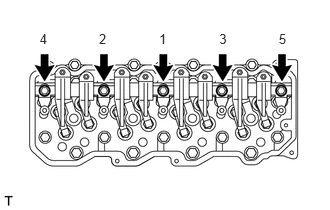
Install the 5 bolts in the order shown in the illustration.
- Torque:
69 N*m (699 kgf*cm, 51 ft.*lbf)
- NOTICE:
-
Do not allow the valve push rod to interfere with the adjusting screw.
7.ADJUST VALVE CLEARANCE
17141
8.INSTALL EXHAUST MANIFOLD
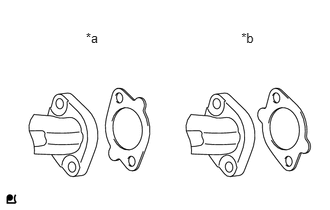
Install 4 new exhaust manifold gaskets onto the cylinder head sub-assembly as shown in the illustration.
| *a | INCORRECT |
| *b | CORRECT |
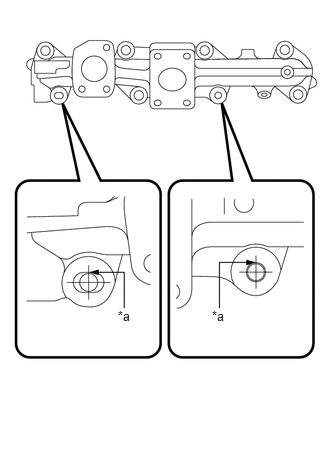
Temporarily install the exhaust manifold.
| *a | Contact |
- HINT:
-
The stud bolts should contact the exhaust manifold as shown in the illustration.
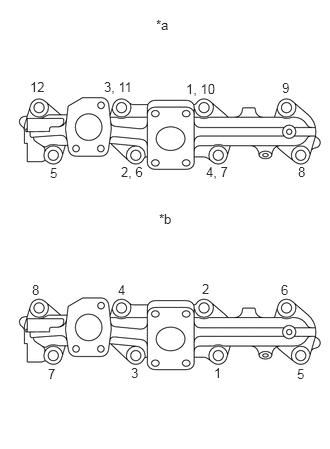
Tighten the 8 nuts, 4 collars and 4 spacers in the order shown in the illustration.
- Torque:
60 N*m (612 kgf*cm, 44 ft.*lbf)
| *a | New Exhaust Manifold |
| *b | Used Exhaust Manifold |
- HINT:
-
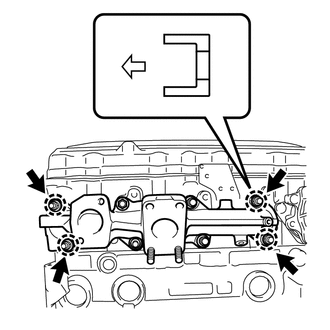
-
Make sure to install the 4 collars in the correct direction.
|
|
Exhaust Manifold Side |
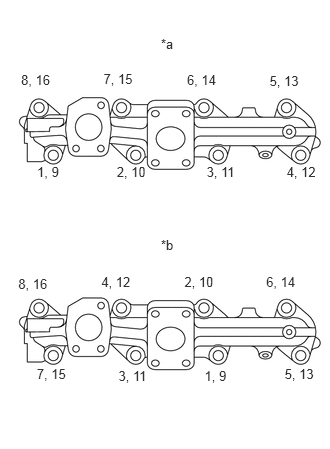
Check and re-tighten the 8 nuts, 4 collars and 4 spacers in the order shown in the illustration.
- Torque:
60 N*m (612 kgf*cm, 44 ft.*lbf)
| *a | New Exhaust Manifold |
| *b | Used Exhaust Manifold |
Install the exhaust manifold heat insulator with the 3 bolts.
- Torque:
29 N*m (291 kgf*cm, 21 ft.*lbf)
17111
9.INSTALL INTAKE MANIFOLD
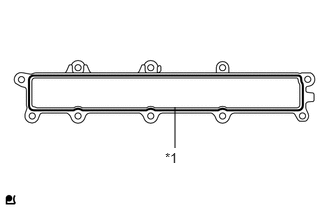
Apply a continuous bead of seal packing (width: 2.2 mm (0.0866 in.)) as shown in the illustration.
- Seal packing:
Toyota Genuine Seal Packing Black, ThreeBond 1207B or equivalent
| *1 | Seal Packing |
- NOTICE:
- ·
Remove any oil from the contact surface.
·Install the timing chain cover within 3 minutes, and tighten the bolts within 15 minutes of applying the seal packing.
·Do not start the engine for at least 2 hours after the installation.
Install the intake manifold with the 8 bolts and 2 nuts.
- Torque:
29 N*m (291 kgf*cm, 21 ft.*lbf)
16333
10.INSTALL WATER OUTLET HOUSING
16331A
11.INSTALL THERMOSTAT
Install the thermostat with the new gasket.
16331
12.INSTALL WATER OUTLET
27020
13.INSTALL GENERATOR ASSEMBLY
16206
14.INSTALL WATER BY-PASS PIPE SUB-ASSEMBLY
16206B
15.INSTALL NO. 3 WATER BY-PASS PIPE SUB-ASSEMBLY
Connect the water hose.
Connect the engine coolant temperature sensor connector and camshaft position sensor connector.
Install the No. 3 water by-pass pipe sub-assembly with the 2 bolts.
- Torque:
29 N*m (291 kgf*cm, 21 ft.*lbf)
87208L
16.INSTALL WATER PIPE SUB-ASSEMBLY
16577C
17.INSTALL RADIATOR PIPE
26100
18.INSTALL VENTURI ASSEMBLY
23670
19.INSTALL INJECTOR ASSEMBLY
17201
20.INSTALL TURBOCHARGER SUB-ASSEMBLY
16400
21.INSTALL RADIATOR ASSEMBLY