WINDOW / GLASS FRONT SIDE WINDOW GLASS(for Front Passenger Side) REMOVAL
CAUTION / NOTICE / HINT
- HINT:
- ·
Use the same procedure for RHD and LHD vehicles.
·The procedure listed below is for RHD vehicles.
PROCEDURE

 1.DISCONNECT BATTERY NEGATIVE TERMINAL
2.REMOVE FRONT SEAT
87945
3.REMOVE OUTER MIRROR COVER LH
87940
4.REMOVE OUTER REAR VIEW MIRROR ASSEMBLY LH
53182A
5.REMOVE HEADLIGHT COVER LH
6.REMOVE FRONT PILLAR END COVER LH
46243
7.REMOVE PARKING BRAKE LEVER COVER
58651A
8.REMOVE FRONT DOOR NO. 1 MAT PLATE
62311C
9.REMOVE FRONT DOOR OPENING TRIM WEATHERSTRIP RH
73233
10.REMOVE OUTER LAP BELT ANCHOR COVER
73210
11.DISCONNECT FRONT SEAT OUTER BELT ASSEMBLY RH
62413A
12.REMOVE LOWER CENTER PILLAR GARNISH RH
63951
13.REMOVE COOLER PIPE COVER
74617V
14.REMOVE ASSIST GRIP PLUG
74603
15.REMOVE FRONT ASSIST GRIP SUB-ASSEMBLY
62211
16.REMOVE FRONT PILLAR GARNISH RH
62212
17.REMOVE FRONT PILLAR GARNISH LH
62425
18.REMOVE CENTER PILLAR GARNISH COVER (w/ Hand Grip Frame)
74730
19.REMOVE HAND GRIP FRAME ASSEMBLY (w/ Hand Grip Frame)
73220
20.DISCONNECT FRONT SEAT OUTER BELT ASSEMBLY LH (w/ Rear No. 1 Seat)
62547B
21.REMOVE NO. 3 PILLAR GARNISH LH
63371B
22.REMOVE NO. 1 ROOF BOARD SET MOULDING
63610C
23.REMOVE NO. 1 AIR OUTLET REGISTER ASSEMBLY (w/ Rear Air Duct)
74310
24.REMOVE VISOR ASSEMBLY RH
74320
25.REMOVE VISOR ASSEMBLY LH (w/ Passenger Side Visor)
63310A
26.REMOVE ROOF HEADLINING ASSEMBLY HOLE PLUG (w/ Cover)
83910G
27.REMOVE CLOCK ASSEMBLY (w/ Clock)
87810
28.REMOVE INNER REAR VIEW MIRROR ASSEMBLY
63656D
29.REMOVE CENTER AIR INTAKE COVER (w/ Rear Air Duct)
63651B
30.REMOVE AIR INTAKE NET (w/ Rear Air Duct)
63310
31.REMOVE ROOF HEADLINING ASSEMBLY
62989
32.REMOVE CENTER DOOR LOCK COVER (w/o Rear Air Duct)
62638A
33.REMOVE QUARTER PILLAR GARNISH RH (w/o Rear Air Duct)
73224
34.REMOVE FRONT SEAT BELT RETRACTOR COVER LH
67676
35.REMOVE FRONT SIDE TRIM BOARD COVER LH
62540A
36.REMOVE SIDE NO. 2 TRIM ASSEMBLY LH
62520G
37.REMOVE SIDE NO. 1 TRIM ASSEMBLY LH
38.REMOVE FRONT SIDE WINDOW GLASS LH
- NOTICE:
-
The front side window glass LH may fall while performing this procedure. Therefore, use suction cups to hold the side window glass from the outside of the vehicle.
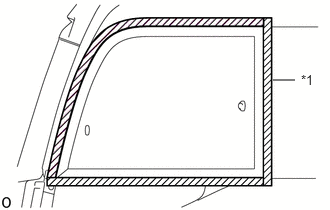
Apply protective tape to the outer surface of the vehicle body and glass to prevent scratches.
| *1 | Protective Tape |
Install the suction cups to the front side window glass LH.
From the interior, insert a piano wire between the vehicle body and glass.
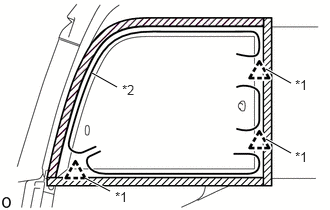
Tie objects that can serve as handles (for example, wooden blocks) to both wire ends.
- NOTICE:
- ·
When separating the glass from the vehicle, Do not damage the vehicle paint or interior/exterior ornaments.
·To prevent the instrument panel from being scratched when removing the glass, place a plastic sheet between the piano wire and instrument panel.
| *1 | No. 1 Side Window Clip |
| *2 | Piano Wire |
Cut through the adhesive by pulling the piano wire around the glass.
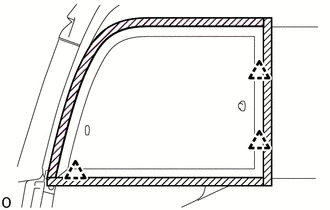
Using suction cups, disconnect the 3 clips and remove the front side window glass LH.
- NOTICE:
-
Be careful not to drop the front side window glass LH.