BRAKE SYSTEM (OTHER) BRAKE FLUID(w/ Brake pedal Load Sensing Switch) BLEEDING
CAUTION / NOTICE / HINT
- NOTICE:
- ·
If brake fluid leaks onto any painted surface, immediately wash it off.
·for Automatic Transmission:
Move the shift lever to P and apply the parking brake before bleeding the brakes.
·for Manual Transmission:
Move the shift lever to neutral and apply the parking brake before bleeding the brakes.
·Add brake fluid to keep the level between the MIN and MAX lines of the reservoir while bleeding the brake fluid.
·Do not operate the brake actuator assembly while air is in the brake system or in the brake master cylinder sub-assembly. Doing so may cause air to enter the brake actuator assembly.
PROCEDURE

 1.BLEED BRAKE LINE
Remove the reservoir tank door (Click HereVehicle Interior>INTERIOR PANEL>INSTRUMENT PANEL SAFETY PAD>REMOVAL).
Remove the brake master cylinder reservoir filler cap assembly.
Add brake fluid until the fluid level is between the MIN and MAX lines of the reservoir.
- Brake Fluid:
SAE J1703 or FMVSS No. 116 DOT3
SAE J1704 or FMVSS No. 116 DOT4
- NOTICE:
- ·
Make sure that there is sufficient brake fluid in the reservoir.
·Do not remove the filter from the brake master cylinder reservoir and be sure to fill the brake master cylinder reservoir with new brake fluid to avoid any potential contamination of the brake system. Contamination, for example by dirt particles or mineral oil, could lead to functional brake problems.
Remove the bleeder plug cap.
Connect a vinyl tube to the bleeder plug.
Loosen the bleeder plug.
Repeatedly depress the brake pedal and bleed the air from the bleeder plug.
- NOTICE:
-
Add brake fluid to keep the level between the MIN and MAX lines of the reservoir while bleeding the brake fluid.
After all the air in the brake fluid is completely bled out, tighten the bleeder plug while depressing the brake pedal.
- Torque:
- Front Brake:
11 N*m (110 kgf*cm, 8 ft.*lbf)
- Rear Brake:
11 N*m (112 kgf*cm, 8 ft.*lbf)
Install the bleeder plug cap.
Repeat the above procedure for each wheel to bleeding the brake lines.
Inspect for brake fluid leaks.
Inspect the brake fluid level in the reservoir (Click hereBrake>BRAKE SYSTEM (OTHER)>BRAKE FLUID (w/ Brake pedal Load Sensing Switch)>ON-VEHICLE INSPECTION).
Install the brake master cylinder reservoir filler cap assembly.
Install the reservoir tank door (Click hereVehicle Interior>INTERIOR PANEL>INSTRUMENT PANEL SAFETY PAD>INSTALLATION).
2.BLEED BRAKE SYSTEM
- CAUTION:
-
If air is bled without using the GTS, damage or accidents may result. Therefore, always use the GTS when bleeding air.
Remove the reservoir tank door (Click hereVehicle Interior>INTERIOR PANEL>INSTRUMENT PANEL SAFETY PAD>REMOVAL).
Remove the brake master cylinder reservoir filler cap assembly.
Add brake fluid until the fluid level is between the MIN and MAX lines of the reservoir.
- Brake Fluid:
SAE J1703 or FMVSS No. 116 DOT3
SAE J1704 or FMVSS No. 116 DOT4
- NOTICE:
- ·
Make sure that there is sufficient brake fluid in the reservoir.
·Do not remove the filter from the brake master cylinder reservoir and be sure to fill the brake master cylinder reservoir with new brake fluid to avoid any potential contamination of the brake system. Contamination, for example by dirt particles or mineral oil, could lead to functional brake problems.
Remove the center instrument cluster panel finish panel (Click hereVehicle Interior>INTERIOR PANEL>INSTRUMENT PANEL SAFETY PAD>REMOVAL).
Remove the lower instrument panel finish panel assembly (Click hereVehicle Interior>INTERIOR PANEL>INSTRUMENT PANEL SAFETY PAD>REMOVAL).
Remove the combination meter assembly (Click hereVehicle Interior>METER / GAUGE / DISPLAY>COMBINATION METER>REMOVAL).
Remove the steering column assembly (Click hereSteering>STEERING COLUMN>STEERING COLUMN ASSEMBLY>REMOVAL).
Using a union nut wrench, disconnect the 2 brake lines from the brake master cylinder.
- NOTICE:
- ·
Do not kink or damage the brake lines.
·Do not allow any foreign matter such as dirt or dust to enter the brake lines from the connecting parts.
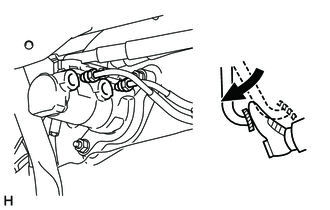
Slowly depress and hold the brake pedal.*1
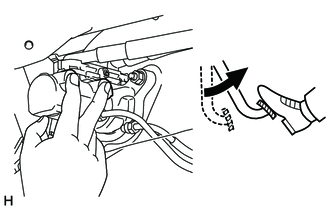
Block the outer holes with your fingers, and then release the brake pedal.*2
Repeat steps *1 and *2, 3 or 4 times.
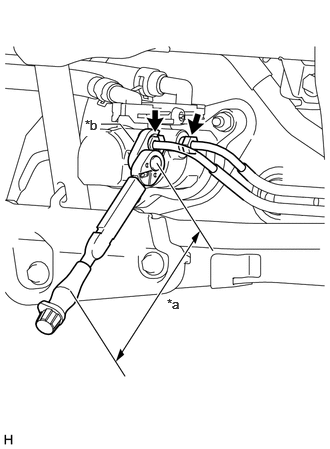
Using a union nut wrench, connect the 2 brake lines to the brake master cylinder.
| *a | Torque Wrench Fulcrum Length |
| *b | Union Nut Wrench |
- Torque:
- Specified tightening torque:
24 N*m (245 kgf*cm, 18 ft.*lbf)
- HINT:
- ·
Calculate the torque wrench reading when changing the fulcrum length of the torque wrench (Click hereGeneral>INTRODUCTION>REPAIR INSTRUCTION>PRECAUTION).
·When using a union nut wrench (fulcrum length of 20 mm (0.788 in.)) + torque wrench (fulcrum length of 180 mm (7.09 in.)): 22 N*m (224 kgf*cm, 16 ft.*lbf)
Remove the bleeder plug cap.
Connect a vinyl tube to the bleeder plug.
Loosen the bleeder plug.
Repeatedly depress the brake pedal and bleed the air from the bleeder plug.
- NOTICE:
-
Add brake fluid to keep the level between the MIN and MAX lines of the reservoir while bleeding the brake fluid.
After all the air in the brake fluid is completely bled out, tighten the bleeder plug while depressing the brake pedal.
- Torque:
- Front Brake:
11 N*m (110 kgf*cm, 8 ft.*lbf)
- Rear Brake:
11 N*m (112 kgf*cm, 8 ft.*lbf)
Install the bleeder plug cap.
Repeat the above procedure for each wheel to bleeding the brake lines.
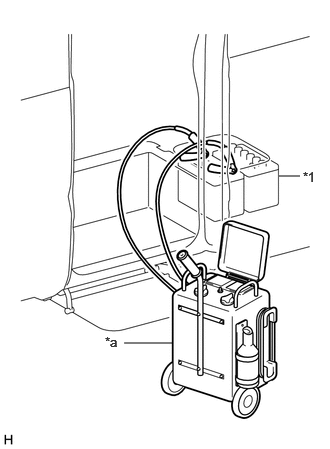
Connect a battery charger to the battery to ensure that a sufficient battery charge is maintained throughout the following steps.
| *1 | Battery |
| *a | Battery Charger |
Depress the brake pedal several times with the engine switch off.
Connect the GTS to the DLC3.
Turn the engine switch on (IG) and turn the GTS on.
- NOTICE:
-
Do not start the engine.
Enter the following menus: Chassis / ABS/VSC/TRC / Utility / Air Bleeding.
Bleed the brake system following the instructions on the GTS.
After air bleeding, tighten each bleeder plug.
- Torque:
- Front Brake:
11 N*m (110 kgf*cm, 8 ft.*lbf)
- Rear Brake:
11 N*m (112 kgf*cm, 8 ft.*lbf)
Install the bleeder plug cap.
Turn the GTS off and turn the engine switch off.
Disconnect the GTS from the DLC3.
Inspect for brake fluid leaks.
Inspect the brake fluid level in the reservoir (Click hereBrake>BRAKE SYSTEM (OTHER)>BRAKE FLUID (w/ Brake pedal Load Sensing Switch)>ON-VEHICLE INSPECTION).
Install the brake master cylinder reservoir filler cap assembly.
Inspect for brake pedal reserve distance (Click hereBrake>BRAKE SYSTEM (OTHER)>BRAKE PEDAL (w/ Brake pedal Load Sensing Switch)>ADJUSTMENT).
Install the steering column assembly (Click hereSteering>STEERING COLUMN>STEERING COLUMN ASSEMBLY>INSTALLATION).
Install the combination meter assembly (Click hereVehicle Interior>METER / GAUGE / DISPLAY>COMBINATION METER>INSTALLATION).
Install the lower instrument panel finish panel assembly (Click hereVehicle Interior>INTERIOR PANEL>INSTRUMENT PANEL SAFETY PAD>INSTALLATION).
Install the center instrument cluster panel finish panel (Click hereVehicle Interior>INTERIOR PANEL>INSTRUMENT PANEL SAFETY PAD>INSTALLATION).