METER / GAUGE / DISPLAY METER / GAUGE SYSTEM Speedometer Malfunction
DESCRIPTION
w/ Multi-information Display:
The combination meter assembly receives vehicle speed signals from the brake actuator assembly (skid control ECU) via the CAN communication line. The wheel speed sensors output voltages that vary according to the vehicle speed. The brake actuator assembly (skid control ECU) supplies power to the wheel speed sensors. The brake actuator assembly (skid control ECU) calculates the vehicle speed based on the pulses of the voltage.
w/o Multi-information Display:
The combination meter assembly controls the speedometer in accordance with vehicle speed signals from the speedometer sensor.
WIRING DIAGRAM
w/ Multi-information Display:
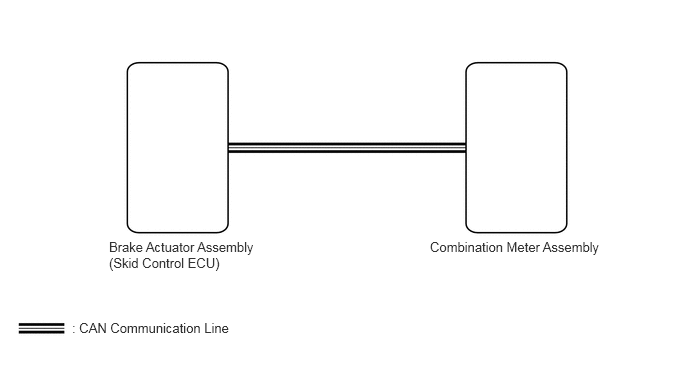
w/o Multi-information Display:
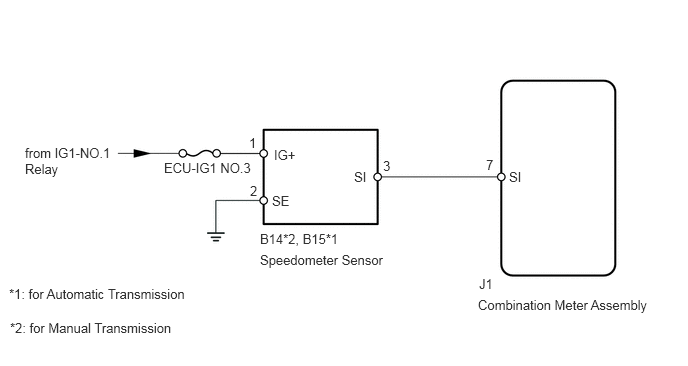
CAUTION / NOTICE / HINT
- NOTICE:
- ·
The meter/gauge system uses the CAN communication system. First, confirm that there is no malfunction in the CAN communication system. Refer to the How to Proceed with Troubleshooting procedure (w/ Multi-information Display) (Click hereVehicle Interior>METER / GAUGE / DISPLAY>METER / GAUGE SYSTEM>HOW TO PROCEED WITH TROUBLESHOOTING).
·If the vehicle speed is outside the allowable range when tested, perform the On-vehicle Inspection (Click hereVehicle Interior>METER / GAUGE / DISPLAY>METER / GAUGE SYSTEM>ON-VEHICLE INSPECTION).
·Before starting the following inspection, check tire size and tire air pressure.
·Inspect the fuses for circuits related to this system before performing the following procedure (w/o Multi-information Display).
·When replacing the combination meter assembly, always replace it with a new one. If a combination meter assembly which was installed to another vehicle is used, the information stored in it will not match the information from the vehicle and a DTC may be stored.
PROCEDURE
- Result:
Result Proceed to w/ Multi-information Display A w/o Multi-information Display B
A
B
Check for DTCs (Click hereBrake>BRAKE CONTROL / DYNAMIC CONTROL SYSTEMS>ANTI-LOCK BRAKE SYSTEM(w/ Brake pedal Load Sensing Switch)>DTC CHECK / CLEAR).
- OK:
Anti-lock system (w/ Brake pedal Load Sensing Switch) DTC is not output.
- Result:
Proceed to OK NG
OK
NG
Using the GTS, perform the Active Test (Click hereVehicle Interior>METER / GAUGE / DISPLAY>METER / GAUGE SYSTEM>DATA LIST / ACTIVE TEST).
| Tester Display | Test Part | Control Range | Diagnostic Note |
|---|---|---|---|
| Speed Meter Operation | Speedometer | OFF, 0, 40, 80, 120 or 160 | There is a deviation in the values displayed on the speedometer display (Control range → Speedometer)
with km/h units (w/o 100 km/h speed limiter):
·
40 → 41.7 to 46.2 ·
80 → 83.4 to 88.4 ·
120 → 125.1 to 130.6 ·
160 → 166.2 to 173.2 with km/h units (w/ 100 km/h speed limiter):
·
40 → 40.2 to 44.7 ·
80 → 80.5 to 85.5 ·
120 → 120.7 to 125.7 ·
160 → 160.9 to 167.4 with mph units:
·
40 → 42.6 to 45.1 ·
80 → 83.1 to 87.1 |
- HINT:
- ·
Make sure that the vehicle is stopped and the engine is idling. The doors will be locked automatically when performing the speedometer Active Test. This is a normal function.
·The displayed value has the same units (km/h, mph) as the main scale of the vehicle speedometer.
·The needle position should be within the acceptable range.
- OK:
Needle indication is normal according to the GTS operation.
- Result:
Proceed to OK NG
OK
NG
Using the GTS, read the Data List (Click hereVehicle Interior>METER / GAUGE / DISPLAY>METER / GAUGE SYSTEM>DATA LIST / ACTIVE TEST).
| Tester Display | Measurement Item/Range | Normal Condition | Diagnostic Note |
|---|---|---|---|
| Vehicle Speed meter | Vehicle speed / Min.: 0 km/h (0 mph), Max.: 255 km/h (158 mph) | Almost the same as actual vehicle speed | - |
- OK:
Vehicle speed displayed on the GTS is almost the same as the actual vehicle speed measured using a speedometer tester (calibrated chassis dynamometer).
- Result:
Proceed to OK NG
OK
NG
Check the input signal waveform using an oscilloscope.
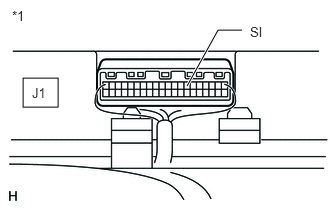
Remove the combination meter assembly with the connector still connected.
Connect the oscilloscope to the terminal J1-7 (SI) and body ground.
Start the engine.
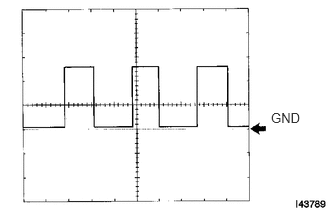
Check the signal waveform according to the condition(s) in the table below.
| Item | Condition |
|---|---|
| Tool setting | 5 V/DIV., 10 ms/DIV. |
| Vehicle condition | Driving at approx. 20 km/h (12 mph) |
- OK:
The correct waveform appears as shown in the illustration.
| *1 | Component with harness connected
(Combination Meter Assembly) |
- HINT:
-
As vehicle speed increases, the cycle of the signal waveform narrows.
- Result:
Proceed to OK NG
OK
NG
*1: for Manual Transmission
*2: for Automatic Transmission
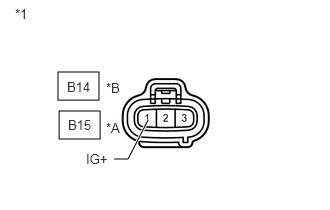
Disconnect the speedometer sensor connector.
Measure the voltage according to the value(s) in the table below.
- Standard Voltage:
Tester Connection Switch Condition Specified Condition B14-1 (IG+) - Body ground*1 Ignition switch turned from off → ON Below 1 V → 11 to 14 V B15-1 (IG+) - Body ground*2 Ignition switch turned from off → ON Below 1 V → 11 to 14 V
| *A | for Automatic Transmission |
| *B | for Manual Transmission |
| *1 | Front view of wire harness connector
(to Speedometer Sensor) |
- Result:
Proceed to OK NG
OK
NG
*1: for Automatic Transmission
*2: for Manual Transmission
Disconnect the J1 combination meter assembly connector.
Disconnect the B14*2 or B15*1 speedometer sensor connector.
Measure the resistance according to the value(s) in the table below.
- Standard Resistance:
Tester Connection Condition Specified Condition J1-7 (SI) - B15-3 (SI)*1 Always Below 1 Ω J1-7 (SI) - B14-3 (SI)*2 Always Below 1 Ω J1-7 (SI) - Body ground Always 10 kΩ or higher
- Result:
Proceed to OK NG
OK
NG
*1: for Manual Transmission
*2: for Automatic Transmission
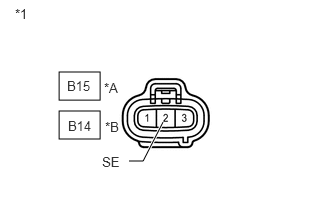
Disconnect the speedometer sensor connector.
Measure the resistance according to the value(s) in the table below.
- Standard Resistance:
Tester Connection Condition Specified Condition B14-2 (SE)*1 - Body ground Always Below 1 Ω B15-2 (SE)*2 - Body ground Always Below 1 Ω
| *A | for Automatic Transmission |
| *B | for Manual Transmission |
| *1 | Front view of wire harness connector
(to Speedometer Sensor) |
- Result:
Proceed to OK NG
OK
NG
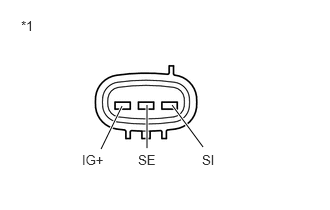
Remove the speedometer sensor.
Connect the positive lead (+) from the battery to terminal 1 (IG+) and negative (-) lead to terminal 2 (SE).
Connect the positive (+) lead from the tester to terminal 3 (SI) and the negative (-) lead to terminal 2 (SE).
Rotate the shaft.
Measure the voltage according to the value in the table below.
- Standard Voltage:
Tester Connection Condition Specified Condition 3 (SI) - 2 (SE) Rotate the shaft Approximately 0 V to 11 V or more
| *1 | Component with harness connected
(Speedometer Sensor) |
- HINT:
-
The voltage should change 8 times for every revolution. If the result is not as specified, replace the sensor.
- Result:
Proceed to OK NG
OK
NG