A861E AUTOMATIC TRANSMISSION / TRANSAXLE AUTOMATIC TRANSMISSION SYSTEM P0751 Shift Solenoid "A" Performance/Stuck OFF P0756 Shift Solenoid "B" Performance/Stuck OFF P0761 Shift Solenoid "C" Performance/Stuck OFF
DESCRIPTION
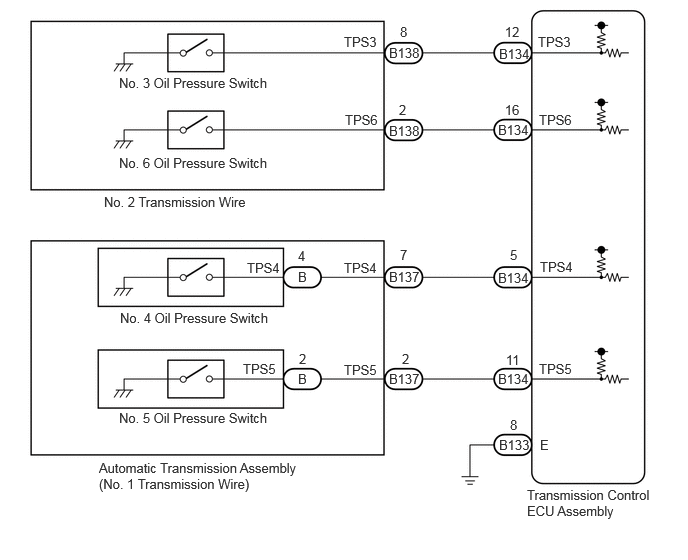
There are 8 oil pressure switches installed inside the valve body. The operation of each solenoid, shift valve, control valve, etc. changes the oil path inside the valve, which causes each oil pressure switch to change between on and off. The No. 3 oil pressure switch operates based on the status of shift solenoid valve S1 and shift valve No. 1. The No. 4 oil pressure switch operates based on the status of shift solenoid valve S2 and shift valve No. 2. The No. 5 oil pressure switch operates based on the status of shift solenoid valve S3 and shift valve No. 3. The No. 6 oil pressure switch operates based on the status of shift solenoid valve S3 and shift valve No. 4. When there is a malfunction in the TPS3 signal system, TPS4 signal system, TPS5 or TPS6 signal system, or a malfunction in the solenoid or shift valve system, the transmission control ECU assembly stores the applicable DTC.
| DTC No. | Detection Item | DTC Detection Condition | Trouble Area | Warning Indicate | Memory |
|---|---|---|---|---|---|
| P0751 | Shift Solenoid "A" Performance/Stuck OFF | 1. Diagnosis Condition 2. Malfunction Status 3. Malfunction Time 4. Other
1.
Shift lever not in P or N, engine running 2.
Shift solenoid valve S1 on or off but the NO. 3 oil pressure switch does not turn on or off 3.
0.5 seconds or more 4.
1 trip detection logic |
·
Wire harness or connector (No. 3 oil pressure switch signal circuit) ·
No. 2 transmission wire ·
Shift solenoid valve S1 ·
No. 3 oil pressure switch ·
Transmission control ECU assembly |
O/D OFF Indicator Light: Blinking | DTC stored |
| P0756 | Shift Solenoid "B" Performance/Stuck OFF | 1. Diagnosis Condition 2. Malfunction Status 3. Malfunction Time 4. Other
1.
Shift lever not in P or N, engine running 2.
Shift solenoid valve S2 on or off but the NO. 4 oil pressure switch does not turn on or off 3.
0.5 seconds or more 4.
1 trip detection logic |
·
Wire harness or connector (No. 4 oil pressure switch signal circuit) ·
No. 1 transmission wire ·
Shift solenoid valve S2 ·
Automatic transmission assembly (No. 4 oil pressure switch) ·
Transmission control ECU assembly |
O/D OFF Indicator Light: Blinking | DTC stored |
| P0761 | Shift Solenoid "C" Performance/Stuck OFF | 1. Diagnosis Condition 2. Malfunction Status 3. Malfunction Time 4. Other
DTC Detection Condition 1:
1.
Shift lever not in P or N, engine running 2.
Shift solenoid valve S3 on or off but the NO. 5 oil pressure switch does not turn on or off 3.
0.5 seconds or more 4.
1 trip detection logic DTC Detection Condition 2:
1.
Shift lever not in P or N, engine running 2.
Shift solenoid valve S3 on or off but the NO. 6 oil pressure switch does not turn on or off 3.
0.5 seconds or more 4.
1 trip detection logic |
·
Wire harness or connector (No. 5 oil pressure switch signal circuit) ·
Wire harness or connector (No. 6 oil pressure switch signal circuit) ·
No. 1 transmission wire ·
No. 2 transmission wire ·
Shift solenoid valve S3 ·
Automatic transmission assembly (No. 5 oil pressure switch) ·
No. 6 oil pressure switch ·
Transmission control ECU assembly |
O/D OFF Indicator Light: Blinking | DTC stored |
CONFIRMATION DRIVING PATTERN
- HINT:
-
After the repair, clear the DTCs and perform the following procedure to check that DTCs are not output.
Perform the D Position Shift Test inspection in Road Test.
Click hereDrivetrain>A861E (AUTOMATIC TRANSMISSION / TRANSAXLE)>AUTOMATIC TRANSMISSION SYSTEM>ROAD TEST
Check for DTCs again.
WIRING DIAGRAM
CAUTION / NOTICE / HINT
- NOTICE:
- ·
When inspecting each shift solenoid valve, do not remove it from the transmission valve body assembly.
·Perform initialization when parts related to the automatic transmission are replaced.
Click hereDrivetrain>A861E (AUTOMATIC TRANSMISSION / TRANSAXLE)>AUTOMATIC TRANSMISSION SYSTEM>INITIALIZATION
- HINT:
- ·
Refer to Parts Location for the location of each shift solenoid valve and each oil pressure switch.
Click hereDrivetrain>A861E (AUTOMATIC TRANSMISSION / TRANSAXLE)>AUTOMATIC TRANSMISSION SYSTEM>PARTS LOCATION
·Use a new transmission wire if the pin and socket terminals are removed on each oil pressure switch.
PROCEDURE
Connect the GTS to the DLC3.
Turn the ignition switch to ON.
Turn the GTS on.
Enter the following menus: Powertrain / ECT / Trouble Codes.
Read DTCs using the GTS.
- Result:
Result Proceed to DTC P0751, P0756, P0761 are output A DTC P0751, P0756, P0761 and other DTCs are output B
- HINT:
-
If any other codes besides DTC P0751, P0756, P0761 are output, perform troubleshooting for those DTCs first.
A
B
Disconnect the No. 1 transmission wire connector.
Disconnect the No. 2 transmission wire connector.
Disconnect the transmission control ECU assembly connector.
Measure the resistance according to the value(s) in the table below.
- Standard Resistance:
Tester Connection Condition Specified Condition B138-8 (TPS3) - B134-12 (TPS3) Always Below 1 Ω B137-7 (TPS4) - B134-5 (TPS4) Always Below 1 Ω B137-2 (TPS5) - B134-11 (TPS5) Always Below 1 Ω B138-2 (TPS6) - B134-16 (TPS6) Always Below 1 Ω B138-8 (TPS3) or B134-12 (TPS3) - Body ground Always 10 kΩ or higher B137-7 (TPS4) or B134-5 (TPS4) - Body ground Always 10 kΩ or higher B137-2 (TPS4) or B134-11 (TPS4) - Body ground Always 10 kΩ or higher B138-2 (TPS6) or B134-16 (TPS6) - Body ground Always 10 kΩ or higher
- Result:
Proceed to OK NG
OK
NG
Start the engine.
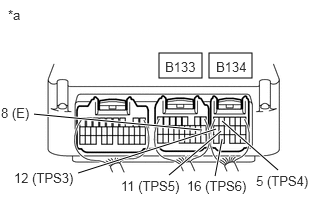
| *a | Component with harness connected
(Transmission Control ECU Assembly) |
Measure the voltage according to the value(s) in the table below.
- Standard Voltage:
Tester Connection Condition Specified Condition B134-12 (TPS3) - B133-8 (E) ·Engine idling speed
·Shift lever in P
·No. 3 oil pressure switch off
11 to 14 V ·Engine idling speed
·Shift lever in R
·No. 3 oil pressure switch on
Below 1 V B134-5 (TPS4) - B133-8 (E) ·Run the vehicle in 2nd gear
·No. 4 oil pressure switch off
11 to 14 V ·Engine idling speed
·Shift lever in P
·No. 4 oil pressure switch on
Below 1 V B134-11 (TPS5) - B133-8 (E) ·Run the vehicle in 2nd gear
·No. 5 oil pressure switch off
11 to 14 V ·Engine idling speed
·Shift lever in P
·No. 5 oil pressure switch on
Below 1 V B134-16 (TPS6) - B133-8 (E) ·Run the vehicle in 2nd gear
·No. 6 oil pressure switch off
11 to 14 V ·Engine idling speed
·Shift lever in P
·No. 6 oil pressure switch on
Below 1 V
- Result:
Result Proceed to OK A NG (No. 3 oil pressure switch) B NG (No. 4 oil pressure switch) C NG (No. 5 oil pressure switch) D NG (No. 6 oil pressure switch) E
A
B
C
D
E
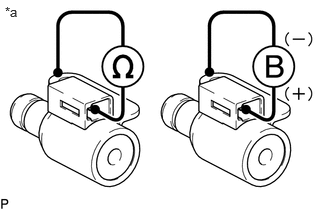
| *a | Component without harness connected
(Shift Solenoid Valve S1) |
Disconnect the shift solenoid valve S1 connector.
Click hereDrivetrain>A861E (AUTOMATIC TRANSMISSION / TRANSAXLE)>SHIFT SOLENOID VALVE>REMOVAL
- NOTICE:
-
When inspecting the shift solenoid valve S1, do not remove it from the transmission valve body assembly.
Measure the resistance according to the value(s) in the table below.
- Standard Resistance:
Tester Connection Condition Specified Condition Terminal of shift solenoid valve S1 connector - Shift solenoid valve S1 body 20°C (68°F) 11 to 15 Ω
Connect a positive (+) lead from the battery to the terminal of the solenoid valve connector, and a negative (-) lead to the solenoid body. Check that the valve moves and makes an operating sound.
- OK:
Valve moves and makes an operating sound.
- Result:
Proceed to OK NG
OK
NG
Remove the No. 2 transmission wire.
Click hereDrivetrain>A861E (AUTOMATIC TRANSMISSION / TRANSAXLE)>TRANSMISSION WIRE>REMOVAL
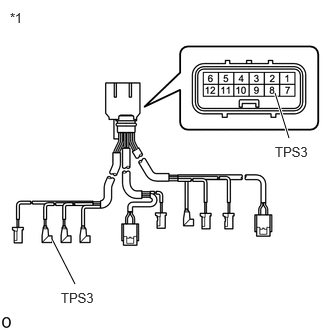
| *1 | No. 2 Transmission Wire |
Measure the resistance according to the value(s) in the table below.
- Standard Resistance:
Tester Connection Condition Specified Condition 8 (TPS3) - TPS3 No. 3 oil pressure switch side Always Below 1 Ω 8 (TPS3) or TPS3 No. 3 oil pressure switch side - Other terminals Always 10 kΩ or higher
- Result:
Proceed to OK NG
OK
Click hereDrivetrain>A861E (AUTOMATIC TRANSMISSION / TRANSAXLE)>SHIFT SOLENOID VALVE>REMOVAL
- HINT:
-
Use a new transmission wire if the pin and socket terminals are removed on each oil pressure switch.
NG
| *a | Component without harness connected
(Shift Solenoid Valve S2) |
Disconnect the shift solenoid valve S2 connector.
Click hereDrivetrain>A861E (AUTOMATIC TRANSMISSION / TRANSAXLE)>SHIFT SOLENOID VALVE>REMOVAL
- NOTICE:
-
When inspecting the shift solenoid valve S2, do not remove it from the transmission valve body assembly.
Measure the resistance according to the value(s) in the table below.
- Standard Resistance:
Tester Connection Condition Specified Condition Terminal of shift solenoid valve S2 connector - Shift solenoid valve S2 body 20°C (68°F) 11 to 15 Ω
Connect a positive (+) lead from the battery to the terminal of the solenoid valve connector, and a negative (-) lead to the solenoid body. Check that the valve moves and makes an operating sound.
- OK:
Valve moves and makes an operating sound.
- Result:
Proceed to OK NG
OK
NG
Remove the No. 1 transmission wire.
Click hereDrivetrain>A861E (AUTOMATIC TRANSMISSION / TRANSAXLE)>TRANSMISSION WIRE>REMOVAL
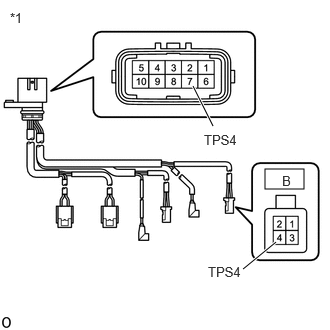
| *1 | No. 1 Transmission Wire |
Measure the resistance according to the value(s) in the table below.
- Standard Resistance:
Tester Connection Condition Specified Condition 7 (TPS4) - B-4 (TPS4) Always Below 1 Ω 7 (TPS4) or B-4 (TPS4) - Other terminals Always 10 kΩ or higher
- Result:
Proceed to OK NG
OK
Click hereDrivetrain>A861E (AUTOMATIC TRANSMISSION / TRANSAXLE)>AUTOMATIC TRANSMISSION ASSEMBLY>REMOVAL
NG
| *a | Component without harness connected
(Shift Solenoid Valve S3) |
Disconnect the shift solenoid valve S3 connector.
Click hereDrivetrain>A861E (AUTOMATIC TRANSMISSION / TRANSAXLE)>SHIFT SOLENOID VALVE>REMOVAL
- NOTICE:
-
When inspecting the shift solenoid valve S3, do not remove it from the transmission valve body assembly.
Measure the resistance according to the value(s) in the table below.
- Standard Resistance:
Tester Connection Condition Specified Condition Terminal of shift solenoid valve S3 connector - Shift solenoid valve S3 body 20°C (68°F) 11 to 15 Ω
Connect a positive (+) lead from the battery to the terminal of the solenoid valve connector, and a negative (-) lead to the solenoid body. Check that the valve moves and makes an operating sound.
- OK:
Valve moves and makes an operating sound.
- Result:
Proceed to OK NG
OK
NG
Remove the No. 1 transmission wire.
Click hereDrivetrain>A861E (AUTOMATIC TRANSMISSION / TRANSAXLE)>TRANSMISSION WIRE>REMOVAL
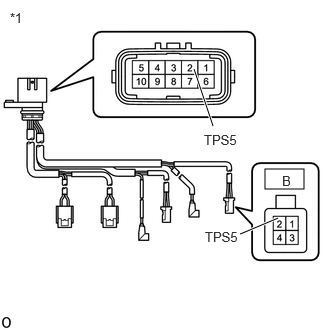
| *1 | No. 1 Transmission Wire |
Measure the resistance according to the value(s) in the table below.
- Standard Resistance:
Tester Connection Condition Specified Condition 2 (TPS5) - B-2 (TPS5) Always Below 1 Ω 2 (TPS5) or B-2 (TPS5) - Other terminals Always 10 kΩ or higher
- Result:
Proceed to OK NG
OK
Click hereDrivetrain>A861E (AUTOMATIC TRANSMISSION / TRANSAXLE)>AUTOMATIC TRANSMISSION ASSEMBLY>REMOVAL
NG
| *a | Component without harness connected
(Shift Solenoid Valve S3) |
Disconnect the shift solenoid valve S3 connector.
Click hereDrivetrain>A861E (AUTOMATIC TRANSMISSION / TRANSAXLE)>SHIFT SOLENOID VALVE>REMOVAL
- NOTICE:
-
When inspecting the shift solenoid valve S3, do not remove it from the transmission valve body assembly.
Measure the resistance according to the value(s) in the table below.
- Standard Resistance:
Tester Connection Condition Specified Condition Terminal of shift solenoid valve S3 connector - Shift solenoid valve S3 body 20°C (68°F) 11 to 15 Ω
Connect a positive (+) lead from the battery to the terminal of the solenoid valve connector, and a negative (-) lead to the solenoid body. Check that the valve moves and makes an operating sound.
- OK:
Valve moves and makes an operating sound.
- Result:
Proceed to OK NG
OK
NG
Remove the No. 2 transmission wire.
Click hereDrivetrain>A861E (AUTOMATIC TRANSMISSION / TRANSAXLE)>TRANSMISSION WIRE>REMOVAL
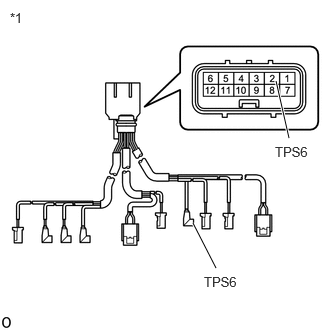
| *1 | No. 2 Transmission Wire |
Measure the resistance according to the value(s) in the table below.
- Standard Resistance:
Tester Connection Condition Specified Condition 2 (TPS6) - TPS6 No. 6 oil pressure switch side Always Below 1 Ω 2 (TPS6) or TPS6 No. 6 oil pressure switch side - Other terminals Always 10 kΩ or higher
- Result:
Proceed to OK NG
OK
Click hereDrivetrain>A861E (AUTOMATIC TRANSMISSION / TRANSAXLE)>SHIFT SOLENOID VALVE>REMOVAL
- HINT:
-
Use a new transmission wire if the pin and socket terminals are removed on each oil pressure switch.
NG