N04C-WA ENGINE CONTROL ECD SYSTEM P2209 NOx Sensor Heater Sense Circuit Range/Performance Bank 1 Sensor 1
DESCRIPTION
| DTC No. | Detection Item | DTC Detection Condition | Trouble Area | MIL | Memory |
|---|---|---|---|---|---|
| P2209 | NOx Sensor Heater Sense Circuit Range/Performance Bank 1 Sensor 1 | Diagnosis Condition:
·
Heater resistance malfunction -
Ignition switch ON -
Power supply voltage for No. 1 nitrogen oxides sensor is in the range of 10 to 16 V. -
Exhaust gas temperature at SCR outlet from No. 5 exhaust gas temperature sensor is higher than 180°C (356°F). ·
Device temperature abnormality -
Ignition switch ON -
Power supply voltage for No. 1 nitrogen oxides sensor is in the range of 10 to 16 V. -
Exhaust gas temperature at SCR outlet from No. 5 exhaust gas temperature sensor is higher than 180°C (356°F). -
After energization instruction, 80 seconds elapsed. Malfunction Status: NOx sensor controller detects system failure that failure in heater is continued for at least 10 seconds. Malfunction Duration: 10 seconds or more |
·
Harness or connector ·
No. 1 nitrogen oxides sensor |
Class A | DTC stored |
MONITOR DESCRIPTION
The No. 1 nitrogen oxides sensor are controlled by the NOx sensor controller.
The NOx sensor controller is connected via the ECM and DCU (emission control ECU assembly) through CAN communication, and it sends and receives data.
CONFIRMATION DRIVING PATTERN
| DTC No. | DTC Detection Drive Pattern |
|---|---|
| P2209 | PM forced regeneration |
WIRING DIAGRAM
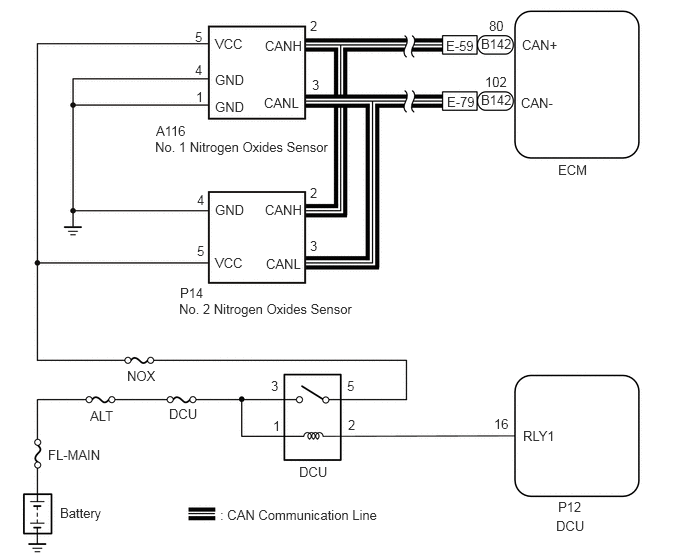
CAUTION / NOTICE / HINT
- NOTICE:
-
After replacing the ECM, the new ECM needs registration (Click hereEngine / Hybrid System>N04C-WA (ENGINE CONTROL)>ECD SYSTEM>REGISTRATION) and initialization (Click hereEngine / Hybrid System>N04C-WA (ENGINE CONTROL)>ECD SYSTEM>INITIALIZATION).
- HINT:
-
Read freeze frame data using the GTS. Freeze frame data records the engine condition when malfunctions are detected. When troubleshooting, freeze frame data can help determine if the vehicle was moving or stationary, if the engine was warmed up or not, and other data from the time the malfunction occurred.
PROCEDURE
Check the connector connection for the No. 1 nitrogen oxides sensor connector.
- Standard:
The connector is connected securely and there are no contact pressure problems.
- Result:
Proceed to OK NG
OK
NG
Disconnect the No. 1 nitrogen oxides sensor connector.
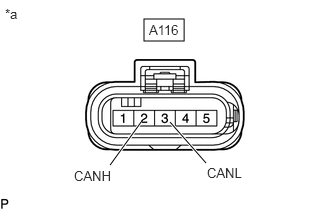
| *a | Front view of wire harness connector
(to No. 1 Nitrogen Oxides Sensor) |
Measure the waveform of the No. 1 nitrogen oxides sensor vehicle side connector using an oscilloscope.
- Standard Voltage:
Tester Connection Condition Specified Condition A116-2 (CANH) - A116-3 (CANL) Ignition switch ON 0 to 5 V
Pulse waveform
- Result:
Proceed to OK NG
OK
NG
Disconnect the No. 1 nitrogen oxides sensor connector.
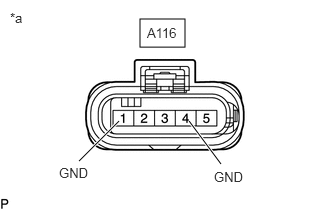
| *a | Front view of wire harness connector
(to No. 1 Nitrogen Oxides Sensor) |
Measure the resistance according to the value(s) in the table below.
- Standard Resistance:
Tester Connection Condition Specified Condition A116-4 (GND) - Body ground Always Below 1 Ω A116-1 (GND) - Body ground Always Below 1 Ω
- Result:
Proceed to OK NG
OK
NG
Disconnect the No. 1 nitrogen oxides sensor connector.
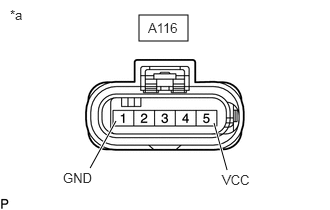
| *a | Front view of wire harness connector
(to No. 1 Nitrogen Oxides Sensor) |
Measure the voltage according to the value(s) in the table below.
- Standard Voltage:
Tester Connection Condition Specified Condition A116-5 (VCC) - A116-1 (GND) Ignition switch ON 11 to 14 V
- Result:
Proceed to OK NG
OK
NG
Check the connector connection for the No. 5 exhaust gas temperature sensor connector.
- Standard:
The connector is connected securely and there are no contact pressure problems.
- Result:
Proceed to OK NG
OK
NG
Check the installation of the No. 5 exhaust gas temperature sensor.
Make sure there is no dirt, damage or clogging in the sensing unit of No. 5 exhaust gas temperature sensor.
- Result:
Proceed to OK NG
OK
NG
Inspect the No. 5 exhaust gas temperature sensor.
Click hereEngine / Hybrid System>N04C-WA (EMISSION CONTROL)>EXHAUST GAS TEMPERATURE SENSOR>INSPECTION
- Result:
Proceed to OK NG
OK
NG
Check the connector connection for the engine coolant temperature sensor connector.
- Standard:
The connector is connected securely and there are no contact pressure problems.
- Result:
Proceed to OK NG
OK
NG
Check the installation of the engine coolant temperature sensor.
Make sure there is no dirt, damage or clogging in the sensing unit of engine coolant temperature sensor.
- Result:
Proceed to OK NG
OK
NG
Inspect the engine coolant temperature sensor.
Click hereEngine / Hybrid System>N04C-WA (ENGINE CONTROL)>ENGINE COOLANT TEMPERATURE SENSOR>INSPECTION
- Result:
Proceed to OK NG
OK
NG
Replace No. 1 nitrogen oxides sensor.
Click hereEngine / Hybrid System>N04C-WA (ENGINE CONTROL)>NITROGEN OXIDES SENSOR>REMOVAL
- Result:
Proceed to NEXT
NEXT
Connect the GTS to the DLC3.
Turn the ignition switch to ON and turn the GTS on.
Clear the DTCs.
- HINT:
-
Clear the DTCs with the engine stopped, as DTCs cannot be cleared while the engine is running.
Turn the ignition switch off for 30 seconds or more.
Perform the confirmation driving pattern.
Turn the GTS on.
Enter the following menus: Powertrain / Engine / Trouble Codes.
Read Current DTCs.
- Result:
Result Proceed to DTC P2209 is output A DTCs are not output B
A
B
Replace the DCU (emission control ECU assembly).
Click hereEngine / Hybrid System>N04C-WA (EMISSION CONTROL)>UREA PUMP CONTROL ECU>REMOVAL
- Result:
Proceed to NEXT
NEXT
Replace the engine coolant temperature sensor.
Click hereEngine / Hybrid System>N04C-WA (ENGINE CONTROL)>ENGINE COOLANT TEMPERATURE SENSOR>REMOVAL
- Result:
Proceed to NEXT
NEXT
Repair or replace the engine coolant temperature sensor.
- HINT:
-
Clean the sensing unit and install it properly.
-
If damaged, replace the engine coolant temperature sensor.
- Result:
Proceed to NEXT
NEXT
Connect securely the engine coolant temperature sensor connector.
- HINT:
-
Repair it as needed.
- Result:
Proceed to NEXT
NEXT
Replace the No. 5 exhaust gas temperature sensor.
Click hereEngine / Hybrid System>N04C-WA (EMISSION CONTROL)>EXHAUST GAS TEMPERATURE SENSOR>REMOVAL
- Result:
Proceed to NEXT
NEXT
Repair or replace the No. 5 exhaust gas temperature sensor.
- HINT:
-
Clean the sensing unit and install it properly.
-
If damaged, replace the No. 5 exhaust gas temperature sensor.
- Result:
Proceed to NEXT
NEXT
Connect securely the No. 5 exhaust gas temperature sensor connector.
- HINT:
-
Repair it as needed.
- Result:
Proceed to NEXT
NEXT
Repair or replace the harness or connector.
- Result:
Proceed to NEXT
NEXT
Repair or replace the harness or connector.
- Result:
Proceed to NEXT
NEXT
Repair or replace the harness or connector.
- Result:
Proceed to NEXT
NEXT
Connect securely the No. 1 nitrogen oxides sensor connector.
- HINT:
-
Repair it as needed.
- Result:
Proceed to NEXT
NEXT
Connect the GTS to the DLC3.
Turn the ignition switch to ON and turn the GTS on.
Clear the DTCs.
- HINT:
-
Clear the DTCs with the engine stopped, as DTCs cannot be cleared while the engine is running.
Turn the ignition switch off for 30 seconds or more.
Perform the confirmation driving pattern.
Turn the GTS on.
Enter the following menus: Powertrain / Engine / Trouble Codes.
Confirm that the DTC is not output again.
- Result:
Proceed to NEXT
NEXT