WINDOW / GLASS REAR SIDE WINDOW GLASS(for No. 2 RH) REMOVAL
CAUTION / NOTICE / HINT
- HINT:
- ·
Use the same procedure for RHD and LHD vehicles.
·The procedure listed below is for RHD vehicles.
PROCEDURE

 1.REMOVE REAR SEAT ASSEMBLY (for Rear End)
for Tumble Type 4-Passenger Seat:
Click hereVehicle Interior>SEAT>REAR SEAT ASSEMBLY (for Tumble Type 4-Passenger Seat)>REMOVAL
for Fixed Type 4-Passenger Seat:
Click hereVehicle Interior>SEAT>REAR SEAT ASSEMBLY (for Fixed Type 4-Passenger Seat)>REMOVAL
45619K
2.REMOVE KNUCKLE STOPPER COVER (w/ Room Rack)
3.REMOVE ROOM RACK ASSEMBLY (w/ Room Rack)
63372A
4.REMOVE NO. 2 ROOF BOARD SET MOULDING (w/ Rear Air Duct)
63372F
5.REMOVE NO. 3 ROOF BOARD SET MOULDING (w/ Rear Air Duct)
63372A
6.REMOVE NO. 2 ROOF BOARD SET MOULDING (for Super Long Body)
63324
7.REMOVE NO. 4 ROOF BOARD (for Long Body, w/ Rear Air Duct)
63324
8.REMOVE NO. 4 ROOF BOARD (for Super Long Body)
65939
9.REMOVE NO. 4 CURTAIN RAIL (w/ Curtain)
65936
10.REMOVE NO. 1 CURTAIN RAIL (w/ Curtain)
63323
11.REMOVE NO. 3 ROOF BOARD (w/ Rear Air Duct)
63930
12.REMOVE NO. 4 INNER COOLER DUCT RH (for Long Body, w/ Rear Air Duc)
63930
13.REMOVE NO. 4 INNER COOLER DUCT RH (for Super Long Body)
63917
14.REMOVE NO. 3 INNER COOLER DUCT RH (w/ Rear Air Duct)
63916
15.REMOVE NO. 2 INNER COOLER DUCT RH (w/ Rear Air Duct)
58614A
16.REMOVE NO. 4 MAT SET PLATE
66301D
17.REMOVE ROPE HOOK SUB-ASSEMBLY (w/ Rope Hook)
64735A
18.REMOVE CENTER BACK INNER RAIL GARNISH (for Lift Up Type)
65905B
19.REMOVE WINDOW CURTAIN RAIL SUB-ASSEMBLY (for Lift Up Type, w/ Curtain)
63349A
20.REMOVE REAR ROOF HEADLINING GARNISH (for Double Swing Out Type)
62487A
21.REMOVE INNER ROOF SIDE GARNISH COVER RH (for Double Swing Out Type)
62488A
22.REMOVE INNER ROOF SIDE GARNISH COVER LH (for Double Swing Out Type)
62471D
23.REMOVE REAR UPPER PILLAR GARNISH RH
62472D
24.REMOVE REAR UPPER PILLAR GARNISH LH
62227
25.REMOVE QUARTER PILLAR COVER RH
62511R
26.REMOVE REAR BODY REAR INSIDE TRIM RH
63316A
27.REMOVE NO. 6 ROOF HEADLINING
28.REMOVE SIDE PANEL
for RHD:
Perform the linked removal procedures until the No. 2 side trim assembly RH.
Click hereVehicle Interior>INTERIOR>SIDE PANEL (for RHD)>REMOVAL
for LHD:
Perform the linked removal procedures until the No. 2 side trim assembly LH.
Click hereVehicle Interior>INTERIOR>SIDE PANEL (for LHD)>REMOVAL
63372A
29.REMOVE NO. 2 ROOF BOARD SET MOULDING (w/o Rear Air Duct)
63377C
30.REMOVE NO. 2 ROOF HEADLINING MOULDING (w/o Rear Air Duct)
63378C
31.REMOVE NO. 3 ROOF HEADLINING MOULDING (w/o Rear Air Duct)
63372G
32.REMOVE NO. 4 ROOF BOARD SET MOULDING (w/o Rear Air Duct)
62451B
33.REMOVE NO. 3 ROOF SIDE RAIL GARNISH RH (w/ Rear Air Duct)
62451E
34.REMOVE REAR ROOF SIDE RAIL GARNISH (w/o Rear Air Duct)
62431F
35.REMOVE ROOF SIDE RAIL GARNISH (for Long Body, w/ Rear Air Duct)
36.REMOVE REAR SIDE FRONT WINDOW GLASS RH
- NOTICE:
-
The rear side front window glass RH may fall while performing this procedure. Therefore, use suction cups to hold the rear side front window glass RH from the outside of the vehicle.
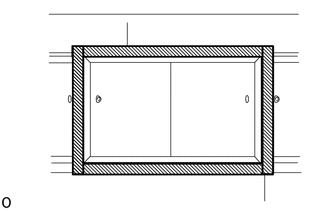

|
Protective Tape |
Apply protective tape to the outer surface of the vehicle body and glass to prevent scratches.
Install the suction cups to the rear side front window glass RH.
Apply a sufficient amount of soapy water to the adhesive.
- HINT:
-
Start this procedure where the rear side front window glass RH and body are furthest apart.
From the interior, insert a knife between the vehicle body and glass.
Cut through the adhesive by knife around the glass.
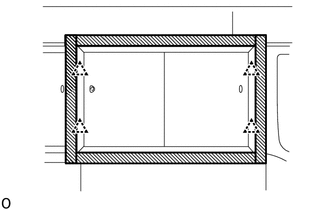
Using suction cups, disconnect the 4 side window glass spacers and remove the rear side front window glass RH.
- NOTICE:
-
Be careful not to drop the rear side window glass.