N04C-VJ FUEL FUEL SUPPLY PUMP INSTALLATION
PROCEDURE

 13613
1.INSTALL INJECTION PUMP DRIVE GEAR
Install a new O-ring to the timer cover.
Install the timer cover to the supply pump assembly with the 2 bolts.
- Torque:
- 28.5 N*m (291 kgf*cm, 21 ft.*lbf)
Temporarily install the crankshaft angle sensor plate and injection pump drive gear with the nut.
Mount the injection pump drive gear in a vise between aluminum plates.
Tighten the nut.
- Torque:
- 64 N*m (653 kgf*cm, 47 ft.*lbf)
22100
2.INSTALL SUPPLY PUMP ASSEMBLY
Install a new O-ring to the timer cover.
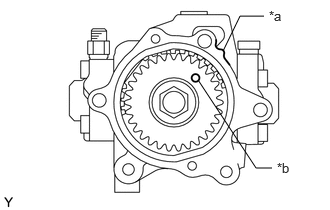
| *a | Matchmark |
| *b | Hole |
Turn the drive gear and align the hole with the matchmark as shown in the illustration.
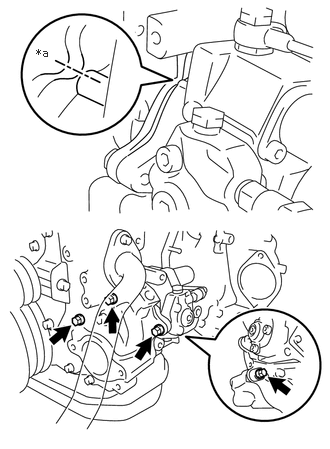
| *a | Matchmark |
Align the matchmarks of the timer cover and the front end plate, and then install the supply pump assembly with the 4 bolts.
- Torque:
- 28.5 N*m (291 kgf*cm, 21 ft.*lbf)
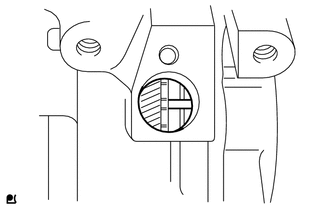
When the crankshaft position sensor installation hole can be accessed directly:
Check that the knock pin of the injection pump drive gear is at the center of the hole.
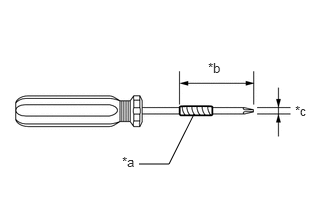
| *a | Vinyl Tape |
| *b | 36 mm (1.42 in.) |
| *c | 6 mm (0.236 in.) |
When the crankshaft position sensor installation hole cannot be accessed directly:
Tape the screwdriver as shown in the illustration.
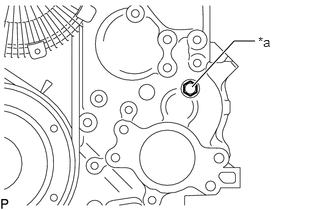
| *a | Service Plug |
Remove the service plug and gasket from the timing chain cover sub-assembly.
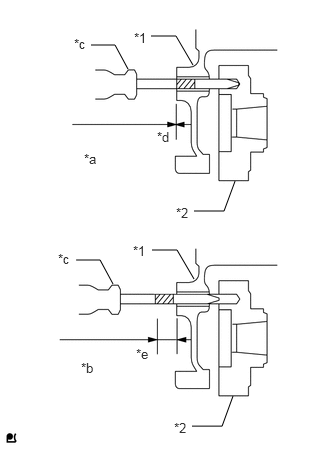
| *1 | Timing Chain Cover |
| *2 | Injection Pump Drive Gear |
| *a | Correct |
| *b | Incorrect |
| *c | Screwdriver |
| *d | 0 to 2 mm of the tape is visible |
| *e | 10 mm or more of the tape is visible |
Insert the taped screwdriver into the timing gear case. Check that the tape and end of the timing gear case are aligned.
Install the service plug and a new gasket to the timing chain cover sub-assembly.
- Torque:
- 7.5 N*m (76 kgf*cm, 66 in.*lbf)
Install the injection pump stay with the spacer, nut and 2 bolts.
- Torque:
- 28.5 N*m (291 kgf*cm, 21 ft.*lbf)
Connect the 2 connectors.
3.INSTALL CRANKSHAFT POSITION SENSOR
23802E
4.INSTALL FUEL PIPE SUB-ASSEMBLY
Temporarily install the fuel pipe sub-assembly.
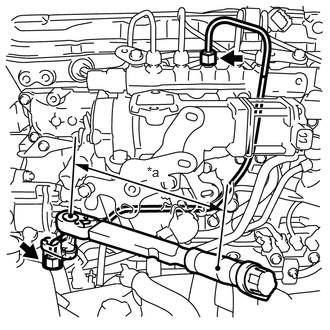
| *a | Torque Wrench Fulcrum Length |
Using a 17 mm union nut wrench, install the fuel pipe sub-assembly with the 2 union nuts.
- Torque:
- Specified tightening torque : 35 N*m (357 kgf*cm, 26 ft.*lbf)
- HINT:
- ·
Calculate the torque wrench reading when changing the fulcrum length of the torque wrench.
·When using a union nut wrench (fulcrum length of 30 mm (1.18 in.)) + torque wrench (fulcrum length of 180 mm (7.09 in.)): 30 N*m (306 kgf*cm, 22 ft.*lbf)
Install the fuel pipe clamps with the 2 nuts.
- HINT:
-
Tighten the nut until the clamp edge makes contact with the engine side clamp edge.
5.INSTALL FUEL PIPE
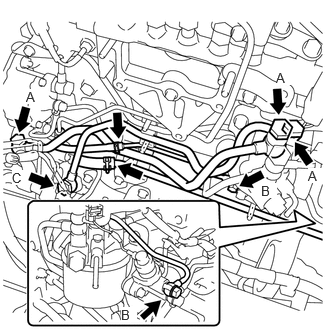
Install new gaskets, the No. 1 fuel pipe, No. 2 fuel pipe and fuel filter to injection pump fuel pipe sub-assembly with the 6 union bolts.
- Torque:
- for union bolt A : 24.5 N*m (250 kgf*cm, 18 ft.*lbf)
- for union bolt B : 19.6 N*m (200 kgf*cm, 14 ft.*lbf)
- for union bolt C : 42 N*m (428 kgf*cm, 31 ft.*lbf)
Connect the 2 fuel tubes to the No. 2 fuel pipe and fuel filter to injection pump fuel pipe and slide the 2 hose clamps to secure the tubes.
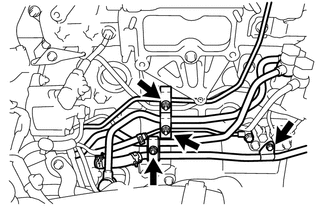
Install the 3 fuel pipe clamps with the 3 nuts.
- HINT:
-
Tighten the nut until the clamp edge makes contact with the engine side clamp edge.
Connect the fuel filter to injection pump fuel pipe with the bolt.
- Torque:
- 28.5 N*m (291 kgf*cm, 21 ft.*lbf)
17113
6.INSTALL INTAKE PIPE
11202D
7.INSTALL NO. 2 CYLINDER HEAD COVER SUB-ASSEMBLY
58396E
8.INSTALL WIRE HARNESS CLAMP BRACKET
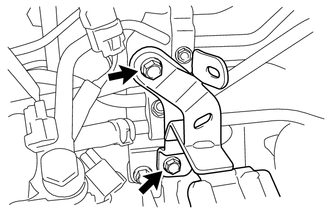
Install the wire harness clamp bracket with the 2 bolts.
- Torque:
- 28.5 N*m (291 kgf*cm, 21 ft.*lbf)
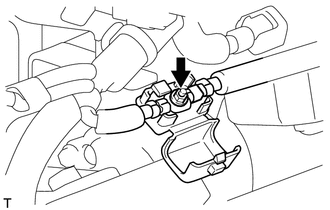
Connect the engine wire with the nut.
- Torque:
- 5.0 N*m (51 kgf*cm, 44 in.*lbf)
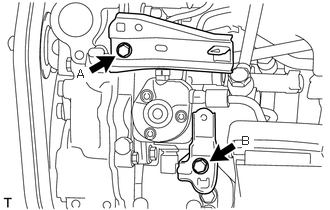
Install the 2 wire harness clamp brackets with the 2 bolts.
- Torque:
- for bolt A : 32 N*m (326 kgf*cm, 24 ft.*lbf)
- for bolt B : 28.5 N*m (291 kgf*cm, 21 ft.*lbf)
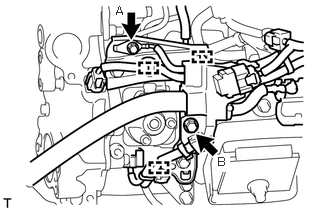
Connect the wire harness and ground wire with the 2 bolts.
- Torque:
- for bolt A : 8.4 N*m (86 kgf*cm, 74 in.*lbf)
- for bolt B : 17.6 N*m (179 kgf*cm, 13 ft.*lbf)
Connect the 3 clamps.
25608
9.INSTALL EGR COOLER SUB-ASSEMBLY
10.CONNECT CABLE TO NEGATIVE BATTERY TERMINAL
11.BLEED AIR FROM FUEL SYSTEM
12.INSPECT FOR FUEL LEAK
13.INSPECT FOR OIL LEAK
53712C
14.INSTALL FRONT FENDER APRON LH
15.SUPPLY PUMP INITIALIZATION