2GR-FE FUEL FUEL TANK INSTALLATION
PROCEDURE

 77651A
1.INSTALL FUEL TANK CUSHION
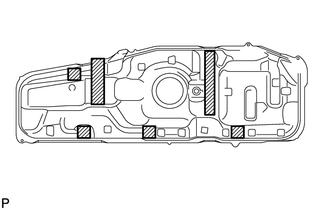
Install 6 new fuel tank cushions onto the fuel tank as shown in the illustration.
77512
2.INSTALL REAR FUEL TANK BRACKET
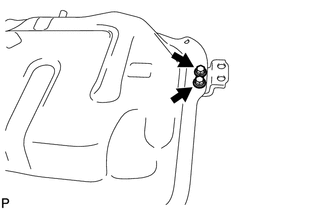
Install the bracket and spacer with the 2 bolts.
- Torque:
- 42 N*m (428 kgf*cm, 31 ft.*lbf)
77641A
3.INSTALL NO. 1 FUEL TANK PROTECTOR
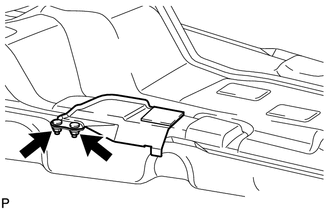
Install the protector with the 2 nuts.
- Torque:
- 6.0 N*m (61 kgf*cm, 53 in.*lbf)
77020A
4.INSTALL FUEL SUCTION WITH PUMP AND GAUGE TUBE ASSEMBLY
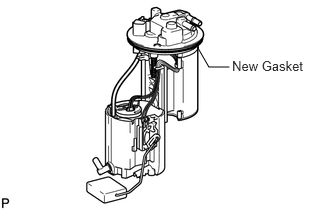
Install a new gasket onto the fuel pump.
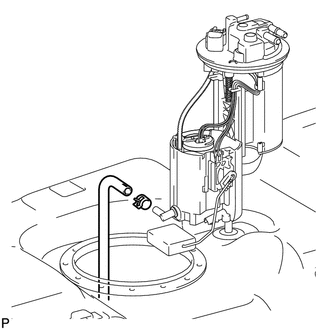
Connect the fuel hose and install the fuel pump into the fuel tank.
- NOTICE:
- ·
When connecting the fuel hose, make sure the fuel hose marking faces upward and that the grip part of the clamp faces the front of the vehicle.
- ·
Be careful not to bend the arm of the fuel sender gauge.
- ·
When connecting the fuel hose, do not forcibly pull on the hose.
77168A
5.INSTALL FUEL TANK VENT TUBE SET PLATE
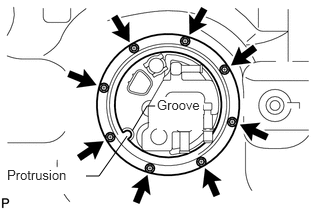
Install the set plate with the 8 bolts.
- Torque:
- 6.0 N*m (61 kgf*cm, 53 in.*lbf)
- HINT:
-
Align the protrusion of the set plate with the groove of the fuel pump.
77027
6.INSTALL NO. 2 FUEL EVAPORATION TUBE SUB-ASSEMBLY
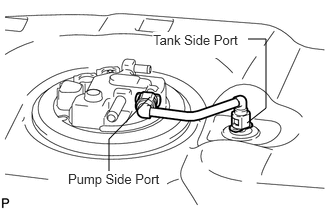
Install the evaporation tube.
- HINT:
-
When installing the evaporation tube, first connect the pump side port, then connect the tank side port.
- NOTICE:
- ·
Before installing the pipe, make sure that it is not damaged. Make sure that there is no foreign matter present on the connecting surfaces.
- ·
After connecting, check if the pipe and the connector are securely connected by pulling on them.
77286B
7.INSTALL NO. 1 FUEL TUBE CLAMP
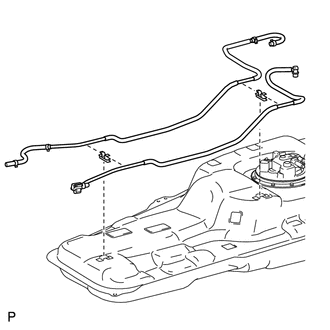
Install the 2 tube clamps to the fuel tank.
77209D
8.INSTALL FUEL TANK MAIN TUBE SUB-ASSEMBLY
Install the main tube to the fuel tube clamps.
77026A
9.INSTALL NO. 1 FUEL EVAPORATION TUBE SUB-ASSEMBLY
Install the tube to the fuel tube clamps.
Connect the tube to the fuel tube assembly.
77100
10.INSTALL FUEL TANK ASSEMBLY
Set the fuel tank on a transmission jack.
Lift up the transmission jack.
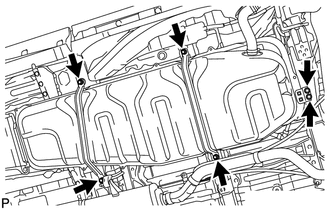
Install the fuel tank bracket and 2 fuel tank bands with the 6 bolts.
- Torque:
- 45 N*m (459 kgf*cm, 33 ft.*lbf)
- NOTICE:
-
First temporarily install the bolts of the tank bracket. Then temporarily install the bolts of the tank bands. Finally, tighten all of the bolts.
77707
11.CONNECT CHARCOAL CANISTER OUTLET TUBE SUB-ASSEMBLY
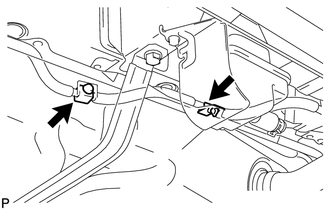
Install the outlet tube to the fuel tank.
77213B
12.CONNECT FUEL TANK TO FILLER PIPE HOSE
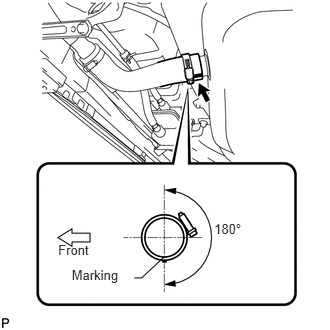
Connect the filler pipe hose to the fuel tank.
77221
13.CONNECT NO. 1 FUEL TANK BREATHER TUBE
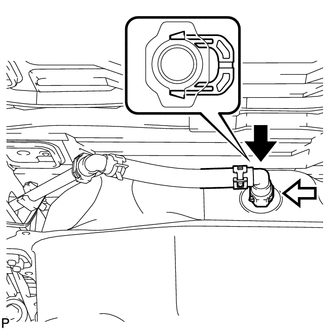
Connect the fuel tank breather tube to the fuel tank.
- NOTICE:
- ·
Before installing the pipe, make sure that it is not damaged. Make sure that there is no foreign matter present on the connecting surfaces.
- ·
After connecting, check if the pipe and the connector are securely connected by pulling on them.
77209D
14.CONNECT FUEL TANK MAIN TUBE SUB-ASSEMBLY
- NOTICE:
-
Before installing the tube connector to the pipe, check the connector for damage and foreign matter.
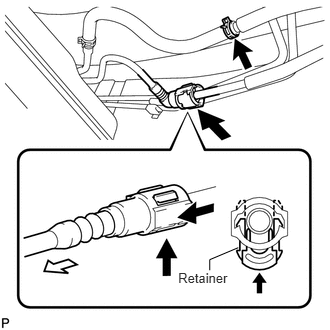
Connect the main tube connector to the pipe and install the retainer. Push the 2 parts together firmly until a "click" sound is heard.
- NOTICE:
-
Check that the connector and pipe are securely connected by trying to pull them apart.
77026A
15.CONNECT NO. 1 FUEL EVAPORATION TUBE SUB-ASSEMBLY
Connect the purge line hose to the pipe.
58166A
16.INSTALL FRONT FLOOR COVER LH
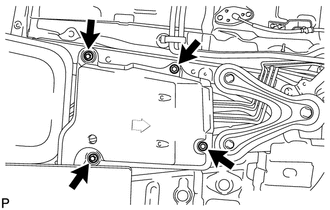
Install the floor cover with the 4 bolts.
- Torque:
- 31 N*m (316 kgf*cm, 23 ft.*lbf)
77020A
17.INSTALL FUEL SUCTION WITH PUMP AND GAUGE TUBE ASSEMBLY
77209D
18.CONNECT FUEL TANK MAIN TUBE SUB-ASSEMBLY
77707
19.CONNECT CHARCOAL CANISTER OUTLET TUBE SUB-ASSEMBLY
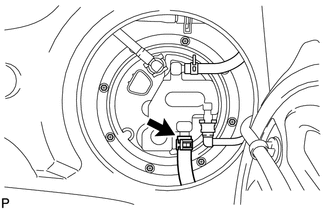
Connect the outlet tube to the fuel tube assembly.
58325E
20.INSTALL REAR FLOOR SERVICE HOLE COVER
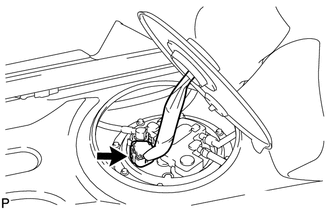
Connect the fuel pump connector.
Install the service hole cover with new butyl tape.
21.ADD FUEL
77310A
22.INSTALL FUEL TANK CAP
72129
23.INSTALL NO. 1 SEAT TRACK LOWER RAIL PROTECTOR
58595
24.INSTALL NO. 3 FLOOR CARPET MOULDING
25.INSTALL REAR NO. 1 SEAT ASSEMBLY (for Captain Seat Type)
71940A
26.INSTALL REAR SEAT HEADREST ASSEMBLY (for Captain Seat Type)
27.INSTALL REAR SEAT ASSEMBLY (for Tumble Seat Type LH Side)
71940A
28.INSTALL REAR SEAT HEADREST ASSEMBLY (for Tumble Seat Type LH Side)
28800
29.CONNECT CABLE TO NEGATIVE BATTERY TERMINAL
30.INSPECT FOR FUEL LEAK