AIR CONDITIONING CONDENSER INSTALLATION
PROCEDURE

 88474
1.INSTALL COOLER DRYER
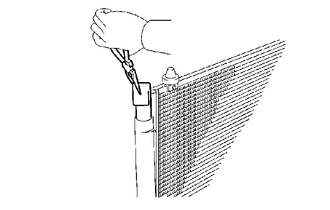
Using pliers, install the cooler dryer.
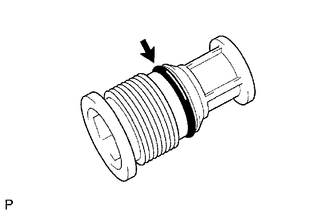
Apply a sufficient amount of compressor oil to the contact surfaces of a new O-ring and the cap.
- Compressor oil:
ND-OIL 8 or equivalent
Install the O-ring to the cap.
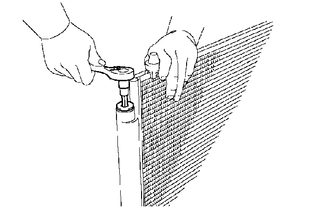
Using a 14 mm socket hexagon wrench, install the cap to the modulator.
- Torque:
- 2.9 N*m (29 kgf*cm, 25 in.*lbf)
88460
2.INSTALL COOLER CONDENSER ASSEMBLY
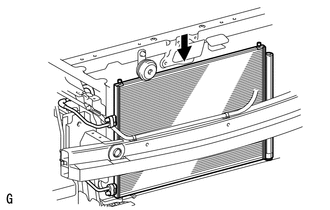
Install the cooler condenser.
16712
3.INSTALL NO. 2 FAN SHROUD
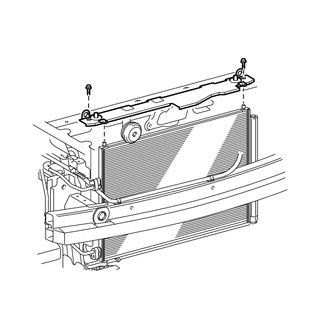
Install the fan shroud with the 2 bolts.
- Torque:
- 11 N*m (112 kgf*cm, 8 ft.*lbf)
16533
4.INSTALL RADIATOR SUPPORT UPPER BRACKET
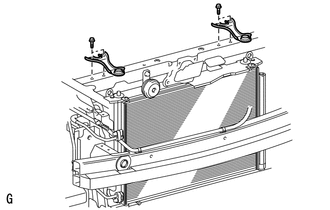
Install the 2 brackets with the 4 bolts.
- Torque:
- 19 N*m (193 kgf*cm, 14 ft.*lbf)
88716A
5.INSTALL COOLER REFRIGERANT LIQUID PIPE
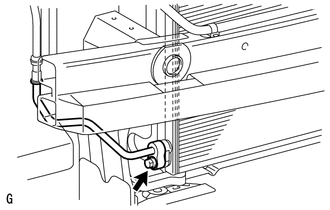
Remove the attached vinyl tape from the pipe and the connecting part of the cooler condenser.
Sufficiently apply compressor oil to a new O-ring and the fitting surface of the pipe joint.
- Compressor oil:
ND-OIL 8 or equivalent
Install the O-ring on the cooler refrigerant liquid pipe.
Install the cooler refrigerant liquid pipe on the cooler condenser with the bolt.
- Torque:
- 5.4 N*m (55 kgf*cm, 48 in.*lbf)
88711
6.INSTALL NO. 1 COOLER REFRIGERANT DISCHARGE HOSE
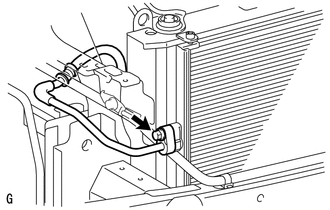
Remove the attached vinyl tape from the hose and the connecting part of the cooler condenser.
Sufficiently apply compressor oil to a new O-ring and the fitting surface of the hose joint.
- Compressor oil:
ND-OIL 8 or equivalent
Install the O-ring on the cooler refrigerant discharge hose.
Install the cooler refrigerant discharge hose on the cooler condenser with the bolt.
- Torque:
- 5.4 N*m (55 kgf*cm, 48 in.*lbf)
81175
7.INSTALL HEADLIGHT ASSEMBLY LH
81135
8.INSTALL HEADLIGHT ASSEMBLY RH
- HINT:
-
Use the same procedure as for the LH side.
9.INSTALL FRONT BUMPER ASSEMBLY (for Standard)
10.INSTALL FRONT BUMPER ASSEMBLY (for Sport Package)
11.CONNECT CABLE TO NEGATIVE BATTERY TERMINAL
12.CHARGE AIR CONDITIONING SYSTEM WITH REFRIGERANT
13.WARM UP ENGINE
14.INSPECT FOR REFRIGERANT LEAK
15.PERFORM INITIALIZATION
Perform initialization (See page General>INTRODUCTION>REPAIR INSTRUCTION>INITIALIZATION).
- NOTICE:
-
Certain systems need to be initialized after disconnecting and reconnecting the cable from the negative (-) battery terminal.