AIR CONDITIONING ION GENERATOR SWITCH REMOVAL
PROCEDURE

 1. PRECAUTION
- NOTICE:
-
After turning the engine switch off, waiting time may be required before disconnecting the cable from the negative (-) battery terminal. Therefore, make sure to read the disconnecting the cable from the negative (-) battery terminal notices before proceeding with work (See page General>INTRODUCTION>REPAIR INSTRUCTION>PRECAUTION).
2.DISCONNECT CABLE FROM NEGATIVE BATTERY TERMINAL (w/ Navigation System)
- NOTICE:
-
When disconnecting the cable, some systems need to be initialized after the cable is reconnected (See page General>INTRODUCTION>REPAIR INSTRUCTION>INITIALIZATION).
55420A
3.REMOVE INSTRUMENT CLUSTER FINISH PANEL CENTER ASSEMBLY
55414A
4.REMOVE INSTRUMENT CLUSTER FINISH PANEL END (w/o Navigation System)
5.REMOVE RADIO RECEIVER ASSEMBLY WITH BRACKET (for Radio Receiver Type)
6.REMOVE NAVIGATION RECEIVER ASSEMBLY WITH BRACKET (for Navigation Receiver Type)
55650
7.REMOVE NO. 1 INSTRUMENT PANEL REGISTER ASSEMBLY
55041B
8.REMOVE NO. 1 INSTRUMENT PANEL BOX DOOR SUB-ASSEMBLY
55446A
9.REMOVE NO. 1 SWITCH HOLE BASE
67913B
10.REMOVE FRONT DOOR SCUFF PLATE RH
- HINT:
-
Use the same procedure as for the LH side (See page Vehicle Interior>INTERIOR>ROOF HEADLINING>REMOVAL).
62111C
11.REMOVE COWL SIDE TRIM BOARD RH
- HINT:
-
Use the same procedure as for the LH side (See page Vehicle Interior>INTERIOR>ROOF HEADLINING>REMOVAL).
55606
12.REMOVE NO. 1 INSTRUMENT PANEL UNDER COVER SUB-ASSEMBLY
55432B
13.REMOVE INSTRUMENT PANEL FINISH PANEL LOWER (w/o Driver Side Knee Airbag)
55432B
14.REMOVE INSTRUMENT PANEL FINISH PANEL LOWER (w/ Driver Side Knee Airbag)
84740B
15.REMOVE ION GENERATOR SWITCH (AIR PURIFIER SWITCH ASSEMBLY)
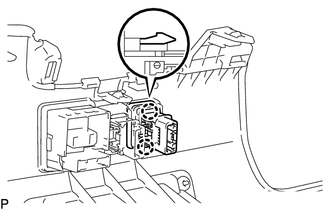
Disengage the 2 claws and remove the ion generator switch (air purifier switch assembly).