P0724 Brake Switch "B" Circuit High
Diagnostic trouble codes · Vehicles built from Nov 2010
Versions by build date: Jul 2007 – Jul 2009 Aug 2009 – Oct 2010 from Nov 2010
DESCRIPTION
The purpose of this circuit is to prevent the engine from stalling while driving in the lock-up condition when the brakes are suddenly applied.When the brake pedal is depressed, this switch sends a signal to the ECM. Then the ECM cancels the operation of the lock-up clutch while braking is in progress.
| DTC No. |
DTC Detection Condition |
Trouble Area |
| P0724 |
Stop light switch remains ON even when vehicle is driven in GO (30 km/h (18.63 mph) or more) and STOP (less than 3 km/h (1.86 mph)) pattern 5 times (2 trip detection logic) |
|
MONITOR DESCRIPTION
This DTC indicates that the stop light switch remains ON. When the stop light switch remains ON during GO and STOP driving, the ECM interprets this as a fault in the stop light switch. Then the MIL illuminates and the ECM stores the DTC. The vehicle must GO (30 km/h (18.63 mph) or more) and STOP (less than 3 km/h (1.86 mph)) 5 times for 2 driving cycles in order for the DTC to be output.WIRING DIAGRAM
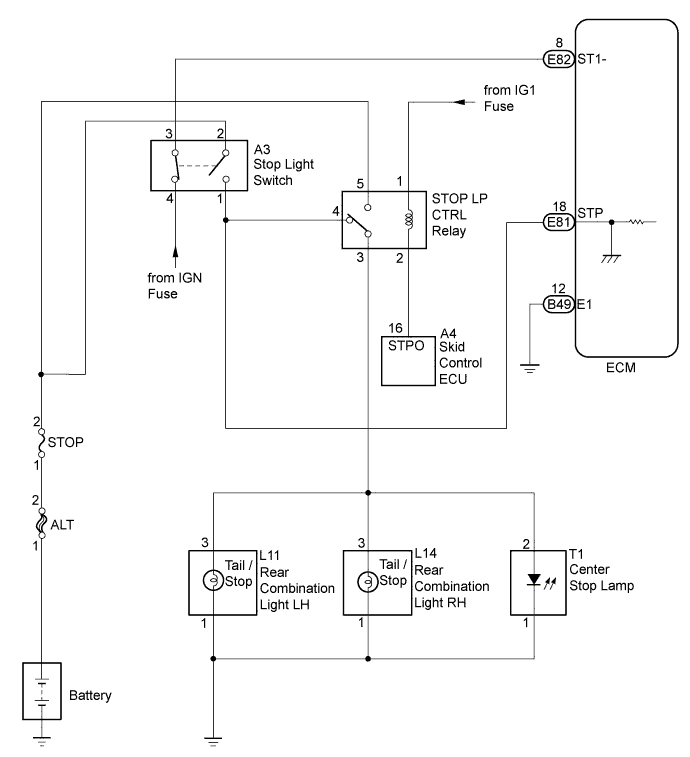

INSPECTION PROCEDURE
- HINT:
- Using the intelligent tester to read the Data List allows switch, sensor, actuator and other item values to be read without removing any parts. Reading the Data List early in troubleshooting is one way to save time.
- NOTICE:
- In the table below, the values listed under "Normal Condition" are reference values. Do not depend solely on these reference values when deciding whether a part is faulty or not.
- Warm up the engine.
- Turn the ignition switch off.
- Connect the intelligent tester to the DLC3.
- Turn the ignition switch to ON.
- Turn the tester on.
- Enter the following menus: Powertrain / Engine and ECT / Data List.
- Follow the instructions on the tester and read the Data List.
| Tester Display |
Measurement Item/ Range (Display) |
Normal Condition |
Diagnostic Note |
| STOP LIGHT SW (Stop Light Switch) |
Stop light switch status/ ON or OFF |
|
- |
| 1. READ VALUE USING INTELLIGENT TESTER (STOP LIGHT SWITCH) |

Connect the intelligent tester to the DLC3.
Turn the ignition switch to ON.
Turn the tester on.
Enter the following menus: Powertrain / Engine and ECT / Data List / All Data / Stop Light Switch.
Read the values displayed on the tester.
- OK:
Tester Display
Measurement Item: Range (display)
Normal Condition
Stop Light Switch
Stop light switch status:
ON or OFF
- ON: Brake pedal is depressed
- OFF: Brake pedal is released
- ON: Brake pedal is depressed
|
|
||||

| OK | ||
 |
||
| ||
| 2. INSPECT STOP LIGHT SWITCH |
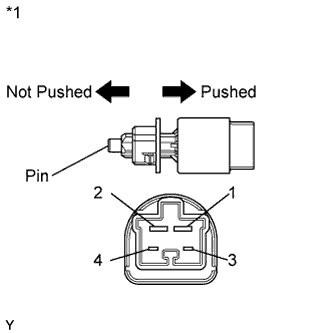 |
Remove the stop light switch.
Measure the resistance according to the value(s) in the table below.
- Standard Resistance:
Tester Connection
Switch Condition
Specified Condition
1 - 2
Pin not pushed
Below 1 Ω
Pin pushed
10 kΩ or higher
3 - 4
Pin not pushed
10 kΩ or higher
Pin pushed
Below 1 Ω
Text in Illustration *1
Component without harness connected
(Stop Light Switch)
|
|
||||

| OK | |
 |
| 3. CHECK HARNESS AND CONNECTOR (ECM - BATTERY) |
Disconnect the ECM connector.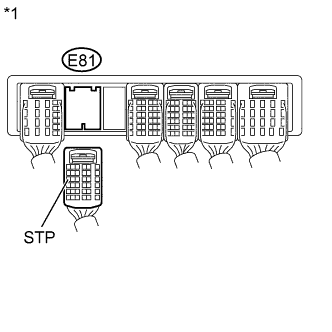
Measure the voltage according to the value(s) in the table below.
- Standard Voltage:
Tester Connection
Condition
Specified Condition
E81-18 (STP) - Body ground
Brake pedal is depressed
11 to 14 V
E81-18 (STP) - Body ground
Brake pedal is released
Below 1 V
Text in Illustration *1
Rear view of wire harness connector
(to ECM)
|
|
||||
| OK | ||
|
||
| ||