P0031 Oxygen (A/F) Sensor Heater Control Circuit Low (Bank 1 Sensor 1)
Diagnostic trouble codes · Vehicles built Jul 2007 – Nov 2007
Also covers:
- P0032 Oxygen (A/F) Sensor Heater Control Circuit High (Bank 1 Sensor 1)
- P0051 Oxygen (A/F) Sensor Heater Control Circuit Low (Bank 2 Sensor 1)
- P0052 Oxygen (A/F) Sensor Heater Control Circuit High (Bank 2 Sensor 1)
Versions by build date: Jul 2007 – Nov 2007 Dec 2007 – Jul 2009 Aug 2009 – Jul 2014 from Aug 2014
DESCRIPTION
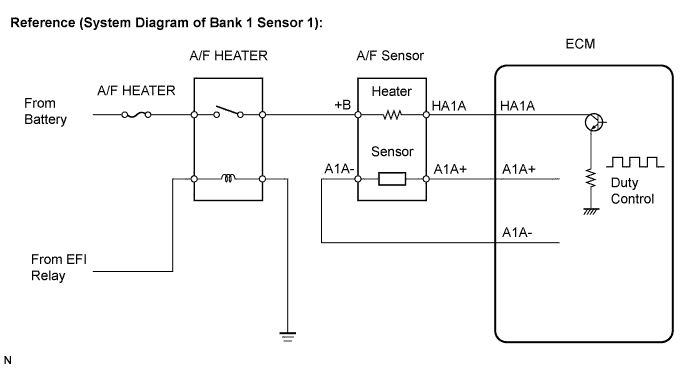
Refer to DTC P2237 (Click here).- HINT:
- Although the DTC titles say the oxygen sensor, these DTCs relate to the Air Fuel Ratio (A/F) sensor.
- Sensor 1 refers to the sensor mounted in front of the Three-Way Catalytic Converter (TWC) and located near the engine assembly.
- When any of these DTCs are set, the ECM enters fail-safe mode. The ECM turns off the A/F sensor heater in fail-safe mode. Fail-safe mode continues until the ignition switch is turned OFF.
- The ECM provides a pulse width modulated control circuit to adjust the current through the heater. The A/F sensor heater circuit uses a relay on the +B side of the circuit.
- Although the DTC titles say the oxygen sensor, these DTCs relate to the Air Fuel Ratio (A/F) sensor.

| DTC No. |
DTC Detection Conditions |
Trouble Areas |
| P0031 P0051 |
Air Fuel Ratio (A/F) sensor heater current less than 0.8 A (1 trip detection logic) |
|
| P0032 P0052 |
Air Fuel Ratio (A/F) sensor heater current more than 10 A (1 trip detection logic) |
|
- HINT:
- Bank 1 refers to the bank that includes cylinder No. 1.
- Bank 2 refers to the bank that does not include cylinder No. 1.
- Sensor 1 refers to the sensor closest to the engine assembly.
- Sensor 2 refers to the sensor farthest away from the engine assembly.
- Bank 1 refers to the bank that includes cylinder No. 1.
MONITOR DESCRIPTION
The ECM uses information from the Air Fuel Ratio (A/F) sensor to regulate the air fuel ratio and keep it close to the stoichiometric level. This maximizes the ability of the Three-Way Catalytic Converter (TWC) to purify the exhaust gases.The A/F sensor detects oxygen levels in the exhaust gas and transmits the information to the ECM. The inner surface of the sensor element is exposed to the outside air. The outer surface of the sensor element is exposed to the exhaust gas. The sensor element is made of platinum coated zirconia and includes an integrated heating element.
The zirconia element generates a small voltage when there is a large difference in the oxygen concentrations between the exhaust gas and outside air. The platinum coating amplifies this voltage generation.
The A/F sensor is more efficient when heated. When the exhaust gas temperature is low, the sensor cannot generate useful voltage signals without supplementary heating. The ECM regulates the supplementary heating using a duty-cycle approach to adjust the average current in the sensor heater element. If the heater current is outside the normal range, the signal transmitted by the A/F sensor will be inaccurate, as a result, the ECM will be unable to regulate air fuel ratio properly.
When the current in the A/F sensor heater is outside the normal operating range, the ECM interprets this as a malfunction in the sensor heater and sets a DTC.
Example:
The ECM sets DTC P0032 or P0052 when the current in the A/F sensor heater is more than 10 A. Conversely, when the heater current is less than 0.8 A, DTC P0031 or P0051 is set.
WIRING DIAGRAM
Refer to DTC P2237 (Click here).INSPECTION PROCEDURE
- HINT:
- Read freeze frame data using an intelligent tester. Freeze frame data record the engine condition when malfunctions are detected. When troubleshooting, freeze frame data can help determine if the vehicle was moving or stationary, if the engine was warmed up or not, if the air fuel ratio was lean or rich, and other data, from the time the malfunction occurred.
| 1. INSPECT AIR FUEL RATIO SENSOR (HEATER RESISTANCE) |

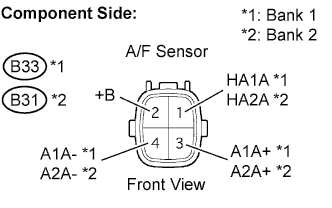 |
Disconnect the B33*1 or B31*2 A/F sensor connector.
- HINT:
- *1: Bank 1 Sensor 1
- *2: Bank 2 Sensor 1
- *1: Bank 1 Sensor 1
Measure the resistance between the terminals of the A/F sensor connector.
- Standard Resistance (Bank 1 Sensor 1):
Tester Connections
Specified Conditions
HA1A (1) - +B (2)
1.8 to 3.4 Ω at 20°C (68°F)
HA1A (1) - A1A- (4)
10 kΩ or higher
- Standard Resistance (Bank 2 Sensor 1):
Tester Connections
Specified Conditions
HA2A (1) - +B (2)
1.8 to 3.4 Ω at 20°C (68°F)
HA2A (1) - A2A- (4)
10 kΩ or higher
Reconnect the A/F sensor connector.
|
|
||||

| OK | |
 |
| 2. INSPECT AIR FUEL RATIO SENSOR HEATER RELAY |
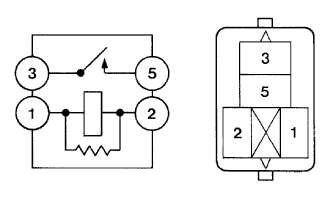 |
Remove the A/F sensor heater relay from the engine room relay block.
Check the A/F sensor heater relay resistance.
- Standard Resistance:
Tester Connections
Specified Conditions
3 - 5
10 kΩ or higher
Below 1 Ω
(when battery voltage applied to terminals 1 and 2)
Reinstall the A/F sensor heater relay.
|
|
||||
| OK | |
|
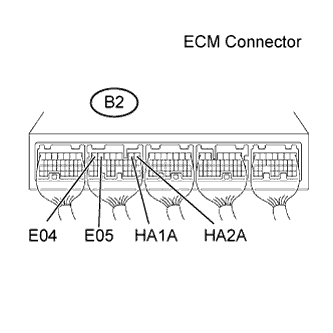
| 3. INSPECT ECM (HA1A OR HA2A VOLTAGE) |
 |
Turn the ignition switch ON.
Measure the voltage between the terminals of the B2 ECM connector.
- Standard Voltage:
Tester Connections
Specified Conditions
HA1A (B2-2) - E04 (B2-7)
11 to 14 V
HA2A (B2-1) - E05 (B2-6)
- HINT:
- The HA1A means the A/F sensor bank 1 sensor 1.
- The HA2A means the A/F sensor bank 2 sensor 1.
- The HA1A means the A/F sensor bank 1 sensor 1.
|
|
||||
| NG | |
|
| 4. CHECK HARNESS AND CONNECTOR (A/F SENSOR - ECM, A/F SENSOR - A/F SENSOR HEATER RELAY) |
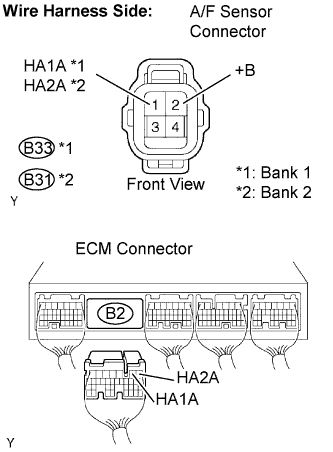 |
Check the harness and the connector between the ECM and the A/F sensor.
Disconnect the B33*1 or B31*2 A/F sensor connector.
- HINT:
- *1: Bank 1 Sensor 1
- *2: Bank 2 Sensor 1
- *1: Bank 1 Sensor 1
Disconnect the B2 ECM connector.
Check the resistance.
- Standard Resistance (Check for open):
Tester Connections
Specified Conditions
HA1A (B33-1) - HA1A (B2-2)
Below 1 Ω
HA2A (B31-1) - HA2A (B2-1)
- Standard Resistance (Check for short):
Tester Connections
Specified Conditions
HA1A (B33-1) or HA1A (B2-2) - Body ground
10 kΩ or higher
HA2A (B31-1) or HA2A (B2-1) - Body ground
Reconnect the A/F sensor connector.
Reconnect the ECM connector.
Check the harness and the connector between the A/F sensor and A/F sensor heater relay.
Disconnect the B33*1 or B31*2 A/F sensor connector.
Remove the A/F sensor heater relay from the engine room relay block.
Check the resistance.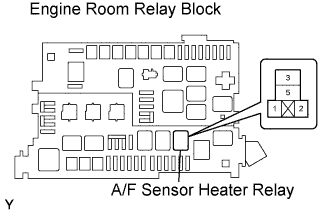
- Standard Resistance (Check for open):
Tester Connections
Specified Conditions
+B (B33-2) - A/F sensor heater relay (3)
Below 1 Ω
+B (B31-2) - A/F sensor heater relay (3)
- Standard Resistance (Check for short):
Tester Connections
Specified Conditions
+B (B33-2) or A/F sensor heater relay (3) - Body ground
10 kΩ or higher
+B (B31-2) or A/F sensor heater relay (3) - Body ground
Reconnect the A/F sensor connector.
Reinstall the A/F sensor heater relay.
|
|
||||
| OK | ||
 |
||
| ||