Key Reminder Buzzer does not Sound
Circuit diagnosis · Vehicles built from Nov 2010
Versions by build date: Jul 2007 – Oct 2010 from Nov 2010
DESCRIPTION
The key reminder warning buzzer sounds when the driver side door is opened while the ignition switch is in the LOCK or ACC position.WIRING DIAGRAM
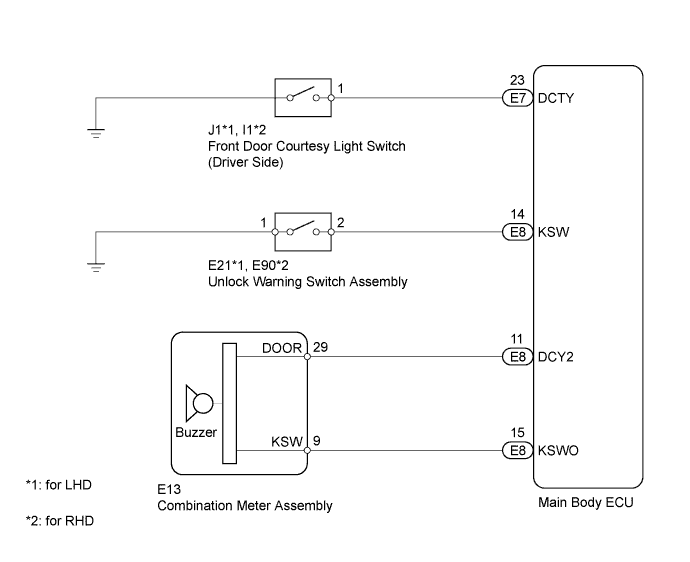

INSPECTION PROCEDURE
| 1. READ VALUE USING INTELLIGENT TESTER (D DOOR COURTESY SW) |

Connect the intelligent tester to the DLC3.
Turn the ignition switch to ON.
Turn the intelligent tester on.
Enter the following menus: Body / Main Body / Data List.
According to the display on the intelligent tester, read the Data List.
Main Body Tester Display
Measurement Item/Range
Normal Condition
Diagnostic Note
D Door Courtesy SW
Driver side door courtesy switch signal / ON or OFF
ON: Driver side door is open
OFF: Driver side door is closed
-
- OK:
- When the driver side door is opened/closed, the display will change as shown above.
|
|
||||

| OK | |
 |
| 2. READ VALUE USING INTELLIGENT TESTER (KEY UNLOCK WARNING SW) |
Connect the intelligent tester to the DLC3.
Turn the ignition switch to ON.
Turn the intelligent tester on.
Enter the following menus: Body / Main Body / Data List.
According to the display on the intelligent tester, read the Data List.
Main Body Tester Display
Measurement Item/Range
Normal Condition
Diagnostic Note
Key Unlock Warning SW
Unlock warning switch signal / ON or OFF
ON: Key is in ignition key cylinder
OFF: No key is in ignition key cylinder
-
- OK:
- When the ignition key is operated, the display changes as shown above.
|
|
||||
| OK | |
|
| 3. INSPECT MAIN BODY ECU |
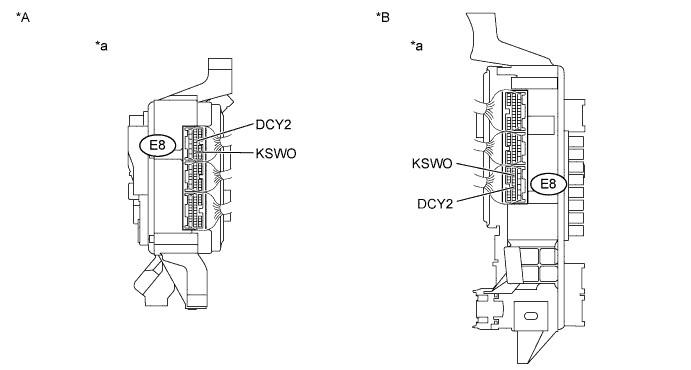
| *A |
for LHD |
*B |
for RHD |
| *a |
Component with harness connected (Main Body ECU) |
- |
- |
Measure the voltage according to the value(s) in the table below.
- Standard Voltage:
Tester Connection
Condition
Specified Condition
E8-11 (DCY2) - Body ground
Driver side door is open
Below 1 V
Driver side door is closed
9 to 14 V (or pulse generation)
E8-15 (KSWO) - Body ground
Key is in ignition key cylinder
Below 1 V
No key is in ignition key cylinder
9 to 14 V (or pulse generation)
|
|
||||

| OK | |
|
| 4. CHECK HARNESS AND CONNECTOR (MAIN BODY ECU - COMBINATION METER ASSEMBLY) |
Disconnect the E8 main body ECU connector.
Disconnect the E13 combination meter assembly connector.
Measure the resistance according to the value(s) in the table below.
- Standard Resistance:
Tester Connection
Condition
Specified Condition
E8-11 (DCY2) - E13-29 (DOOR)
Always
Below 1 Ω
E8-15 (KSWO) - E13-9 (KSW)
Always
Below 1 Ω
E8-11 (DCY2) - Body ground
Always
10 kΩ or higher
E8-15 (KSWO) - Body ground
Always
10 kΩ or higher
Reconnect the combination meter assembly connector.
Reconnect the main body ECU connector.
|
|
||||
| OK | ||
 |
||
| ||
| 5. INSPECT FRONT DOOR COURTESY LIGHT SWITCH (DRIVER SIDE) |
Inspect the front door courtesy light switch (driver side) (Click here).
|
|
||||
| OK | |
|
| 6. CHECK HARNESS AND CONNECTOR (FRONT DOOR COURTESY LIGHT SWITCH (DRIVER SIDE) - MAIN BODY ECU) |
for LHD
Disconnect the J1 front door courtesy light switch (driver side) connector.
for RHD
Disconnect the I1 front door courtesy light switch (driver side) connector.
Disconnect the E7 main body ECU connector.
Measure the resistance according to the value(s) in the table below.
- Standard Resistance:
for LHD Tester Connection
Condition
Specified Condition
J1-1 - E7-23 (DCTY)
Always
Below 1 Ω
J1-1 - Body ground
Always
10 kΩ or higher
for RHD Tester Connection
Condition
Specified Condition
I1-1 - E7-23 (DCTY)
Always
Below 1 Ω
I1-1 - Body ground
Always
10 kΩ or higher
Reconnect the main body ECU connector.
Reconnect the front door courtesy light switch (driver side) connector.
|
|
||||
| OK | ||
|
||
| ||
| 7. INSPECT UNLOCK WARNING SWITCH ASSEMBLY |
Inspect the unlock warning switch assembly.
- HINT:
- for LHD: (Click here)
- for RHD: (Click here)
- for LHD: (Click here)
Result Result
Proceed to
OK
A
NG (for LHD)
B
NG (for RHD)
C
|
|
||||
|
|
||||
| A | |
|
| 8. CHECK HARNESS AND CONNECTOR (UNLOCK WARNING SWITCH ASSEMBLY - MAIN BODY ECU) |
for LHD
Disconnect the E21 unlock warning switch assembly connector.
for RHD
Disconnect the E90 unlock warning switch assembly connector.
Disconnect the E8 main body ECU connector.
Measure the resistance according to the value(s) in the table below.
- Standard Resistance:
for LHD Tester Connection
Condition
Specified Condition
E21-2 - E8-14 (KSW)
Always
Below 1 Ω
E21-2 - Body ground
Always
10 kΩ or higher
E21-1 - Body ground
Always
Below 1 Ω
for RHD Tester Connection
Condition
Specified Condition
E90-2 - E8-14 (KSW)
Always
Below 1 Ω
E90-2 - Body ground
Always
10 kΩ or higher
E90-1 - Body ground
Always
Below 1 Ω
Reconnect the main body ECU connector.
Reconnect the unlock warning switch assembly connector.
|
|
||||
| OK | ||
|
||
| ||