ON-VEHICLE INSPECTION
Inspection · Vehicles built Jul 2007 – Jul 2009
Versions by build date: Jul 2007 – Jul 2009 Aug 2009 – Jul 2014 from Aug 2014
| INSPECT ENGINE COOLANT |

The engine coolant should be between the LOW and FULL lines when the engine is cold.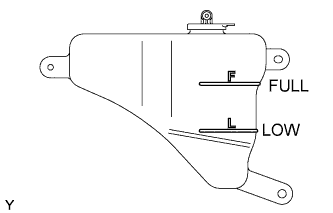

If low, check for leakage and add Toyota Super Long Life Coolant or similar high quality ethylene glycol based non-silicate, non-amine, non-nitrite, and non-borate coolant with long-life hybrid organic acid technology up to the FULL line.
| INSPECT ENGINE OIL |
Warm up the engine, then stop the engine and wait for 5 minutes.
Check that the engine oil level is between the low level and full level marks on the level gauge.
If low, check for leakage and top oil up to the full level mark.- NOTICE:
- Do not fill with engine oil to above the full level mark.
| INSPECT BATTERY |
Check the battery for damage and deformation. If severe damage, deformation or leakage is found, replace the battery.
Check the voltage of electrolyte in each cell.
For batteries that are maintenance-free:
- If the electrolyte volume is below the lower line, replace the battery.
- If the electrolyte volume is above the lower line, check the battery voltage when cranking the engine.
- If the electrolyte volume is below the lower line, replace the battery.
Check the voltage.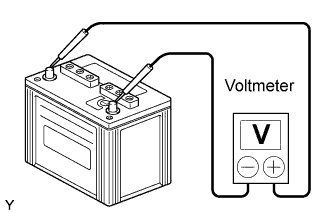
If it has been less than 20 minutes since you stopped driving the vehicle or since the engine was stopped, turn the ignition switch and electrical systems (headlight, blower motor, rear defogger etc.) to the ON position for 60 seconds. This will remove the surface charge on the battery.
Turn the ignition switch to OFF.
Turn the electrical systems to OFF.
Using a voltmeter, measure the battery voltage between the negative (-) and positive (+) terminals of the battery.
- Standard voltage:
- 12.6 to 12.9 V at 20°C (68°F)
Check that the indicator is as shown in the illustration.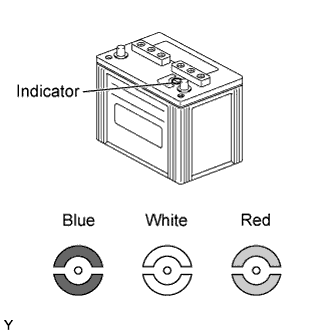
Indicator Color
Condition
Blue
Ready
White
Charging Necessary
Red
Have battery checked by Toyota dealer
| INSPECT AIR CLEANER FILTER ELEMENT SUB-ASSEMBLY |
| INSPECT SPARK PLUG |
- NOTICE:
- Do not use a wire brush for cleaning.
Check the electrode.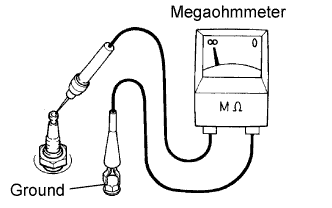
Using a megaohmmeter, measure the insulation resistance.
- Standard resistance:
- 10 MΩ or more
- HINT:
- If the result is not as specified, clean the spark plug with a spark plug cleaner and measure the resistance again.
- If a megaohmmete is not available, perform the following simple inspection instead.
- If the result is not as specified, clean the spark plug with a spark plug cleaner and measure the resistance again.
Alternative inspection method.
Quickly accelerate the engine to 4,000 rpm 5 times.
Remove the spark plug.
Visually check the spark plug.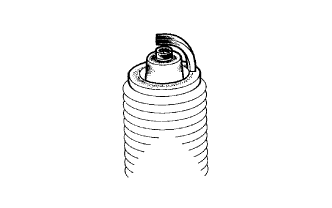
If the electrode is dry, the spark plug is functioning properly. If the electrode is damp, proceed to the next step.
Check the spark plug for any damage to its thread and insulator.
If there is damage, replace the spark plug.- Recommended spark plug:
Manufacturer
Product
DENSO
K20HR-U11
NGK
LFR6C11
Check the spark plug electrode gap.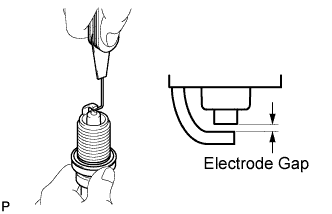
- Maximum electrode gap for used spark plug:
Product
Electrode gap
K20HR-U11
1.1 mm (0.043 in.)
LFR6C11
1.1 mm (0.043 in.)
- Electrode gap for new spark plug:
Product
Electrode gap
K20HR-U11
1.0 to 1.1 mm (0.039 to 0.043 in.)
LFR6C11
1.0 to 1.1 mm (0.039 to 0.043 in.)
Clean the spark plug.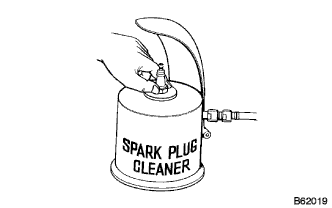
If the electrode has traces of wet carbon, clean the electrode with a spark plug cleaner and then dry it.- Air pressure:
- Below 588 kPa (6 kg/cm2, 85 psi)
- Duration:
- 20 seconds or less
- HINT:
- Only use the spark plug cleaner when the electrode is free of oil. If the electrode has traces of oil, use gasoline to clean off the oil before using the spark plug cleaner.
| INSPECT FAN & GENERATOR V BELT |
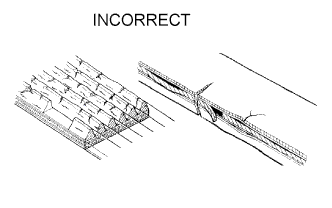 |
Visually check the driver belt for excessive wear, frayed cords, etc. If any defect is found, replace the drive belt.
- HINT:
- Cracks on the rib side of the drive belt are considered acceptable. If the drive belt has chunks missing from the ribs, it should be replaced.
| INSPECT IGNITION TIMING |
- NOTICE:
- Turn all the electrical systems OFF.
- Conduct the inspection when the cooling fan motor is turned OFF.
- Turn all the electrical systems OFF.
Warm up the engine.
When using the intelligent tester:
Connect the intelligent tester to the DLC3.
Select the following menu items: Powertrain / Engine and ECT / Date List / IGN Advance.
Inspect the ignition timing during idling.
- Ignition timing:
- 7 to 24°CA BTDC during idling (Transmission in neutral position)
Check that the ignition timing advances immediately when the engine speed is increased.
When not using intelligent tester: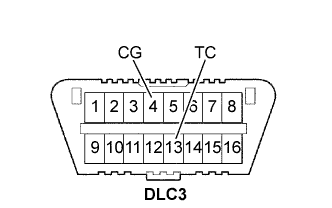
Using SST, connect the terminals 13 (TC) and 4 (CG) of the DLC3.
- SST
- 09843-18040
- NOTICE:
- Do not connect the terminals incorrectly as it causes breakage of the engine.
Remove the air cleaner.
Pull out the wire harness shown in the illustration.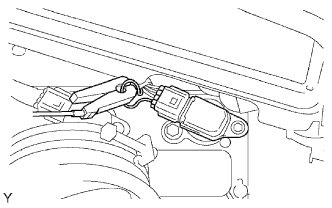
Connect the tester probe of a timing light to the wire of the ignition coil connector for the No. 1 cylinder.
- NOTICE:
- Use timing light that detects the first signal.
- Use timing light that detects the first signal.
- After checking, wrap the wire harness with tape.
- After checking, wrap the wire harness with tape.
Inspect the ignition timing during idling.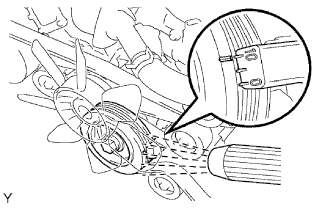
- Ignition timing:
- 8 to 12°CA BTDC during idling (Transmission in neutral position)
Remove SST from the DLC3.
Inspect the ignition timing during idling.
- Ignition timing:
- 7 to 24°CA BTDC during idling (Transmission in neutral position)
Install the air cleaner.
| INSPECT ENGINE IDLING SPEED |
- NOTICE:
- Turn all the electrical systems OFF.
- Operate the inspection when the cooling fan motor is turned OFF.
- Turn all the electrical systems OFF.
Warm up the engine.
When using the intelligent tester:
Connect the intelligent tester to the DLC3.
Select the following menu items: Powertrain / Engine and ECT / Date List / Engine Speed.
Inspect the engine idling speed.
- Idling speed:
- 650 to 750 rpm (Transmission in neutral position)
When not using the intelligent tester: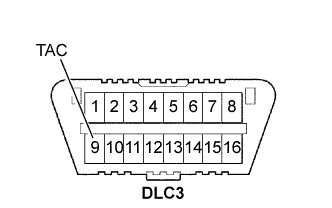
Using SST, connect the terminal 9 (TAC) of the DLC3.
- SST
- 09843-18030
Race the engine speed at 2500 rpm for approximately 90 seconds.
Inspect the engine idling speed.
- Idling speed:
- 650 to 750 rpm (Transmission in neutral position)
| INSPECT COMPRESSION |
Warm up and stop the engine.
Remove the circuit opening relay (Click here).
Remove the V-bank cover (Click here).
Remove the air cleaner assembly (Click here).
Remove the throttle body bracket (Click here).
Remove the oil baffle plate (Click here).
Remove the No. 1 surge tank stay (Click here).
Remove the No. 2 surge tank stay (Click here).
Remove the ignition coils (Click here).
Remove the spark plugs.
Inspect the cylinder compression pressure.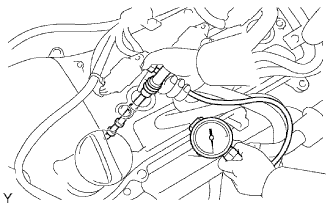
Insert a compression gauge into the spark plug hole. (*1)
Fully open the throttle. (*2)
While cranking the engine, measure the compression pressure. (*3)
- Compression pressure:
- 1300 kPa (13.3 kgf/cm2, 189 psi)
- Minimum pressure:
- 1000 kPa (10.2 kgf/cm2, 145 psi)
- Difference between cylinders:
- 100 kPa (1.0 kgf/cm2, 15 psi)
- NOTICE:
- Use a fully-charged battery so the engine speed can be increased to 2500 rpm or more.
- Use a fully-charged battery so the engine speed can be increased to 2500 rpm or more.
- Inspect the other cylinders in the same way.
- Inspect the other cylinders in the same way.
- Measure the compression in as short a time as possible.
- Measure the compression in as short a time as possible.
If the cylinder compression is low, pour a small amount of engine oil into the cylinder through the spark plug hole and repeat steps (*1) through (*3) for cylinders with low compression.
- If adding oil increases the compression, the piston rings and/or cylinder bore may be worn or damaged.
- If the pressure stays low, a valve may be stuck or seated improperly, or there may be leakage from the gasket.
- If adding oil increases the compression, the piston rings and/or cylinder bore may be worn or damaged.
| INSPECT CO/HC |
Start the engine.
Run the engine at 2500 rpm for approximately 180 seconds.
Insert the CO/HC meter testing probe at least 40 cm (1.3 ft) into the tailpipe during idling.
Immediately check the CO/HC concentration during idling and/or while running at 2500 rpm.
- HINT:
- Complete the measurement within 3 minutes.
- Complete the measurement within 3 minutes.
- When carrying out the 2 mode (with the engine idling/running at 2500 rpm) test, the measurement orders are prescribed by the applicable local regulations.
- When carrying out the 2 mode (with the engine idling/running at 2500 rpm) test, the measurement orders are prescribed by the applicable local regulations.
If the CO/HC concentration does not comply with regulations, troubleshoot in the order given below.
Check the heated oxygen sensor operation.
CO
HC
Problems
Causes
Normal
High
Rough idling
- Faulty ignition:
- Incorrect timing
- Fouled, shorted or improperly gapped plugs
- Incorrect valve clearance
- Leaking intake and exhaust valves
- Leaking cylinders
Low
High
Rough idling
(Fluctuating HC reading)
- Vacuum leaks:
- PCV hoses
- Intake manifold
- Throttle body
- IAC valve
- Brake booster line
- Lean mixture causing misfire
High
High
Rough idling
(Black smoke from exhaust)
- Restricted air filter
- Plugged PCV valve
- Faulty EFI systems:
- Faulty pressure regulator
- Faulty engine coolant temperature sensor
- Faulty mass air flow meter
- Faulty ECM
- Faulty injectors
- Faulty throttle position sensor
- Faulty ignition: