INSTALLATION
Removal / installation · Vehicles built Jul 2007 – Jul 2009
| 1. INSTALL CHAIN TENSIONER SLIPPER |
| 2. INSTALL NO. 1 CHAIN TENSIONER ASSEMBLY |

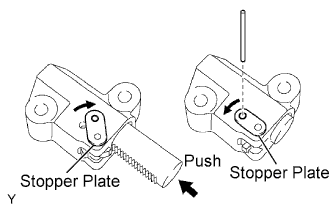  |
While turning the stopper plate of the tensioner clockwise, push in the plunger of the tensioner as shown in the illustration.
While turning the stopper plate of the tensioner counterclockwise, insert a bar of φ 35 mm (0.138 in.) into the holes in the stopper plate and tensioner to fix the stopper plate.
Install the chain tensioner with the 2 bolts.
- Torque:
- 10 N*m{ 102 kgf*cm , 7.4 ft.*lbf }
| 3. INSTALL CHAIN SUB-ASSEMBLY |
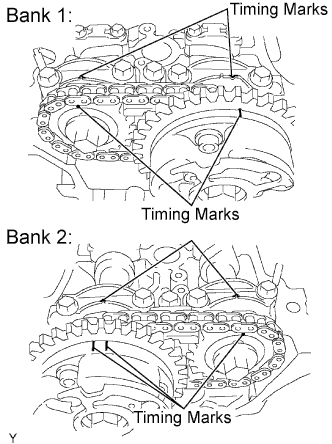 |
Set the No. 1 cylinder to TDC/ compression.
Align the timing marks of the camshaft timing gears and bearing caps.
Using the crankshaft pulley set bolt, turn the crankshaft to align the crankshaft set key with the timing line of the cylinder block.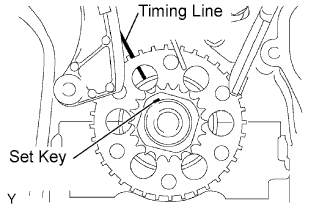
Align the yellow mark link with the timing mark of the crankshaft timing link.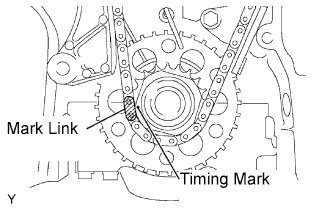
Align the orange mark links with the timing marks of the camshaft timing gears, and install the chain.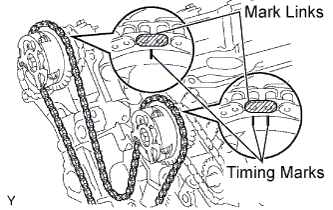
| 4. INSTALL NO. 2 CHAIN VIBRATION DAMPER |
Install the 2 No. 2 chain vibration dampers.
| 5. INSTALL NO. 1 IDLE GEAR |
Apply a light coat of engine oil to rotating surface of the No. 1 idle gear shaft.
Temporarily install the No. 1 idle gear shaft together with the No. 2 idle gear shaft with the knock pin of the No. 1 idle gear shaft and the knock pin groove of the cylinder block are aligned.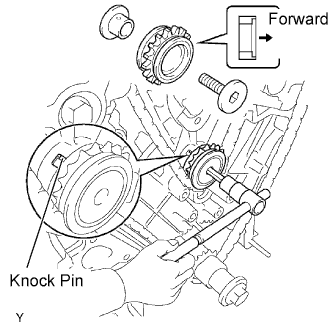
- NOTICE:
- Orient the idle gear shafts correctly.
Using a 10 mm hexagon wrench, tighten the No. 2 idle gear shaft.
- Torque:
- 60 N*m{ 612 kgf*cm , 44 ft.*lbf }
Remove the bar from the chain tensioner.
| 6. INSTALL TIMING GEAR CASE OR TIMING CHAIN CASE OIL SEAL |
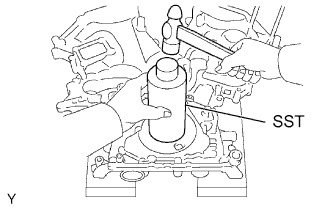 |
Using SST and a hammer, tap in a new oil seal until its surface is flush with the timing chain cover edge.
- SST
- 09226-10010
Apply MP grease to the oil seal lip.
| 7. INSTALL TIMING CHAIN OR BELT COVER SUB-ASSEMBLY |
Remove any old packing (FIPG) material.
- HINT:
- Do not drop any oil on the contact surfaces of the timing chain cover, cylinder head and cylinder block.
Install a new O-ring onto the bank 2 cylinder head as shown in the illustration.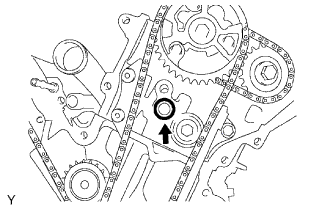
Apply continuous beads of seal packing (diameter 3 to 4 mm (0.12 to 0.16 in.)) to the 4 locations shown in the illustration.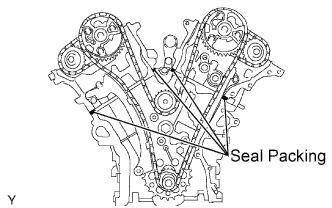
- Seal packing:
- Toyota Genuine Seal Packing Black, Three Bond 1207B or the equivalent
Keep the seal surface between the cylinder block and the cylinder head shown in the illustration free of oil before installing the chain cover.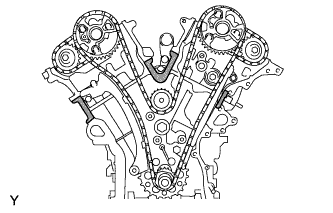
Apply continuous beads of seal packing (diameter 3 to 4 mm (0.12 to 0.16 in.)) to the timing chain cover as shown in the illustration.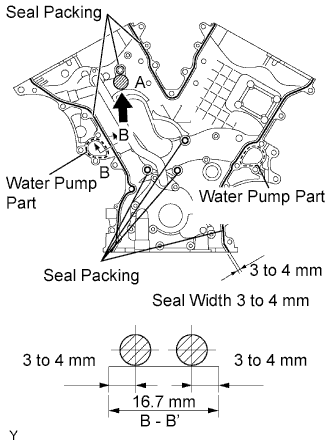
- Seal packing:
- Water pump part:
- Toyota Genuine Seal Packing 1282B, Three Bond 1282B or the equivalent
- Other parts:
- Toyota Genuine Seal Packing Black, Three Bond 1207B or the equivalent
- NOTICE:
- Install the timing chain cover within 3 minutes of applying the seal packing. The timing chain cover bolts and nuts must be tightened within 15 minutes of the installation. Otherwise the seal packing must be removed and reapplied.
- Do not apply seal packing to portion A shown in the illustration.
- Install the timing chain cover within 3 minutes of applying the seal packing. The timing chain cover bolts and nuts must be tightened within 15 minutes of the installation. Otherwise the seal packing must be removed and reapplied.
Align the key way of the oil pump drive rotor with the rectangular portion of the crankshaft timing gear, and slide the timing chain cover into place.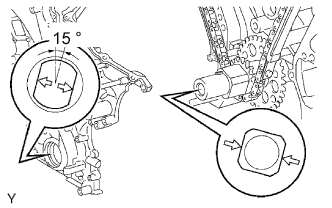
Install the timing chain cover with the 24 bolts and 2 nuts. Tighten the bolts and nuts uniformly in several steps.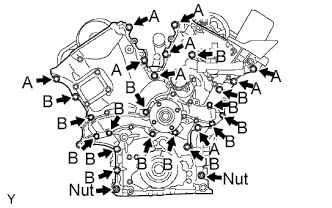
- Torque:
- 23 N*m{ 235 kgf*cm , 17 ft.*lbf }
- NOTICE:
- Pay attention not to wrap the chain and slipper over the timing chain cover seal line.
- Each bolt length is as follows:
Bolt
Length
A
25 mm (0.98 in.)
B
55 mm (2.17 in.)
| 8. INSTALL CYLINDER HEAD COVER SUB-ASSEMBLY LH |
Remove any old packing (FIPG) material.
- HINT:
- Do not drop any oil on the contact surfaces of the cylinder head, timing chain cover and cylinder head cover.
Apply a continuous bead of seal packing (diameter 2 to 3 mm (0.08 to 0.12 in.)) to the cylinder head and timing chain cover as shown in the illustration.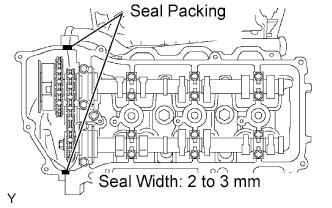
- Seal packing:
- Toyota Genuine Seal Packing Black, Three Bond 1207B or the equivalent
- NOTICE:
- Install the cylinder head cover within 3 minutes of applying the seal packing. Tighten the cylinder head cover bolts and nuts within 15 minutes of installing the cylinder head cover. Otherwise, the seal packing must be removed and reapplied.
Install the seal washers onto the bolts.
Install the cylinder head cover with the 10 bolts and 2 nuts. Tighten the bolts and nuts uniformly in several steps.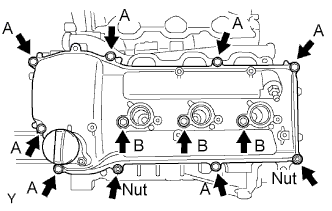
- Torque:
- Bolt A:
- 10 N*m{ 102 kgf*cm , 7.4 ft.*lbf }
- Bolt B:
- 9.0 N*m{ 92 kgf*cm , 80 in.*lbf }
- Nut:
- 9.0 N*m{ 92 kgf*cm , 80 in.*lbf }
- HINT:
- Each bolt length is as follows.
Bolt
Length
A
25 mm (0.98 in.)
B
60 mm (2.36 in.)
| 9. INSTALL CYLINDER HEAD COVER SUB-ASSEMBLY |
Remove any old packing (FIPG) material.
- HINT:
- Do not drop any oil on the contact surfaces of the cylinder head, timing chain cover and cylinder head cover.
Apply a continuous bead of seal packing (diameter 2 to 3 mm (0.08 to 0.12 in.)) to the cylinder head and timing chain cover as shown in the illustration.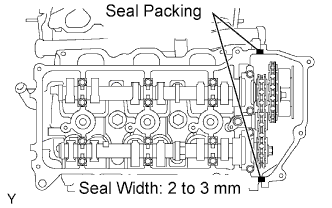
- Seal packing:
- Toyota Genuine Seal Packing Black, Three Bond 1207B or the equivalent
- NOTICE:
- Install the cylinder head cover within 3 minutes of applying the seal packing. Tighten the cylinder head cover bolts and nuts within 15 minutes of installing the cylinder head cover. Otherwise, the seal packing must be removed and reapplied.
Install the seal washers onto the bolts.
Install the cylinder head cover with the 10 bolts and 2 nuts. Tighten the bolts and nuts uniformly in several steps.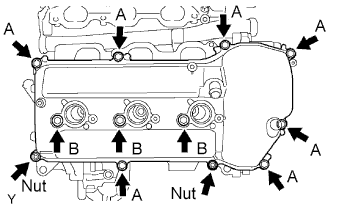
- Torque:
- Bolt A:
- 10 N*m{ 102 kgf*cm , 7.4 ft.*lbf }
- Bolt B:
- 9.0 N*m{ 92 kgf*cm , 80 in.*lbf }
- Nut:
- 9.0 N*m{ 92 kgf*cm , 80 in.*lbf }
- HINT:
- Each bolt length is as follows.
Bolt
Length
A
25 mm (0.98 in.)
B
60 mm (2.36 in.)
| 10. INSTALL WATER INLET |
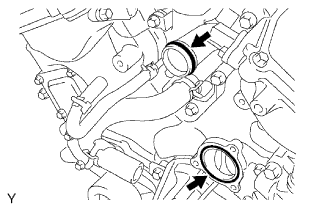 |
Install a new O-ring onto the water outlet pipe.
Install a new gasket onto the water pump.
Apply soapy water to the O-ring.
Install the water inlet with the 5 bolts.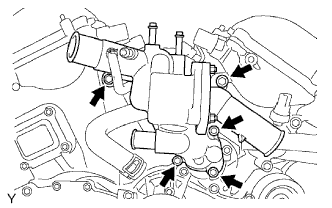
- Torque:
- 9.0 N*m{ 92 kgf*cm , 80 in.*lbf }
Connect the 5 water by-pass hoses.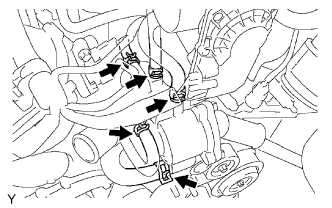
Connect the 2 radiator hoses.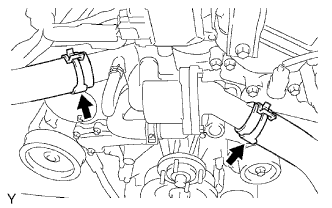
Connect the oil cooler hoses. (w/ Oil Cooler)
| 11. INSTALL VVT SENSOR |
Bank 2 side VVT sensor: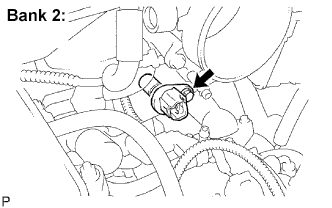
Apply a light coat of engine oil to the O-ring of the VVT sensor.
Install the VVT sensor with the bolt.
- Torque:
- 8.0 N*m{ 82 kgf*cm , 71 in.*lbf }
Connect the VVT sensor connector.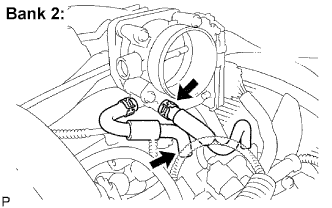
Connect the No. 4 water by-pass hose and No. 5 water by-pass hose.
Bank 1 side VVT sensor: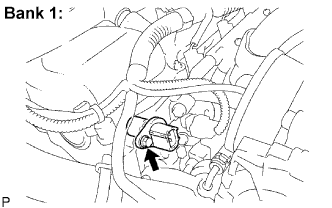
Apply a light coat of engine oil to the O-ring of the VVT sensor.
Install the VVT sensor with the bolt.
- Torque:
- 8.0 N*m{ 82 kgf*cm , 71 in.*lbf }
Connect the VVT sensor connector.
| 12. INSTALL CAMSHAFT TIMING OIL CONTROL VALVE ASSEMBLY |
Install the 2 camshaft timing oil control valves with the 2 bolts.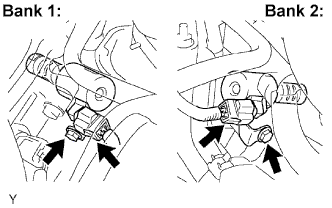
- Torque:
- 9.0 N*m{ 92 kgf*cm , 80 in.*lbf }
Connect the 2 connectors.
| 13. INSTALL IGNITION COIL ASSEMBLY |
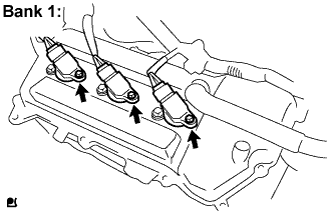 |
For Bank 1:
Install the 3 ignition coils with the 3 bolts.
- Torque:
- 10 N*m{ 102 kgf*cm , 7.4 ft.*lbf }
Connect the 3 ignition coil connectors.
For Bank 2: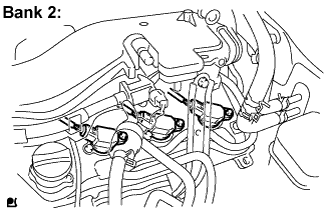
Install the 3 ignition coils with the 3 bolts.
- Torque:
- 10 N*m{ 102 kgf*cm , 7.4 ft.*lbf }
Connect the 3 ignition coil connectors.
| 14. INSTALL INTAKE AIR SURGE TANK |
Install a new gasket onto the intake air surge tank.
Using a socket hexagon wrench 8, install the intake air surge tank with the 4 bolts.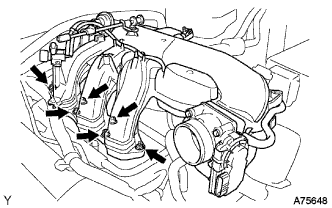
- Torque:
- 28 N*m{ 286 kgf*cm , 21 ft.*lbf }
Install the 2 nuts.
- Torque:
- 28 N*m{ 286 kgf*cm , 21 ft.*lbf }
Install the 3 wire harness clamps and hose clamp.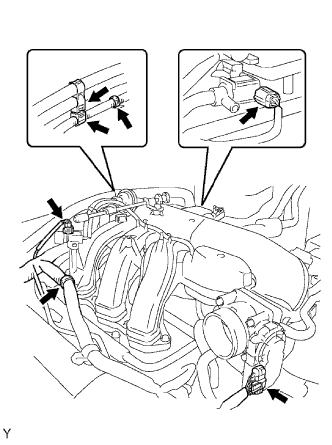
Connect the throttle body with motor connector.
Connect the 2 VSV connectors.
Connect the ventilation hose.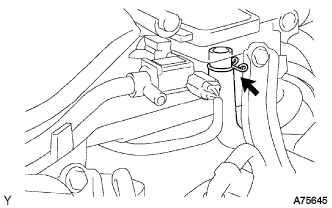
Connect the fuel vapor feed hose.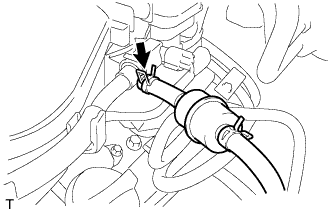
Connect the 2 water by-pass hoses.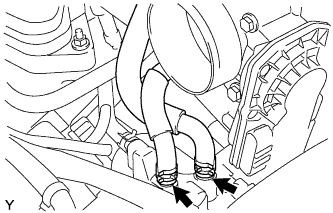
| 15. INSTALL NO. 2 SURGE TANK STAY |
Install the No. 2 surge tank stay with the 2 bolts.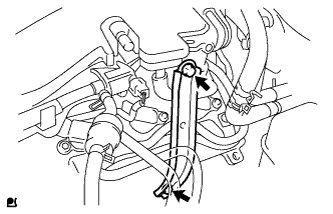
- Torque:
- 21 N*m{ 214 kgf*cm , 15 ft.*lbf }
| 16. INSTALL NO. 1 SURGE TANK STAY |
Install the No. 1 surge tank stay with the 2 bolts.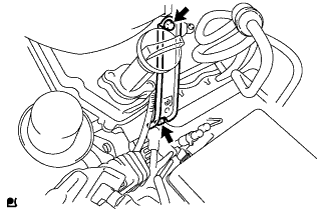
- Torque:
- 21 N*m{ 214 kgf*cm , 15 ft.*lbf }
| 17. INSTALL OIL BAFFLE PLATE |
Install the oil baffle plate with the bolt.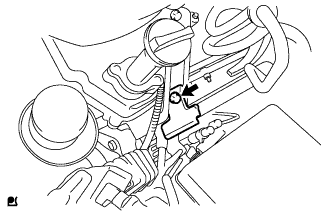
- Torque:
- 9.0 N*m{ 92 kgf*cm , 80 in.*lbf }
| 18. INSTALL THROTTLE BODY BRACKET |
Install the throttle body bracket with the 2 bolts.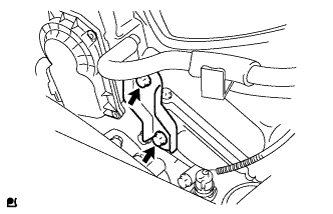
- Torque:
- 21 N*m{ 214 kgf*cm , 15 ft.*lbf }
| 19. INSTALL AIR CLEANER ASSEMBLY |
Install the air cleaner onto the throttle body.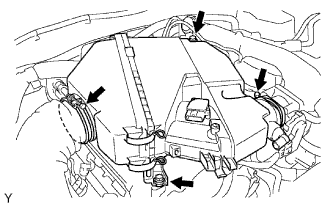
Connect the air cleaner hose to the air cleaner.
Install the air cleaner with the 2 bolts.
- Torque:
- 8.0 N*m{ 82 kgf*cm , 71 in.*lbf }
Connect the mass air flow meter connector.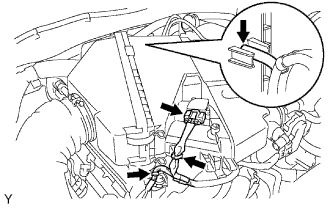
Engage the 2 wire harness clamps.
Connect the vacuum hose.
Connect the No. 2 ventilation hose.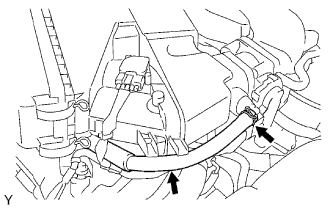
| 20. INSTALL OIL PAN SUB-ASSEMBLY |
Remove any old packing (FIPG) material.
- HINT:
- Do not drop any oil on the contact surfaces of the cylinder block, rear oil seal and oil pan.
Install a new O-ring onto the oil pump.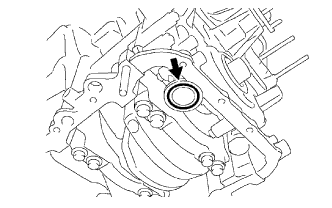
Apply a continuous bead of seal packing (diameter 3 to 4 mm (0.12 to 0.16 in.)) to the oil pan as shown in the illustration.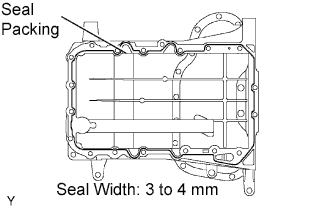
- Seal packing:
- Toyota Genuine Seal Packing Black, Three Bond 1207B or the equivalent
- NOTICE:
- Install the oil pan within 3 minutes of applying the seal packing. Tighten the oil pan bolts and nuts within 15 minutes of installing the oil pan. Otherwise, the seal packing must be removed and reapplied.
Install the oil pan with the 17 bolts and 2 nuts, and tighten the bolts and nuts uniformly in several steps.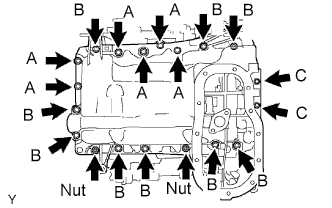
- Torque:
- 10 mm (0.39 in.) head:
- 10 N*m{ 102 kgf*cm , 7.4 ft.*lbf }
- 12 mm (0.47 in.) head:
- 21 N*m{ 214 kgf*cm , 16 ft.*lbf }
- Nut:
- 21 N*m{ 214 kgf*cm , 16 ft.*lbf }
- HINT:
- Each bolt length is as follows:
Bolt
Length
A
25 mm (0.98 in.)
B
45 mm (1.77 in.)
C
14 mm (0.55 in.)
Install the 4 housing bolts.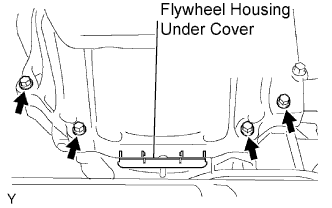
- Torque:
- 37 N*m{ 377 kgf*cm , 27 ft.*lbf }
Install the flywheel housing under cover.
| 21. INSTALL OIL STRAINER SUB-ASSEMBLY |
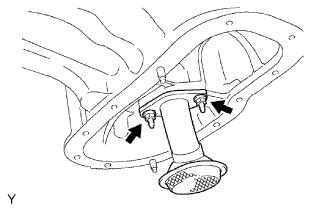 |
Install a new gasket and the oil strainer with the 2 nuts.
- Torque:
- 9.0 N*m{ 92 kgf*cm , 80 in.*lbf }
| 22. INSTALL NO. 2 OIL PAN SUB-ASSEMBLY |
Remove any old packing (FIPG) material.
- HINT:
- Do not drop any oil on the contact surfaces of the oil pan and No. 2 oil pan.
Apply a continuous bead of seal packing (diameter 3 to 4 mm (0.12 to 0.16 in.)) as shown in the illustration.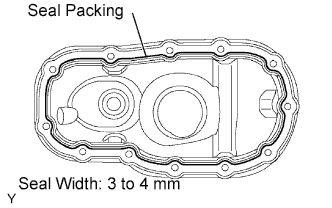
- Seal packing:
- Toyota Genuine Seal Packing Black, Three Bond 1207B or the equivalent
- NOTICE:
- Install the No. 2 oil pan within 3 minutes of applying the seal packing. Tighten the No. 2 oil pan bolts and nuts within 15 minutes of installing the No. 2 oil pan. Otherwise, the seal packing must be removed and reapplied.
Install the No. 2 oil pan with the 10 bolts and 2 nuts. Tighten the bolts and nuts uniformly in several steps.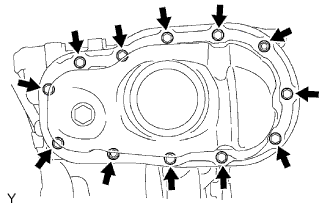
- Torque:
- Bolt:
- 9.0 N*m{ 92 kgf*cm , 80 in.*lbf }
- Nut:
- 10 N*m{ 102 kgf*cm , 7.4 ft.*lbf }
| 23. INSTALL CRANKSHAFT PULLEY |
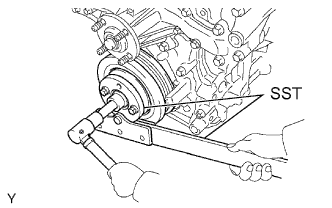 |
Using SST, install the pulley set bolt.
- SST
- 09213-54015
(91651-60855)
09330-00021
- Torque:
- 250 N*m{ 2,549 kgf*cm , 184 ft.*lbf }
| 24. INSTALL NO. 1 IDLER PULLEY SUB-ASSEMBLY |
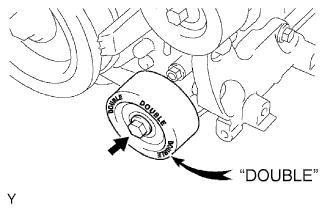 |
Install the idler pulley with the bolt.
- Torque:
- 39 N*m{ 398 kgf*cm , 29 ft.*lbf }
- HINT:
- DOUBLE is marked on the No. 1 idler pulley to distinguish it from the No. 2 idler pulley.
| 25. INSTALL NO. 2 IDLER PULLEY SUB-ASSEMBLY |
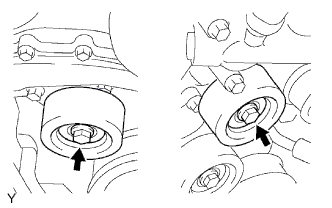 |
Install the 2 No. 2 idler pulleys with the 2 bolts.
- Torque:
- 54 N*m{ 551 kgf*cm , 40 ft.*lbf }
| 26. INSTALL VANE PUMP ASSEMBLY |
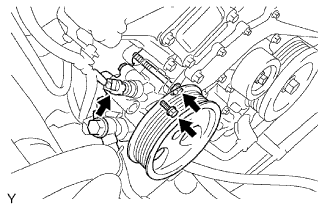 |
Install the vane pump with the 2 bolts.
- Torque:
- 43 N*m{ 438 kgf*cm , 32 ft.*lbf }
- NOTICE:
- Do not hit the pulley with other parts when installing the vane pump.
Connect the power steering pressure switch connector.
| 27. INSTALL OIL LEVEL GAUGE GUIDE |
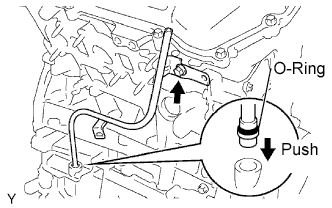 |
Install a new O-ring onto the oil level gauge guide.
Apply a light coat of engine oil to the O-ring.
Push the oil level gauge guide end into the guide hole in the oil pan.
Install the oil level gauge guide with the bolt.
- Torque:
- 9.0 N*m{ 92 kgf*cm , 80 in.*lbf }
Install the oil level gauge guide.
| 28. INSTALL V-RIBBED BELT TENSIONER ASSEMBLY |
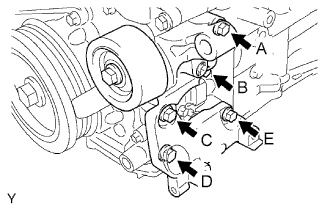 |
- NOTICE:
- The bolt in position A is not reusable.
- HINT:
- Each bolt length is as follows:
Position
Length
A
70 mm (2.76 in.)
B, C, D and E
33 mm (1.30 in.)
Use a new bolt in position A.
Finger-tighten the bolts in positions A and E and install the bracket.
Tighten the bolts in positions A and E.
- Torque:
- 36 N*m{ 267 kgf*cm , 27 ft.*lbf }
Tighten the bolts in positions B, C and D.
- Torque:
- 36 N*m{ 267 kgf*cm , 27 ft.*lbf }
| 29. INSTALL COOLER COMPRESSOR ASSEMBLY |
Install the cooler compressor assembly with the 4 bolts.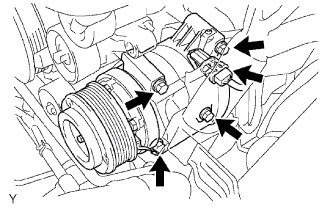
- Torque:
- 24.5 N*m{ 250 kgf*cm , 18 ft.*lbf }
Connect the cooler compressor assembly connector.
Install the suction hose sub-assembly with the bolt.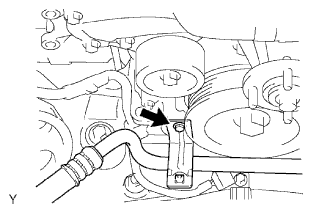
- Torque:
- 7.8 N*m{ 80 kgf*cm , 69 in.*lbf }
| 30. INSTALL GENERATOR ASSEMBLY |
| 31. INSTALL FAN |
| 32. INSTALL FRONT DIFFERENTIAL CARRIER ASSEMBLY |
| 33. INSTALL POWER STEERING LINK ASSEMBLY |
| 34. INSTALL BATTERY |
| 35. ADD ENGINE COOLANT |
Pour coolant into the radiator until it overflows.
- Capacity:
Transmission
Capacity
Manual Transmission
9.4 liters (9.9 Us qts, 8.3 Imp. qts)
Automatic Transmission
9.8 liters (10.4 Us qts, 8.6 Imp. qts)
- NOTICE:
- Do not substitute plain water for engine coolant.
- HINT:
- Use of improper coolants may damage the engine cooling system.
- Use only TOYOTA SLLC or similar high quality ethylene glycol based non-silicate, non-amine, non-nitrite, and non-borate coolant with long-life hybrid organic acid technology (coolant with long-life hybrid organic acid technology consists of a combination of low phosphates and organic acids).
- New TOYOTA vehicles are filled with TOYOTA SLLC (color is pink, premixed ethylene glycol concentration is approximately 50 % and freezing temperature is -35°C (-31°F)). When replacing the coolant, TOYOTA SLLC is recommended.
- Use of improper coolants may damage the engine cooling system.
Check the coolant level inside the radiator by squeezing the inlet and outlet radiator hoses several times by hand. If the coolant level goes down, add coolant.
Install the radiator cap securely.
Slowly pour coolant into the radiator reservoir until it reaches the FULL line.
Warm up the engine until the cooling fan operates.
Set the air conditioning as follows while warming up the engine.
Item
Condition
Fan Speed
Any setting except OFF
Temperature
Toward WARM
Air Conditioning Switch
OFF
Maintain the engine speed at 2,000 to 2,500 rpm and warm up the engine until the cooling fan operates.
- NOTICE:
- Make sure that the radiator reservoir still has some coolant in it.
- Pay attention to the needle of the water temperature meter. Make sure that the needle does not show an abnormally high temperature.
- If there is not enough coolant, the engine may burn out or overheat.
- Make sure that the radiator reservoir still has some coolant in it.
Squeeze the inlet and outlet radiator hoses several times by hand while warming up the engine to bleed the air.
- CAUTION:
-
When pressing the radiator hoses:
- Wear protective gloves.
- Be careful as the radiator hoses are hot.
- Keep your hands away from the fan.
- Wear protective gloves.
Stop the engine and wait until the coolant cools down.
Remove the radiator cap and check the coolant level inside the radiator.
If the coolant level is below the full level, repeat the operation until the coolant level remains at the full level.
Check the coolant level inside the radiator reservoir tank again. If it is below the full level, add coolant.
| 36. ADD ENGINE OIL |
Add fresh engine oil and install the oil filler cap.
- Engine Oil:
Oil Grade
Oil Viscosity (SAE)
ILSAC multigrade engine oil
- 5 W-30
- 10 W-30
- 5 W-30
- Oil Capacity:
Item
Specification
With oil filter change
5.2 liters (5.5 US qts, 4.6 lmp. qts)
Without oil filter change
4.9 liters (5.2 US qts, 4.3 lmp. qts)
Dry fill
6.0 liters (6.3 US qts, 5.3 lmp. qts)
Reinstall the oil filler cap.
| 37. ADD POWER STEERING FLUID |
| 38. BLEED POWER STEERING FLUID |
Check the fluid level.
Jack up the front of the vehicle and support it with stands.
Turn the steering wheel.
With the engine stopped, turn the wheel slowly from lock to lock several times.
Lower the vehicle.
Start the engine.
Run the engine at idle for a few minutes.
Turn the steering wheel.
With the engine idling, turn the wheel to the left or right full lock position and keep it there for 2 to 3 seconds. Then turn the wheel to the opposite full lock position and keep it there for 2 to 3 seconds (step A).
Repeat step A several times.
Stop the engine.
Check for foaming or emulsification.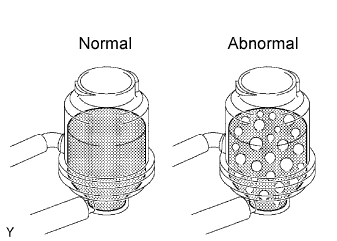
Especially, if the system has to be bled twice because of foaming or emulsification, check for fluid leakage in the system.
Check the fluid level.
| 39. ADD DIFFERENTIAL OIL |
| 40. INSPECT DIFFERENTIAL OIL |
 |
Stop the vehicle on a level surface.
Remove the differential filler plug and gasket.
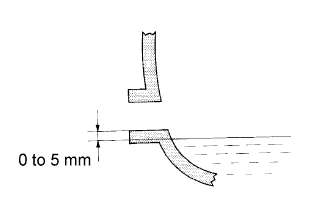
Check that the oil level is between 0 to 5 mm (0 to 0.20 in.) from the bottom lip of the differential filler plug hole.
- NOTICE:
- After changing the oil seal, drive the vehicle and then check the oil level again.
- After changing the oil seal, drive the vehicle and then check the oil level again.
- Too much or too little oil will lead to differential problems.
- Too much or too little oil will lead to differential problems.
- HINT:
- If necessary, fill the differential carrier assembly with hypoid gear oil.
- Front Differential:
Item
Temperature
Oil grade
Viscosity
Capacity
w/ A.D.D.
-
Hypoid gear oil API GL-4 or GL-5
SAE 75W-90
1.45 to 1.55 liters
(1.53 to 1.63 US qts, 1.27 to 1.36 Imp. qts.)
w/o A.D.D.
Above -18 °C (-0.4 °F)
SAE 90
1.35 to 1.45 liters
(1.42 to 1.53 US qts, 1.18 to 1.27 Imp. qts.)
Below -18 °C (-0.4 °F)
SAE 85W-90
- Rear Differential:
Item
Temperature
Oil grade
Viscosity
Capacity
w/o Differential lock
Above -18 °C (-0.4 °F)
Hypoid gear oil API GL-5
SAE 90
2.95 to 3.05 liters
(3.12 to 3.22 US qts, 2.60 to 2.68 Imp. qts.)
Below -18 °C (-0.4 °F)
SAE 85W-90
w/ Differential lock
Above -18 °C (-0.4 °F)
SAE 90
2.85 to 2.95 liters
(3.01 to 3.12 US qts, 2.51 to 2.60 Imp. qts.)
Below -18 °C (-0.4 °F)
SAE 85W-90
Check for oil leakage when the oil level is low.
Install the differential filler plug with a new gasket.
- Torque:
- Front differential:
- 39 N*m{ 400 kgf*cm , 29 ft.*lbf }
- Rear differential:
- 49 N*m{ 500 kgf*cm , 36 ft.*lbf }
| 41. INSPECT FOR COOLANT LEAK |
Fill the radiator with coolant and attach a radiator cap tester.
Pump it to 177 kPa (1.8 kgf/cm2 25.7 psi), then check for leakage.
| 42. INSPECT FOR ENGINE OIL LEAK |
| 43. INSPECT FOR POWER STEERING FLUID LEAK |
| 44. INSPECT FOR DIFFERENTIAL OIL LEAK |
| 45. INSPECT AND ADJUST FRONT WHEEL ALIGNMENT |