Home › BRAKE › BRAKE CONTROL › VEHICLE STABILITY CONTROL SYSTEMTC and CG Terminal Circuit
Circuit diagnosis · Vehicles built Aug 2011 – Jul 2012
Versions by build date: Jul 2007 – Jul 2008 Aug 2008 – Jul 2009 Aug 2009 – Oct 2010 Nov 2010 – Jul 2011 Aug 2011 – Jul 2012 from Aug 2012
DESCRIPTION
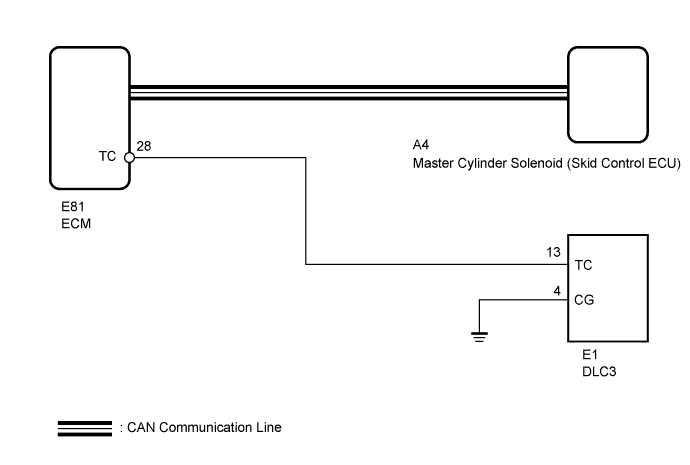
DTC output mode is set by connecting terminals TC and CG of the DLC3. WIRING DIAGRAM
HINT:
When each warning light continues blinking, a ground short in the wiring of terminal TC of the DLC3 or an internal ground short in each ECU is suspected.
INSPECTION PROCEDURE
NOTICE:
When replacing the master cylinder solenoid, perform the zero point calibration (Click here ).
1. INSPECT DLC3
Turn the ignition switch to ON.
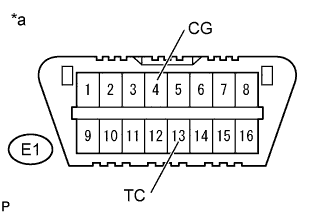
Measure the voltage according to the value(s) in the table below.
Standard Voltage:
Tester Connection
Switch Condition
Specified Condition
E1-13 (TC) - E1-4 (CG)
Ignition switch ON
11 to 14 V
Text in Illustration
*a
Front view of DLC3
NG
OK
2. CHECK CAN COMMUNICATION LINE
Turn the ignition switch off.
Connect the intelligent tester to the DLC3.
Turn the ignition switch to ON.
Turn the tester on.
Select CAN Bus Check from the System Selection Menu screen and follow the prompts on the screen to inspect the CAN bus (Click here ).
OK:
CAN Bus Check indicates no malfunctions in CAN communication.
NG
GO TO CAN COMMUNICATION SYSTEM (HOW TO PROCEED WITH TROUBLESHOOTING) (Click here )
OK
3. CHECK DTC (CAN COMMUNICATION SYSTEM)
Turn the ignition switch off.
Connect the intelligent tester to the DLC3.
Turn the ignition switch to ON.
Turn the tester on.
Check for DTCs (Click here ).
Result
Result
Proceed to
CAN system DTC is not output
A
CAN system DTC is output
B
B
GO TO CAN COMMUNICATION SYSTEM (HOW TO PROCEED WITH TROUBLESHOOTING) (Click here )
A
4. CHECK HARNESS AND CONNECTOR (ECM - DLC3)
Turn the ignition switch off.
Disconnect the E81 ECM connector.
Measure the resistance according to the value(s) in the table below.
Standard Resistance:
Tester Connection
Condition
Specified Condition
E81-28 (TC) - E1-13 (TC)
Always
Below 1 Ω
NG
REPAIR OR REPLACE HARNESS OR CONNECTOR
OK
5. CHECK HARNESS AND CONNECTOR (DLC3 - BODY GROUND)
Measure the resistance according to the value(s) in the table below.
Standard Resistance:
Tester Connection
Condition
Specified Condition
E1-4 (CG) - Body ground
Always
Below 1 Ω
NG
REPAIR OR REPLACE HARNESS OR CONNECTOR
OK
6. INSPECT ECM (DLC3 INPUT)
Using SST, connect terminals 13 (TC) and 4 (CG) of the DLC3.
Check that the malfunction indicator lamp is blinking.
Result
Result
Proceed to
MIL is blinking
A
MIL is not blinking
B
Text in Illustration
*a
Front view of DLC3
B
REPAIR OR REPLACE HARNESS OR CONNECTOR OR REPLACE ECU
A
7. CHECK DTC (CAN COMMUNICATION SYSTEM)
Turn the ignition switch off.
Connect the intelligent tester to the DLC3.
Turn the ignition switch to ON.
Turn the tester on.
Check for DTCs (Click here ).
Result
Result
Proceed to
CAN system DTC is not output
A
CAN system DTC is output
B
B
GO TO CAN COMMUNICATION SYSTEM (HOW TO PROCEED WITH TROUBLESHOOTING) (Click here )
A