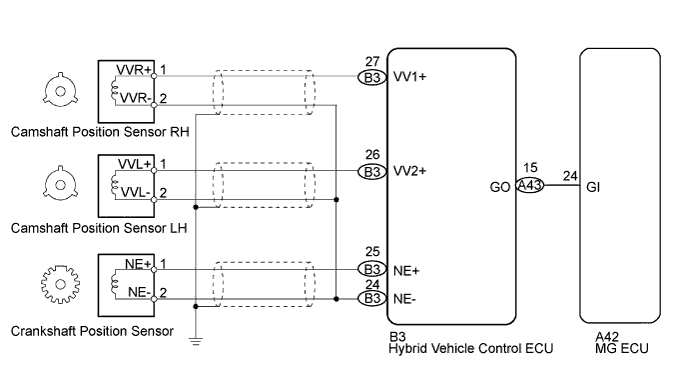
DTC P0343-747 Camshaft Position Sensor "A" Circuit High Input |
| DTC No. | INF Code | DTC Detection Condition | Trouble Area |
| P0343 | 747 | GI signal is not input for 1 sec. or more while the engine is running. |
|
| 1.CHECK DTC OUTPUT (ENGINE CONTROL SYSTEM) |
Connect the Techstream to the DLC3.
Turn the power switch on (IG).
Select the following menu items: Powertrain / Engine and ECT/ Trouble Codes.
Check if DTCs are output.
| Result | Proceed to |
| Engine control system DTCs are not output. | A |
| Engine control system DTCs are output. | B |
|
| ||||
| A | |
 |
| 2.CHECK DTC OUTPUT (HV) |
Select the following menu items: Powertrain / Hybrid Control / Trouble Codes.
Check if DTCs are output.
| Result | Proceed to |
| None of the following DTCs are not output. | A |
| Any of the following DTCs are output. | B |
| DTC No. | Relevant Diagnosis |
| P0A1A-791, 792, 793 | Generator Control Module |
| P0A1B-794, 795, 796 | Drive Motor "A" Control Module |
| P0A3F-243 | Drive Motor "A" Position Sensor Circuit |
| P0A40-500 | Drive Motor "A" Position Sensor Circuit Range / Performance |
| P0A41-245 | Drive Motor "A" Position Sensor Circuit Low |
| P0A4B-253 | Generator Position Sensor Circuit |
| P0A4C-513 | Generator Position Sensor Circuit Range / Performance |
| P0A4D-255 | Generator Position Sensor Circuit Low |
|
| ||||
| A | |
|
| 3.CHECK CONNECTOR CONNECTION CONDITION (HYBRID VEHICLE CONTROL ECU CONNECTOR) |
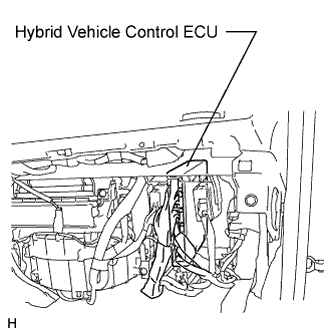 |
Check the connections of all hybrid vehicle control ECU connectors.
|
| ||||
| OK | |
|
| 4.CHECK CONNECTOR CONNECTION CONDITION (MG ECU CONNECTOR) |
Turn the power switch off.
Remove the service plug grip (Click here).
Remove the inverter cover (Click here).
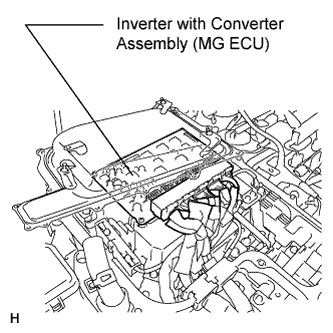 |
Check the connections of the MG ECU connectors.
|
| ||||
| OK | |
|
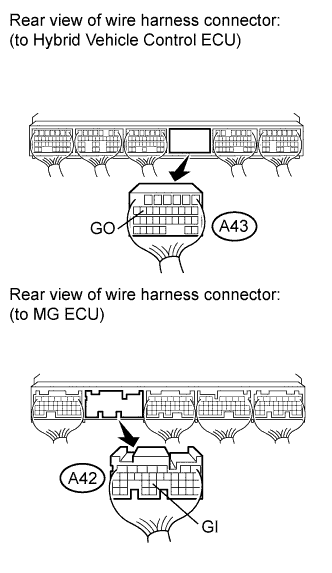
| 5.CHECK HARNESS AND CONNECTOR (HYBRID VEHICLE CONTROL ECU - MG ECU) |
Disconnect connector A43 from the hybrid vehicle control ECU.
Disconnect connector A42 from the MG ECU.
 |
Measure the resistance according to the value(s) in the table below.
| Tester Connection | Switch Condition | Specified Condition |
| A43-15 (GO) - A42-24 (GI) | Power switch off | Below 1 Ω |
| Tester Connection | Switch Condition | Specified Condition |
| A43-15 (GO) or A42-24 (GI) - Body ground or other terminals | Power switch off | 10 kΩ or higher |
|
| ||||
| OK | |
|
| 6.INSPECT MOTOR RESOLVER |
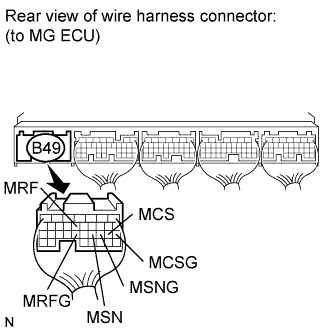 |
Disconnect the B49 connector from the MG ECU.
Turn the power switch on (IG).
Measure the voltage according to the value(s) in the table below.
| Tester Connection | Switch Condition | Specified Condition |
| B49-13 (MRF) - Body ground | Power switch on (IG) | Below 1 V |
| B49-23 (MRFG) - Body ground | Power switch on (IG) | Below 1 V |
| B49-21 (MSN) - Body ground | Power switch on (IG) | Below 1 V |
| B49-20 (MSNG) - Body ground | Power switch on (IG) | Below 1 V |
| B49-19 (MCS) - Body ground | Power switch on (IG) | Below 1 V |
| B49-18 (MCSG) - Body ground | Power switch on (IG) | Below 1 V |
Turn the power switch off.
Measure the resistance according to the value(s) in the table below.
| Tester Connection | Switch Condition | Specified Condition |
| B49-13 (MRF) - B49-23 (MRFG) | Power switch off | 7.65 to 10.2 Ω |
| B49-21 (MSN) - B49-20 (MSNG) | Power switch off | 12.6 to 16.8 Ω |
| B49-19 (MCS) - B49-18 (MCSG) | Power switch off | 12.6 to 16.8 Ω |
| Tester Connection | Switch Condition | Specified Condition |
| B49-13 (MRF) or B49-23 (MRFG) - Body ground and other terminals | Power switch off | 10 kΩ or higher |
| B49-21 (MSN) or B49-20 (MSNG) - Body ground and other terminals | Power switch off | 10 kΩ or higher |
| B49-19 (MCS) or B49-18 (MCSG) - Body ground and other terminals | Power switch off | 10 kΩ or higher |
|
| ||||
| OK | |
|
| 7.INSPECT GENERATOR RESOLVER |
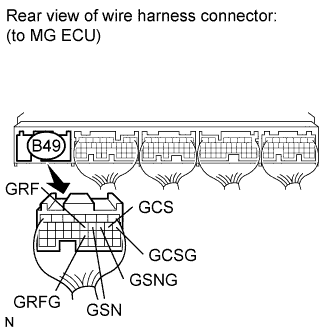 |
Disconnect the B49 connector from the MG ECU.
Turn the power switch on (IG).
Measure the voltage according to the value(s) in the table below.
| Tester Connection | Switch Condition | Specified Condition |
| B49-12 (GRF) - Body ground | Power switch on (IG) | Below 1 V |
| B49-22 (GRFG) - Body ground | Power switch on (IG) | Below 1 V |
| B49-11 (GSN) - Body ground | Power switch on (IG) | Below 1 V |
| B49-10 (GSNG) - Body ground | Power switch on (IG) | Below 1 V |
| B49-9 (GCS) - Body ground | Power switch on (IG) | Below 1 V |
| B49-8 (GCSG) - Body ground | Power switch on (IG) | Below 1 V |
Turn the power switch off.
Measure the resistance according to the value(s) in the table below.
| Tester Connection | Switch Condition | Specified Condition |
| B49-12 (GRF) - B49-22 (GRFG) | Power switch off | 7.65 to 10.2 Ω |
| B49-11 (GSN) - B49-10 (GSNG) | Power switch off | 12.6 to 16.8 Ω |
| B49-9 (GCS) - B49-8 (GCSG) | Power switch off | 12.6 to 16.8 Ω |
| Tester Connection | Switch Condition | Specified Condition |
| B49-12 (GRF) or B49-22 (GRFG) - Body ground and other terminals | Power switch off | 10 kΩ or higher |
| B49-11 (GSN) or B49-10 (GSNG) - Body ground and other terminals | Power switch off | 10 kΩ or higher |
| B49-9 (GCS) or B49-8 (GCSG) - Body ground and other terminals | Power switch off | 10 kΩ or higher |
|
| ||||
| OK | |
|
| 8.CHECK HYBRID VEHICLE CONTROL ECU (CHECK WAVEFORM) |
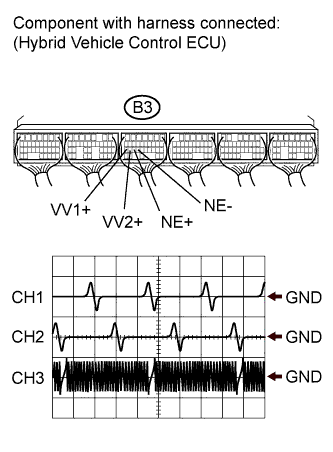 |
Connect an oscilloscope between the hybrid vehicle control ECU terminals specified in the table below, and measure the waveform.
| Item | Condition |
| Terminal | CH1: B3-27 (VV1+) - B3-24 (NE-) CH2: B3-26 (VV2+) - B3-24 (NE-) CH3: B3-25 (NE+) - B3-24 (NE-) |
| Equipment Setting | 2 V/DIV., 20 ms./DIV. |
| Condition | After engine warmed up and idling |
| Result | Proceed to |
| The waveform appears as shown in the illustration. | A |
| The waveform differs from the one shown in the illustration. | B |
|
| ||||
| A | |
|
| 9.CHECK CONNECTOR CONNECTION CONDITION (MOTOR RESOLVER CONNECTOR) |
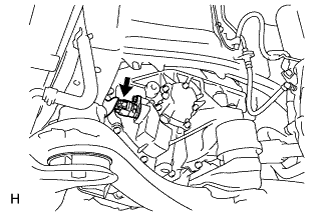 |
Check the connection of the motor resolver connector.
|
| ||||
| OK | |
|
| 10.CHECK CONNECTOR CONNECTION CONDITION (GENERATOR RESOLVER CONNECTOR) |
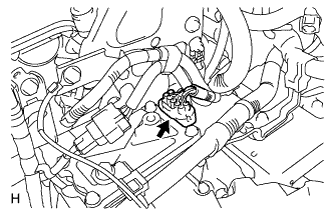 |
Remove the inverter with converter assembly (Click here).
Check the connection of the generator resolver connector.
|
| ||||
| OK | ||
 | ||
| ||
| 11.CHECK CONNECTOR CONNECTION CONDITION (MOTOR RESOLVER CONNECTOR) |
|
Check the connection of the motor resolver connector.
|
| ||||
| OK | |
|
| 12.CHECK MOTOR RESOLVER |
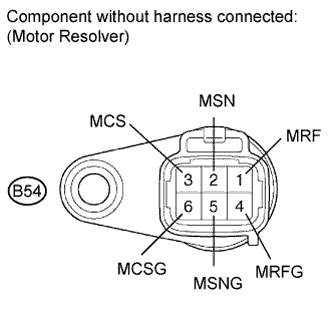 |
Disconnect the B54 motor resolver connector.
Measure the resistance according to the value(s) in the table below.
| Tester Connection | Switch Condition | Specified Condition |
| B54-1 (MRF) - B54-4 (MRFG) | Power switch off | 7.65 to 10.2 Ω |
| B54-2 (MSN) - B54-5 (MSNG) | Power switch off | 12.6 to 16.8 Ω |
| B54-3 (MCS) - B54-6 (MCSG) | Power switch off | 12.6 to 16.8 Ω |
Using a megohmmeter, measure the insulation resistance according to the value(s) in the table below.
| Tester Connection | Switch Condition | Specified Condition |
| B54-1 (MRF) - B54-2 (MSN) | Power switch off | 10 MΩ or higher |
| B54-1 (MRF) - B54-3 (MCS) | Power switch off | 10 MΩ or higher |
| B54-2 (MSN) - B54-3 (MCS) | Power switch off | 10 MΩ or higher |
| B54-4 (MRFG) - B54-5 (MSNG) | Power switch off | 10 MΩ or higher |
| B54-4 (MRFG) - B54-6 (MCSG) | Power switch off | 10 MΩ or higher |
| B54-5 (MSNG) - B54-6 (MCSG) | Power switch off | 10 MΩ or higher |
| Each terminal listed above - Transaxle housing | Power switch off | 10 MΩ or higher |
|
| ||||
| OK | ||
| ||
| ||
| 13.CHECK CONNECTOR CONNECTION CONDITION (GENERATOR RESOLVER CONNECTOR) |
|
Remove the inverter with converter assembly (Click here).
Check the connection of the generator resolver connector.
|
| ||||
| OK | |
|
| 14.CHECK GENERATOR RESOLVER |
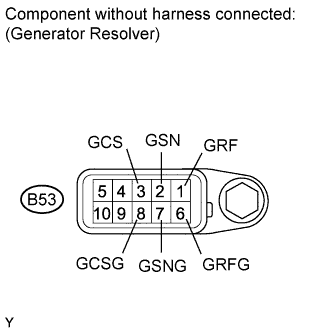 |
Disconnect the B53 generator resolver connector.
Measure the resistance according to the value(s) in the table below.
| Tester Connection | Switch Condition | Specified Condition |
| B53-1 (GRF) - B53-6 (GRFG) | Power switch off | 7.65 to 10.2 Ω |
| B53-2 (GSN) - B53-7 (GSNG) | Power switch off | 12.6 to 16.8 Ω |
| B53-3 (GCS) - B53-8 (GCSG) | Power switch off | 12.6 to 16.8 Ω |
Using a megohmmeter, measure the insulation resistance according to the value(s) in the table below.
| Tester Connection | Switch Condition | Specified Condition |
| B53-1 (GRF) - B53-2 (GSN) | Power switch off | 10 MΩ or higher |
| B53-1 (GRF) - B53-3 (GCS) | Power switch off | 10 MΩ or higher |
| B53-2 (GSN) - B53-3 (GCS) | Power switch off | 10 MΩ or higher |
| B53-6 (GRFG) - B53-7 (GSNG) | Power switch off | 10 MΩ or higher |
| B53-6 (GRFG) - B53-8 (GCSG) | Power switch off | 10 MΩ or higher |
| B53-7 (GSNG) - B53-8 (GCSG) | Power switch off | 10 MΩ or higher |
| Each terminal listed above - Transaxle housing | Power switch off | 10 MΩ or higher |
|
| ||||
| OK | ||
| ||
| ||
| 15.CHECK CRANKSHAFT POSITION SENSOR |
Turn the power switch off.
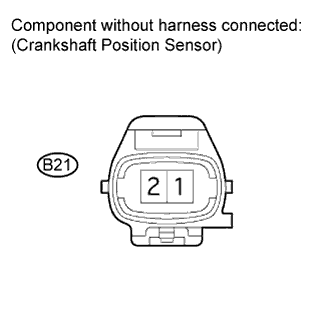 |
Disconnect the connector B21 from the crankshaft position sensor.
Measure the resistance according to the value(s) in the table below.
| Tester Connection | Condition | Specified Condition |
| 1 - 2 | Cold | 1,630 to 2,740 Ω |
| 1 - 2 | Hot | 2,065 to 3,225 Ω |
|
| ||||
| OK | |
|
| 16.CHECK HARNESS AND CONNECTOR (HYBRID VEHICLE CONTROL ECU - CRANKSHAFT POSITION SENSOR) |
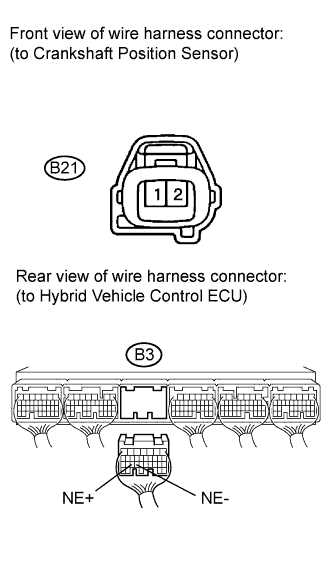 |
Disconnect the connector B3 from the hybrid vehicle control ECU.
Disconnect the connector B21 from the crankshaft position sensor.
| Tester Connection | Switch Condition | Specified Condition |
| B21-1 - B3-25 (NE+) | Power switch off | Below 1 Ω |
| B21-2 - B3-24 (NE-) | Power switch off | Below 1 Ω |
| Tester Connection | Switch Condition | Specified Condition |
| B21-1 or B3-25 (NE+) - Body ground and other terminals | Power switch off | 10 kΩ or more |
| B21-2 or B3-24 (NE-) - Body ground and other terminals | Power switch off | 10 kΩ or more |
|
| ||||
| OK | |
|
| 17.CHECK SENSOR (CRANKSHAFT POSITION SENSOR) |
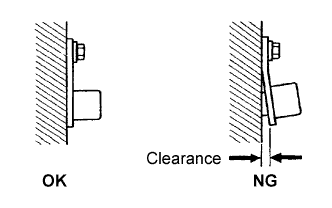 |
Check the crankshaft position sensor installation.
|
| ||||
| OK | |
|
| 18.CHECK CRANKSHAFT TIMING PULLEY (TEETH OF SENSOR PLATE) |
Check the teeth of the sensor plate.
|
| ||||
| OK | ||
| ||
| ||

