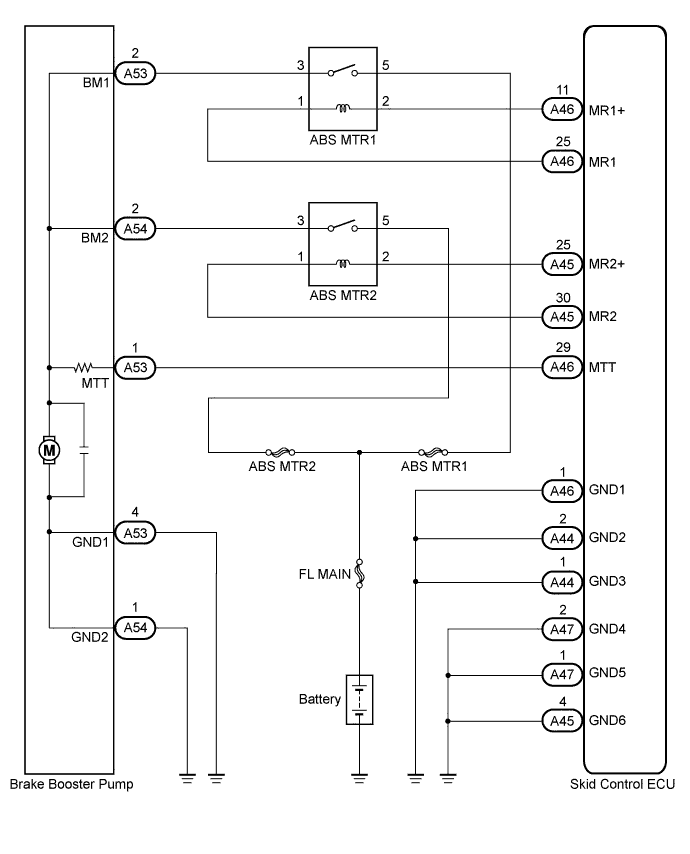
DTC C1252/52 Brake Booster Pump Motor on Time Abnormally Long |
DTC C1253/53 Pump Motor Relay Malfunction |
| DTC Code | INF Code | DTC Detection Condition | Trouble Area |
| C1252/52 | 130 | Motor relay is on for at least 5 minutes. |
|
| C1253/53 | 132 | Motor relay 1 coil is energized for at least 1 second when linear solenoid power source voltage 1 (BS1) is 9.5 V or more and motor relay 1 is off. |
|
| ↑ | 133 | Motor relay 1 coil is not energized for at least 1 second when linear solenoid power source voltage 1 (BS1) is 9.5 V or more and motor relay 1 is on. | ↑ |
| ↑ | 134 | MTT input is 3.5 V or less for at least 1 second when linear solenoid power source voltage 1 (BS1) is 9.5 V or more and motor relay 1 is on. |
|
| ↑ | 136 | Motor relay 2 coil is energized for at least 1 second when linear solenoid power source voltage 2 (BS2) is 9.5 V or more and motor relay 2 is off. |
|
| ↑ | 137 | Motor relay 2 coil is not energized for at least 1 second when linear solenoid power source voltage 2 (BS2) is 9.5 V or more and motor relay 2 is on. | ↑ |
| ↑ | 138 | MTT input is 3.5 V or less for at least 1 second when linear solenoid power source voltage 2 (BS2) is 9.5 V or more and motor relay 2 is on. |
|
| ↑ | 140 | MTT input is 3.5 V or more for at least 2 seconds when motor relay 1 and 2 are off. |
|
| 1.PERFORM ACTIVE TEST USING TECHSTREAM (ABS MOTOR RELAY) |
Connect the Techstream to the DLC3.
Turn the power switch on (IG).
Select the Active Test mode on the Techstream (Click here).
| Tester Display | Test Part | Control Range | Diagnostic Note |
| ECB* Motor Relay | ABS motor relay | Relay ON / OFF | Operation sound of relay (clicking sound) and motor can be heard |
| ECB* Motor Relay2 | ABS motor relay 2 | Relay ON / OFF | Operation sound of relay (clicking sound) and motor can be heard |
Check the operation sound of the ABS motor relay and motor when operating it with the Techstream.
|
| ||||
| OK | |
 |
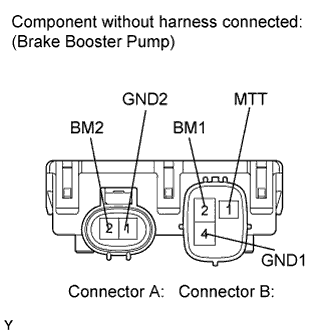
| 2.INSPECT BRAKE BOOSTER PUMP |
 |
Turn the power switch off.
Make sure that there is no looseness at the locking part and the connecting part of the connectors.
Disconnect the brake booster pump connectors.
Measure the resistance according to the value(s) in the table below.
| Tester Connection | Condition | Specified Condition |
| B2 (BM1) - B4 (GND1) | Always | Below 10 Ω |
| A2 (BM2) - B4 (GND1) | Always | Below 10 Ω |
| B2 (BM1) - A2 (BM2) | Always | Below 1 Ω |
| B4 (GND1) - A1 (GND2) | Always | Below 1 Ω |
| B2 (BM1) - B1 (MTT) | Always | 950 to 1050 Ω |
| A2 (BM2) - B1 (MTT) | Always | 950 to 1050 Ω |
|
| ||||
| OK | |
|
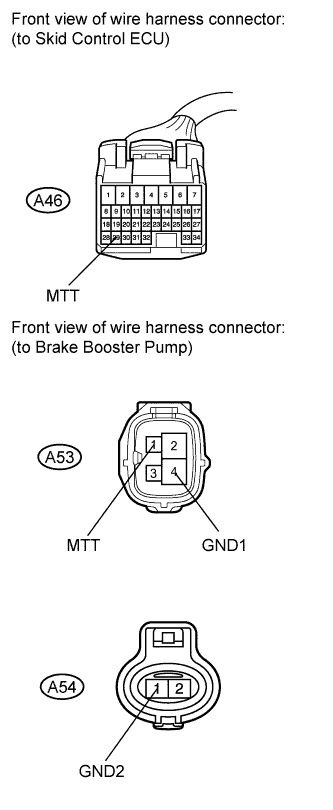
| 3.CHECK HARNESS AND CONNECTOR (SKID CONTROL ECU - BRAKE BOOSTER PUMP) |
 |
Make sure that there is no looseness at the locking part and the connecting part of the connector.
Disconnect the skid control ECU connector.
Measure the resistance according to the value(s) in the table below.
| Tester Connection | Condition | Specified Condition |
| A46-29 (MTT) - A53-1 (MTT) | Always | Below 1 Ω |
| A46-29 (MTT) - Body ground | Always | 10 kΩ or higher |
| A53-4 (GND1) - Body ground | Always | Below 1 Ω |
| A54-1 (GND2) - Body ground | Always | Below 1 Ω |
|
| ||||
| OK | |
|
| 4.READ VALUE USING TECHSTREAM (ACCUMULATOR PRESSURE SENSOR) |
Reconnect the skid control ECU connector and the brake booster pump connectors.
Connect the Techstream to the DLC3.
Turn the power switch on (IG).
Select the Data List mode on the Techstream (Click here).
| Tester Display | Measurement Item/Range | Normal Condition | Diagnostic Note |
| Accumulator Sensor | Accumulator pressure sensor / min.: 0 V, max.: 5 V | Specified value: 3.3 to 4.7 V | - |
Depress the brake pedal 4 or 5 times to operate the pump motor, and check the output value on the Techstream with the motor stopped (not braking).
|
| ||||
| OK | |
|
| 5.RECONFIRM DTC |
Turn the power switch off.
Clear the DTCs (Click here).
Turn the power switch on (IG).
Check if the same DTC is recorded (Click here).
| Result | Proceed to |
| DTCs (C1252/52 and C1253/53) are not output | A |
| DTCs (C1252/52 and/or C1253/53) are output | B |
|
| ||||
| A | ||
 | ||
| ||
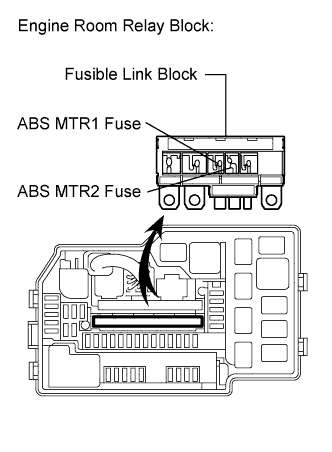
| 6.INSPECT ABS MTR FUSE |
 |
Turn the power switch off.
Remove the fusible link block from the engine room relay block.
Check if the fusible link is melted.
Measure the resistance according to the value(s) in the table below.
| Tester Connection | Condition | Specified Condition |
| ABS MTR1 (50 A) fuse - Body ground | Always | Below 1 Ω |
| ABS MTR2 (50 A) fuse - Body ground | Always | Below 1 Ω |
|
| ||||
| OK | |
|
| 7.INSPECT ABS MOTOR RELAY (ABS MTR1, 2) |
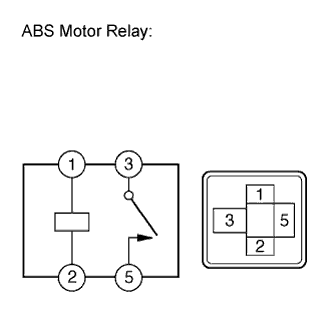 |
Install the fusible link block to the engine room relay block with the bolt.
Remove the ABS MTR1 relay and the ABS MTR2 relay.
Measure the resistance according to the value(s) in the table below.
| Tester Connection | Condition | Specified Condition |
| 3 - 5 | Voltage is not applied between terminals 1 and 2 | 10 kΩ or higher |
| 3 - 5 | Voltage is applied between terminals 1 and 2 | Below 1 Ω |
|
| ||||
| OK | |
|
| 8.INSPECT ENGINE ROOM NO. 2 RELAY BLOCK (POWER SOURCE TERMINAL) |
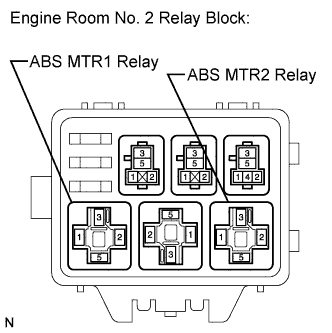 |
Measure the voltage according to the value(s) in the table below.
| Tester Connection | Condition | Specified Condition |
| ABS MTR1 relay terminal 5 - Body ground | Always | 11 to 14 V |
| ABS MTR2 relay terminal 5 - Body ground | Always | 11 to 14 V |
|
| ||||
| OK | |
|
| 9.CHECK HARNESS AND CONNECTOR (BRAKE BOOSTER PUMP - ENGINE ROOM NO. 2 RELAY BLOCK) |
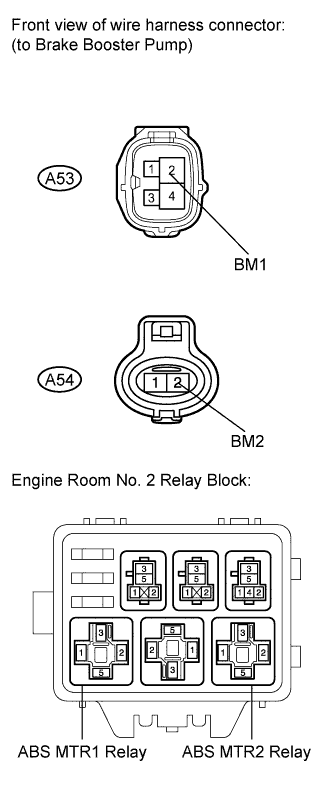 |
Make sure that there is no looseness at the locking part and the connecting part of the connectors.
Disconnect the brake booster pump connectors.
Measure the resistance according to the value(s) in the table below.
| Tester Connection | Condition | Specified Condition |
| A53-2 (BM1) - ABS MTR1 relay terminal 3 | Always | Below 1 Ω |
| A53-2 (BM1) - Body ground | Always | 10 kΩ or higher |
| A54-2 (BM2) - ABS MTR2 relay terminal 3 | Always | Below 1 Ω |
| A54-2 (BM2) - Body ground | Always | 10 kΩ or higher |
|
| ||||
| OK | |
|
| 10.CHECK HARNESS AND CONNECTOR (SKID CONTROL ECU - ENGINE ROOM NO. 2 RELAY BLOCK) |
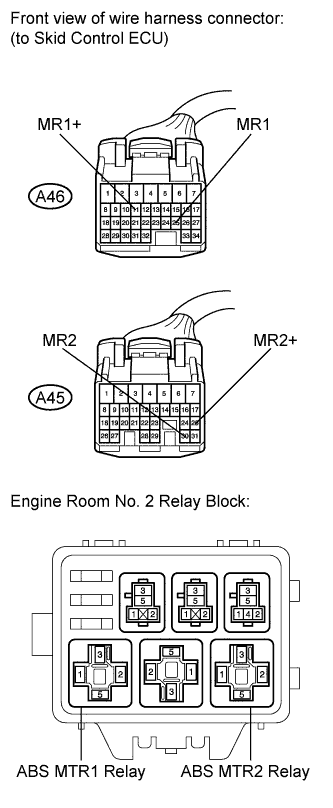 |
Make sure that there is no looseness at the locking part and the connecting part of the connectors.
Disconnect the skid control ECU connectors.
Measure the resistance according to the value(s) in the table below.
| Tester Connection | Condition | Specified Condition |
| A46-11 (MR1+) - ABS MTR1 relay terminal 2 | Always | Below 1 Ω |
| A46-11 (MR1+) - Body ground | Always | 10 kΩ or higher |
| A46-25 (MR1) - ABS MTR1 relay terminal 1 | Always | Below 1 Ω |
| A46-25 (MR1) - Body ground | Always | 10 kΩ or higher |
| A45-25 (MR2+) - ABS MTR2 relay terminal 2 | Always | Below 1 Ω |
| A45-25 (MR2+) - Body ground | Always | 10 kΩ or higher |
| A45-30 (MR2) - ABS MTR2 relay terminal 1 | Always | Below 1 Ω |
| A45-30 (MR2) - Body ground | Always | 10 kΩ or higher |
|
| ||||
| OK | ||
| ||
| ||
| 11.READ VALUE USING TECHSTREAM (PRESSURE SENSOR) |
Select the Data List mode on the Techstream (Click here).
| Tester Display | Measurement Item/Range | Normal Condition | Diagnostic Note |
| Master Cylinder Sensor | Master cylinder pressure sensor 1 reading / min.: 0 V, max.: 5 V | When brake pedal is released: 0.3 to 0.9 V | Reading increases when brake pedal is depressed |
| Master Cylinder Sensor2 | Master cylinder pressure sensor 2 reading / min.: 0 V, max.: 5 V | When brake pedal is released: 0.3 to 0.9 V | Reading increases when brake pedal is depressed |
| FR W/C Sensor | FR wheel cylinder pressure sensor / min.: 0 V, max.: 5 V | When brake pedal is released: 0.3 to 0.9 V | - |
| FL W/C Sensor | FL wheel cylinder pressure sensor / min.: 0 V, max.: 5 V | When brake pedal is released: 0.3 to 0.9 V | - |
| RR W/C Sensor | RR wheel cylinder pressure sensor / min.: 0 V, max.: 5 V | When brake pedal is released: 0.3 to 0.9 V | - |
| RL W/C Sensor | RL wheel cylinder pressure sensor / min.: 0 V, max.: 5 V | When brake pedal is released: 0.3 to 0.9 V | - |
Select the Active Test mode on the Techstream (Click here).
| Tester Display | Test Part | Control Range | Diagnostic Note |
| ECB* Solenoid (SMC1) | Master cut solenoid (SMC1) | Solenoid ON / OFF | Operation sound of solenoid (clicking sound) can be heard |
| ECB* Solenoid (SMC2) | Master cut solenoid (SMC2) | Solenoid ON / OFF | Operation sound of solenoid (clicking sound) can be heard |
| ECB* Solenoid (SLRRL) Value Close | Linear solenoid (SLRRL) valve | Valve close ON / OFF | - |
| ECB* Solenoid (SLRRR) Value Close | Linear solenoid (SLRRR) valve | Valve close ON / OFF | - |
Perform the Active Test of the solenoid using the Techstream.
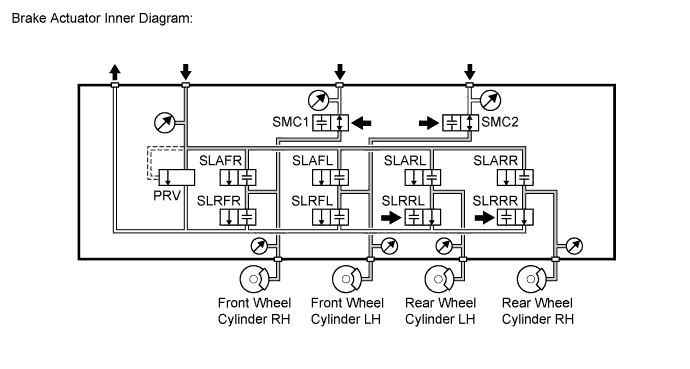
Check that the output value of each wheel cylinder does not increase.
|
| ||||
| OK | ||
| ||
| ||

