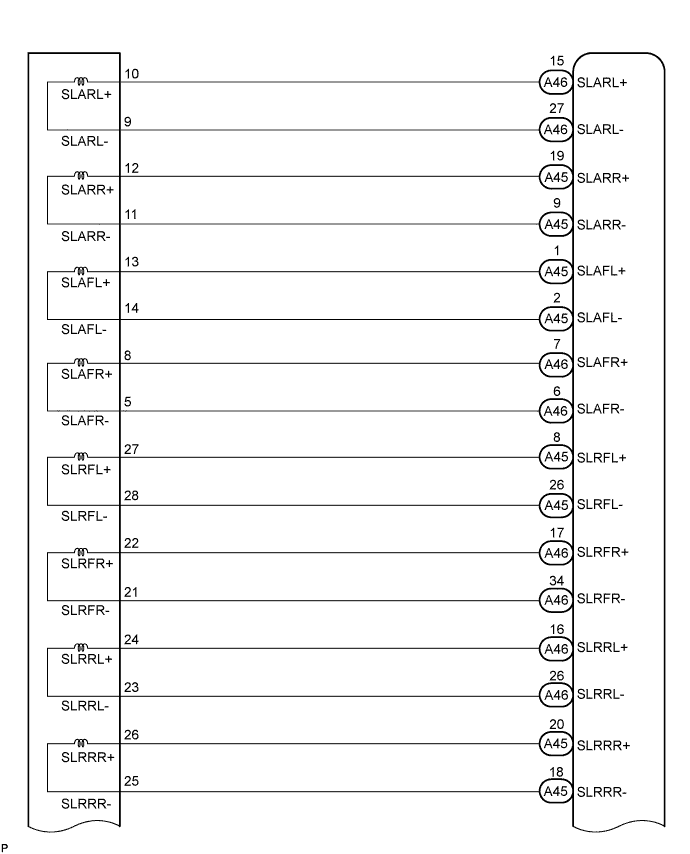
DTC C1315/31 SMC1 Changeover Solenoid Malfunction |
DTC C1316/32 SMC2 Changeover Solenoid Malfunction |
DTC C1352/21 Front Increasing Pressure Solenoid RH Malfunction |
DTC C1353/23 Front Increasing Pressure Solenoid LH Malfunction |
DTC C1354/25 Rear Increasing Pressure Solenoid RH Malfunction |
DTC C1355/27 Rear Increasing Pressure Solenoid LH Malfunction |
DTC C1356/22 Front Decreasing Pressure Solenoid RH Malfunction |
DTC C1357/24 Front Decreasing Pressure Solenoid LH Malfunction |
DTC C1358/26 Rear Decreasing Pressure Solenoid RH Malfunction |
DTC C1359/28 Rear Decreasing Pressure Solenoid LH Malfunction |
| DTC Code | INF Code | DTC Detection Condition | Trouble Area |
| C1315/31 | 61 | Either of the following is detected:
|
|
| ↑ | 62 | Current leaks for 0.05 seconds or more when SMC1 is off. | ↑ |
| ↑ | 63 | Open circuit in SMC1 continues for 0.05 seconds or more. | ↑ |
| ↑ | 64 | Overcurrent in SMC1 continues for 0.05 seconds or more. | ↑ |
| C1316/32 | 66 | Either of the following is detected:
|
|
| ↑ | 67 | Current leaks for 0.05 seconds or more when SMC2 is off. | ↑ |
| ↑ | 68 | Open circuit in SMC2 continues for 0.05 seconds or more. | ↑ |
| ↑ | 69 | Overcurrent in SMC2 continues for 0.05 seconds or more. | ↑ |
| C1352/21 | 11 | Open circuit in SLAFR continues for 0.05 seconds or more when SLAFR is off. |
|
| ↑ | 12 | Open circuit in SLAFR continues for 0.05 seconds or more when SLAFR is on. | ↑ |
| ↑ | 13 | Short to +B or voltage leak in SLAFR continues for 0.05 seconds or more. | ↑ |
| ↑ | 14 | Overcurrent in SLAFR continues for 0.05 seconds or more. | ↑ |
| C1353/23 | 21 | Open circuit in SLAFL continues for 0.05 seconds or more when SLAFL is off. |
|
| ↑ | 22 | Open circuit in SLAFL continues for 0.05 seconds or more when SLAFL is on. | ↑ |
| ↑ | 23 | Short to +B or voltage leak in SLAFL continues for 0.05 seconds or more. | ↑ |
| ↑ | 24 | Overcurrent in SLAFL continues for 0.05 seconds or more. | ↑ |
| C1354/25 | 31 | Open circuit in SLARR continues for 0.05 seconds or more when SLARR is off. |
|
| ↑ | 32 | Open circuit in SLARR continues for 0.05 seconds or more when SLARR is on. | ↑ |
| ↑ | 33 | Short to +B or voltage leak in SLARR continues for 0.05 seconds or more. | ↑ |
| ↑ | 34 | Overcurrent in SLARR continues for 0.05 seconds or more. | ↑ |
| C1355/27 | 41 | Open circuit in SLARL continues for 0.05 seconds or more when SLARL is off. |
|
| ↑ | 42 | Open circuit in SLARL continues for 0.05 seconds or more when SLARL is on. | ↑ |
| ↑ | 43 | Short to +B or voltage leak in SLARL continues for 0.05 seconds or more. | ↑ |
| ↑ | 44 | Overcurrent in SLARL continues for 0.05 seconds or more. | ↑ |
| C1356/22 | 16 | Open circuit in SLRFR continues for 0.05 seconds or more when SLRFR is off. |
|
| ↑ | 17 | Open circuit in SLRFR continues for 0.05 seconds or more when SLRFR is on. | ↑ |
| ↑ | 18 | Short to +B or voltage leak in SLRFR continues for 0.05 seconds or more. | ↑ |
| ↑ | 19 | Overcurrent in SLRFR continues for 0.05 seconds or more. | ↑ |
| C1357/24 | 26 | Open circuit in SLRFL continues for 0.05 seconds or more when SLRFL is off. |
|
| ↑ | 27 | Open circuit in SLRFL continues for 0.05 seconds or more when SLRFL is on. | ↑ |
| ↑ | 28 | Short to +B or voltage leak in SLRFL continues for 0.05 seconds or more. | ↑ |
| ↑ | 29 | Overcurrent in SLRFL continues for 0.05 seconds or more. | ↑ |
| C1358/26 | 36 | Open circuit in SLRRR continues for 0.05 seconds or more when SLRRR is off. |
|
| ↑ | 37 | Open circuit in SLRRR continues for 0.05 seconds or more when SLRRR is on. | ↑ |
| ↑ | 38 | Short to +B or voltage leak in SLRRR continues for 0.05 seconds or more. | ↑ |
| ↑ | 39 | Overcurrent in SLRRR continues for 0.05 seconds or more. | ↑ |
| C1359/28 | 46 | Open circuit in SLRRL continues for 0.05 seconds or more when SLRRL is off. |
|
| ↑ | 47 | Open circuit in SLRRL continues for 0.05 seconds or more when SLRRL is on. | ↑ |
| ↑ | 48 | Short to +B or voltage leak in SLRRL continues for 0.05 seconds or more. | ↑ |
| ↑ | 49 | Overcurrent in SLRRL continues for 0.05 seconds or more. | ↑ |
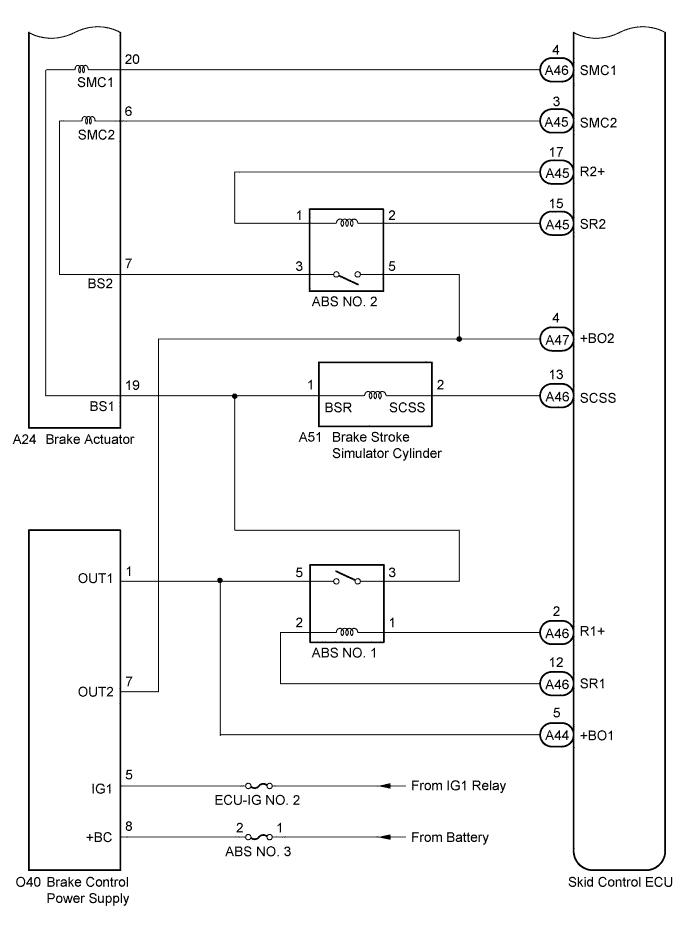
| 1.INSPECT BRAKE ACTUATOR ASSEMBLY |
Make sure that there is no looseness at the locking part and the connecting part of the connector.
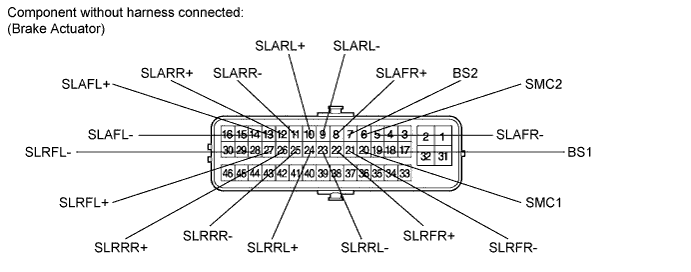
Disconnect the brake actuator connector.
Measure the resistance according to the value(s) in the table below.
| Tester Connection | Condition | Specified Condition |
| 20 (SMC1) - 19 (BS1) | Always | 15.3 to 17.3 Ω |
| 20 (SMC1) - Body ground | Always | 10 kΩ or higher |
| 6 (SMC2) - 7 (BS2) | Always | 15.3 to 17.3 Ω |
| 6 (SMC2) - Body ground | Always | 10 kΩ or higher |
| 8 (SLAFR+) - 5 (SLAFR-) | Always | 3.6 to 4.2 Ω |
| 8 (SLAFR+) - Body ground | Always | 10 kΩ or higher |
| 13 (SLAFL+) - 14 (SLAFL-) | Always | 3.6 to 4.2 Ω |
| 13 (SLAFL+) - Body ground | Always | 10 kΩ or higher |
| 12 (SLARR+) - 11 (SLARR-) | Always | 3.6 to 4.2 Ω |
| 12 (SLARR+) - Body ground | Always | 10 kΩ or higher |
| 10 (SLARL+) - 9 (SLARL-) | Always | 3.6 to 4.2 Ω |
| 10 (SLARL+) - Body ground | Always | 10 kΩ or higher |
| 22 (SLRFR+) - 21 (SLRFR-) | Always | 3.6 to 4.2 Ω |
| 22 (SLRFR+) - Body ground | Always | 10 kΩ or higher |
| 27 (SLRFL+) - 28 (SLRFL-) | Always | 3.6 to 4.2 Ω |
| 27 (SLRFL+) - Body ground | Always | 10 kΩ or higher |
| 26 (SLRRR+) - 25 (SLRRR-) | Always | 4.4 to 5.0 Ω |
| 26 (SLRRR+) - Body ground | Always | 10 kΩ or higher |
| 24 (SLRRL+) - 23 (SLRRL-) | Always | 4.4 to 5.0 Ω |
| 24 (SLRRL+) - Body ground | Always | 10 kΩ or higher |
|
| ||||
| OK | |
 |
| 2.INSPECT SKID CONTROL ECU |
Reconnect the brake actuator connector.
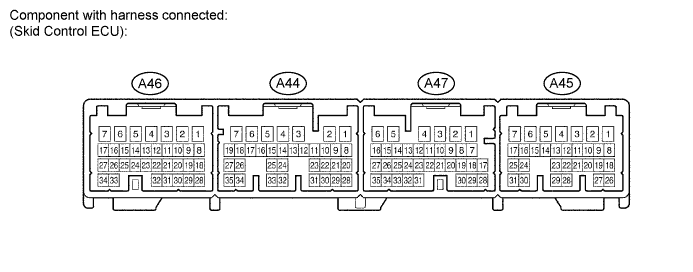
Turn the power switch on (IG).
Measure the voltage according to the value(s) in the table below.
| Tester Connection | Condition | Specified Condition |
| A46-4 (SMC1) - Body ground | Brake pedal released | 11 to 14 V |
| A45-3 (SMC2) - Body ground | Brake pedal released | 11 to 14 V |
| A46-7 (SLAFR+) - Body ground | Brake pedal released | Pulse generation (see waveform 1) (Click here) |
| A46-6 (SLAFR-) - Body ground | Brake pedal released | Pulse generation (see waveform 1) (Click here) |
| A45-1 (SLAFL+) - Body ground | Brake pedal released | Pulse generation (see waveform 1) (Click here) |
| A45-2 (SLAFL-) - Body ground | Brake pedal released | Pulse generation (see waveform 1) (Click here) |
| A45-19 (SLARR+) - Body ground | Brake pedal released | Pulse generation (see waveform 1) (Click here) |
| A45-9 (SLARR-) - Body ground | Brake pedal released | Pulse generation (see waveform 1) (Click here) |
| A46-15 (SLARL+) - Body ground | Brake pedal released | Pulse generation (see waveform 1) (Click here) |
| A46-27 (SLARL-) - Body ground | Brake pedal released | Pulse generation (see waveform 1) (Click here) |
| A46-17 (SLRFR+) - Body ground | Brake pedal released | Below 1.5 V |
| A46-34 (SLRFR-) - Body ground | Brake pedal released | Below 1.5 V |
| A45-8 (SLRFL+) - Body ground | Brake pedal released | Below 1.5 V |
| A45-26 (SLRFL-) - Body ground | Brake pedal released | Below 1.5 V |
| A45-20 (SLRRR+) - Body ground | Brake pedal released | Below 1.5 V |
| A45-18 (SLRRR-) - Body ground | Brake pedal released | Below 1.5 V |
| A46-16 (SLRRL+) - Body ground | Brake pedal released | Below 1.5 V |
| A46-26 (SLRRL-) - Body ground | Brake pedal released | Below 1.5 V |
|
| ||||
| OK | |
|
| 3.CHECK HARNESS AND CONNECTOR (SKID CONTROL ECU - BRAKE ACTUATOR) |
Turn the power switch off.
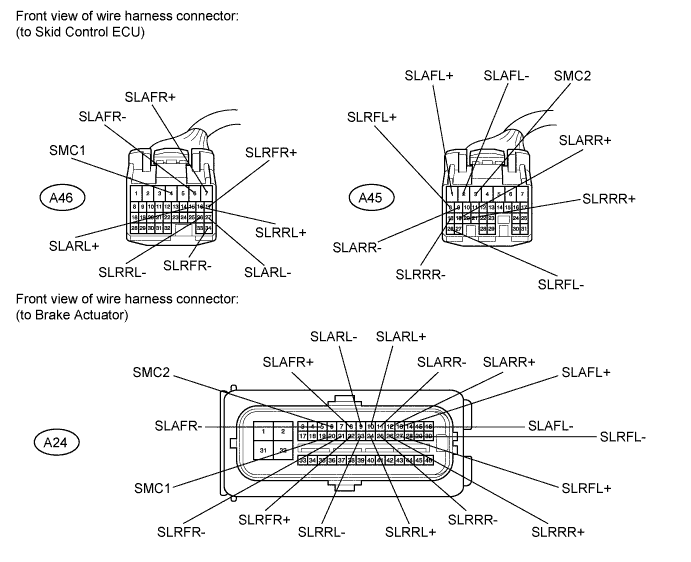
Make sure that there is no looseness at the locking part and the connecting part of the connectors.
Disconnect the skid control ECU connectors and the brake actuator connector.
Measure the resistance according to the value(s) in the table below.
| Tester Connection | Condition | Specified Condition |
| A46-4 (SMC1) - A24-20 (SMC1) | Always | Below 1 Ω |
| A46-4 (SMC1) - Body ground | Always | 10 kΩ or higher |
| A45-3 (SMC2) - A24-6 (SMC2) | Always | Below 1 Ω |
| A45-3 (SMC2) - Body ground | Always | 10 kΩ or higher |
| A46-7 (SLAFR+) - A24-8 (SLAFR+) | Always | Below 1 Ω |
| A46-7 (SLAFR+) - Body ground | Always | 10 kΩ or higher |
| A46-6 (SLAFR-) - A24-5 (SLAFR-) | Always | Below 1 Ω |
| A46-6 (SLAFR-) - Body ground | Always | 10 kΩ or higher |
| A45-1 (SLAFL+) - A24-13 (SLAFL+) | Always | Below 1 Ω |
| A45-1 (SLAFL+) - Body ground | Always | 10 kΩ or higher |
| A45-2 (SLAFL-) - A24-14 (SLAFL-) | Always | Below 1 Ω |
| A45-2 (SLAFL-) - Body ground | Always | 10 kΩ or higher |
| A45-19 (SLARR+) - A24-12 (SLARR+) | Always | Below 1 Ω |
| A45-19 (SLARR+) - Body ground | Always | 10 kΩ or higher |
| A45-9 (SLARR-) - A24-11 (SLARR-) | Always | Below 1 Ω |
| A45-9 (SLARR-) - Body ground | Always | 10 kΩ or higher |
| A46-15 (SLARL+) - A24-10 (SLARL+) | Always | Below 1 Ω |
| A46-15 (SLARL+) - Body ground | Always | 10 kΩ or higher |
| A46-27 (SLARL-) - A24-9 (SLARL-) | Always | Below 1 Ω |
| A46-27 (SLARL-) - Body ground | Always | 10 kΩ or higher |
| A46-17 (SLRFR+) - A24-22 (SLRFR+) | Always | Below 1 Ω |
| A46-17 (SLRFR+) - Body ground | Always | 10 kΩ or higher |
| A46-34 (SLRFR-) - A24-21 (SLRFR-) | Always | Below 1 Ω |
| A46-34 (SLRFR-) - Body ground | Always | 10 kΩ or higher |
| A45-8 (SLRFL+) - A24-27 (SLRFL+) | Always | Below 1 Ω |
| A45-8 (SLRFL+) - Body ground | Always | 10 kΩ or higher |
| A45-26 (SLRFL-) - A24-28 (SLRFL-) | Always | Below 1 Ω |
| A45-26 (SLRFL-) - Body ground | Always | 10 kΩ or higher |
| A45-20 (SLRRR+) - A24-26 (SLRRR+) | Always | Below 1 Ω |
| A45-20 (SLRRR+) - Body ground | Always | 10 kΩ or higher |
| A45-18 (SLRRR-) - A24-25 (SLRRR-) | Always | Below 1 Ω |
| A45-18 (SLRRR-) - Body ground | Always | 10 kΩ or higher |
| A46-16 (SLRRL+) - A24-24 (SLRRL+) | Always | Below 1 Ω |
| A46-16 (SLRRL+) - Body ground | Always | 10 kΩ or higher |
| A46-26 (SLRRL-) - A24-23 (SLRRL-) | Always | Below 1 Ω |
| A46-26 (SLRRL-) - Body ground | Always | 10 kΩ or higher |
|
| ||||
| OK | |
|
| 4.RECONFIRM DTC |
Reconnect the skid control ECU connectors and the brake actuator connector.
Clear the DTCs (Click here).
Turn the power switch on (READY).
Check if the same DTC is recorded (Click here).
| Result | Proceed to |
| DTCs (C1315/31, C1316/32, C1352/21, C1353/23, C1354/25, C1355/27, C1356/22, C1357/24, C1358/26 and C1359/28) are not output | A |
| DTCs (C1315/31, C1316/32, C1352/21, C1353/23, C1354/25, C1355/27, C1356/22, C1357/24, C1358/26 and/or C1359/28) are output | B |
|
| ||||
| A | ||
 | ||
| ||
