1AR-FE INTAKE / EXHAUST INTAKE MANIFOLD REMOVAL
PROCEDURE

 1. PRECAUTION
- NOTICE:
-
After turning the ignition switch off, waiting time may be required before disconnecting the cable from the negative (-) battery terminal. Therefore, make sure to read the disconnecting the cable from the negative (-) battery terminal notice before proceeding with work.
-
Click hereGeneral>INTRODUCTION>REPAIR INSTRUCTION>PRECAUTION
2. DISCHARGE FUEL SYSTEM PRESSURE
3.DISCONNECT CABLE FROM NEGATIVE BATTERY TERMINAL
- NOTICE:
-
When disconnecting the cable, some systems need to be initialized after the cable is reconnected.
-
Click hereGeneral>INTRODUCTION>REPAIR INSTRUCTION>INITIALIZATION
4.REMOVE WINDSHIELD WIPER MOTOR AND LINK ASSEMBLY
55701J
5.REMOVE OUTER COWL TOP PANEL SUB-ASSEMBLY
22030
6.REMOVE THROTTLE BODY WITH MOTOR ASSEMBLY
17650
7.REMOVE VACUUM SWITCHING VALVE ASSEMBLY (for ACIS)
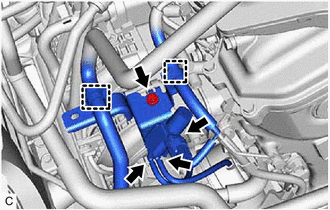
Disconnect the union to vacuum tube hose from the vacuum hose clamp.
Disengage the wire harness clamp.
Disconnect the 2 vacuum hoses.
Disconnect the vacuum switching valve assembly (for ACIS) connector.
Remove the bolt and vacuum switching valve assembly (for ACIS) from the intake manifold.
12262
8.DISCONNECT NO. 2 VENTILATION HOSE
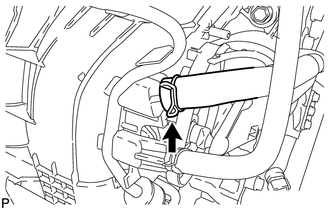
Slide the clip and disconnect the No. 2 ventilation hose from the intake manifold.
44774
9.DISCONNECT UNION TO VACUUM TUBE HOSE
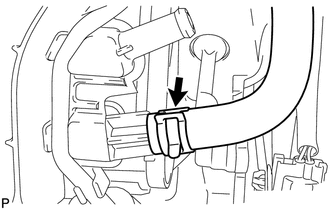
Slide the clip and disconnect the union to vacuum tube hose from the intake manifold.
23901
10.DISCONNECT FUEL TUBE SUB-ASSEMBLY
82121
11.DISCONNECT ENGINE WIRE
23814B
12.REMOVE FUEL DELIVERY PIPE
17111
13.REMOVE INTAKE MANIFOLD
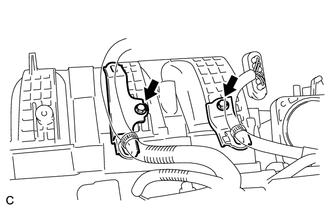
Remove the 2 bolts and 2 wire harness clamp brackets from the intake manifold.
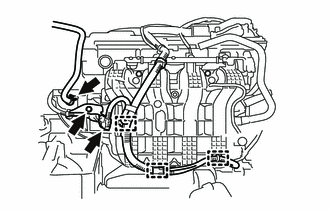
Disconnect the fuel vapor feed hose from the intake manifold.
Disengage the 3 wire harness clamps.
Disconnect the sensor wire connector.
Remove the bolt and wire harness clamp bracket from the intake manifold.
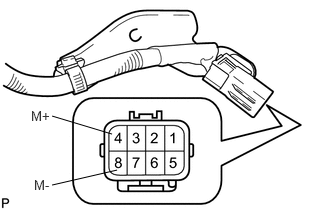
Apply positive (+) battery voltage to terminal 8 (M-) and negative (-) battery voltage to terminal 4 (M+) of the sensor wire connector to close the 4 tumble control valves (TCV).
- NOTICE:
- ·
If this procedure is not performed, the 4 tumble control valves (TCV) may be damaged when the intake manifold is removed.
·Apply battery voltage for 1 to 3 seconds.
·If battery voltage is applied for more than 3 seconds, the intake air control valve actuator (for TCV) may be damaged.
·Do not allow the lead wires to contact the other terminals.
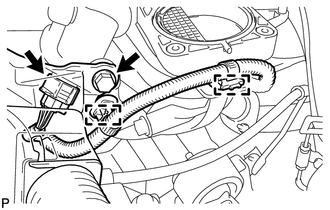
Remove the bolt and disconnect the wire harness.
Disengage the 2 wire harness clamps.
Disconnect the intake air control valve actuator (for TCV) connector.
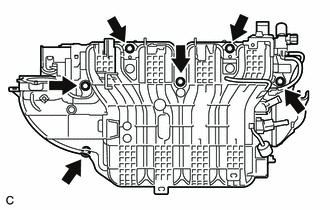
Remove the 6 bolts and intake manifold.
- NOTICE:
-
The 4 tumble control valves (TCV) may be damaged if they are not closed before removing the intake manifold.
- HINT:
-
Connect the battery to the terminals of the intake air control valve actuator (for TCV) to operate the motor and close the 4 tumble control valves (TCV).
-
Click hereEngine / Hybrid System>1AR-FE INTAKE / EXHAUST>INTAKE SYSTEM>ON-VEHICLE INSPECTION
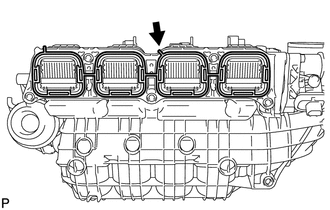
Remove the intake manifold gasket from the intake manifold.
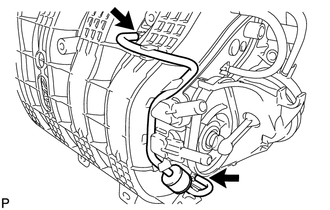
Disconnect the 2 vacuum hoses from the intake manifold and remove the No. 1 check valve.
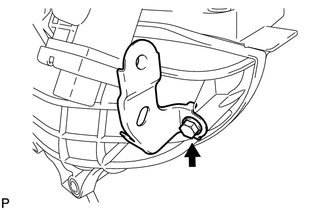
Remove the bolt and wire harness clamp bracket from the intake manifold.