BRAKE SYSTEM (OTHER) BRAKE BOOSTER(for RHD) INSTALLATION
PROCEDURE

 44785
1.INSTALL BRAKE BOOSTER GASKET
Install a new brake booster gasket to the brake booster assembly.
44610
2.INSTALL BRAKE BOOSTER ASSEMBLY
Temporarily install the brake booster assembly to the vehicle body.
Temporarily install the lock nut and brake master cylinder push rod clevis to the brake booster assembly.
- NOTICE:
-
Fully tighten the lock nut when adjusting the brake pedal height.
Install the 4 nuts to secure the brake booster assembly.
- Torque:
- 12.7 N*m (130 kgf*cm, 9 ft.*lbf)
47264A
3.INSTALL PUSH ROD PIN
47101A
4.INSTALL BRAKE PEDAL RETURN SPRING
11201
5.INSTALL CYLINDER HEAD COVER SUB-ASSEMBLY
19500
6.INSTALL IGNITION COIL ASSEMBLY
Install the 3 ignition coil assemblies with the 3 bolts.
- Torque:
- 10 N*m (102 kgf*cm, 7 ft.*lbf)
82121
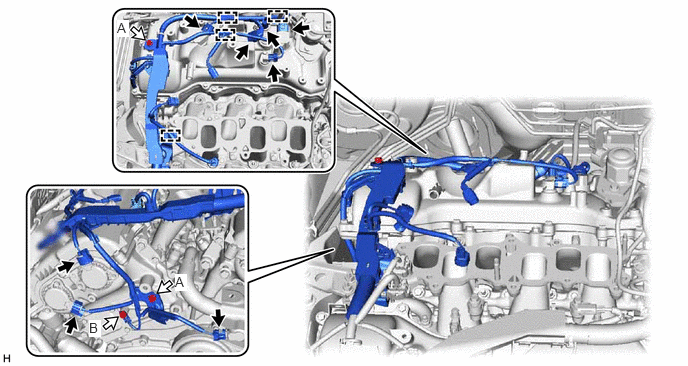
7.INSTALL ENGINE WIRE
Install the engine wire with the 2 bolts (A).

|
Connector | 
|
Bolt |
Install the bolt (B).
- Torque:
- 8.5 N*m (87 kgf*cm, 75 in.*lbf)
Engage the 4 clamps and connect the 8 connectors.
12262
8.CONNECT NO. 2 VENTILATION HOSE
Connect the No. 2 ventilation hose to the cylinder head cover sub-assembly and slide the clip to secure it.
9.INSTALL BRAKE LINE
Install the front No. 6 brake tube and front No. 7 brake tube, and engage the 3 clamps to secure the 2 brake lines.
- NOTICE:
- ·
Do not damage the 3 clamps.
·Do not kink or damage the brake lines.
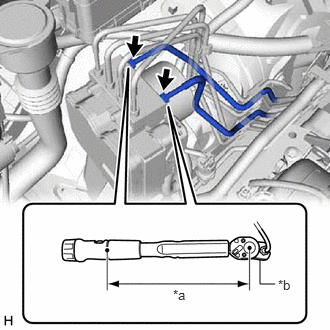
| *a | Torque Wrench Fulcrum Length |
| *b | Union Nut Wrench |
Using a union nut wrench, connect the No. 6 brake tube and front No. 7 brake tube to the brake actuator assembly.
- Torque:
- Specified tightening torque : 19.5 N*m (199 kgf*cm, 14 ft.*lbf)
- NOTICE:
- ·
Do not kink or damage the brake lines.
·Do not allow the brake lines to twist or interfere with other parts or the vehicle body during tightening.
·Do not allow any foreign matter such as dirt or dust to enter the brake lines from the connecting parts.
- HINT:
- ·
Calculate the torque wrench reading when changing the fulcrum length of the torque wrench.
Click hereGeneral>INTRODUCTION>REPAIR INSTRUCTION>PRECAUTION
·When using a union nut wrench (fulcrum length of 20 mm (0.787 in.)) + torque wrench (fulcrum length of 162 mm (6.38 in.)):
17.36 N*m (177 kgf*cm, 13 ft.*lbf)
88704
10.CONNECT SUCTION HOSE SUB-ASSEMBLY
Remove the vinyl tape from the suction hose sub-assembly.
Sufficiently apply compressor oil to 2 new O-rings and the fitting surface of the suction hose sub-assembly.
- Compressor Oil:
ND-OIL 8 or equivalent
Install the 2 O-rings to the suction hose sub-assembly.
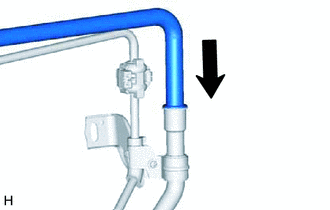
Connect the suction hose sub-assembly to the No. 1 air conditioning accessory assembly.
- NOTICE:
-
Do not deform the refrigerant lines.
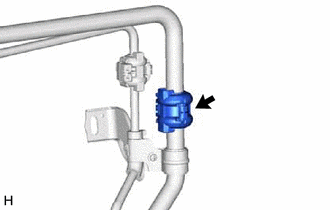
Install the piping clamp to the suction hose sub-assembly.
Click hereVehicle Interior>HEATING / AIR CONDITIONING>REFRIGERANT LINE>INSTALLATION
11.INSTALL AIR CONDITIONER TUBE AND ACCESSORY ASSEMBLY
Remove the vinyl tape from the air conditioner tube and accessory assembly.
Sufficiently apply compressor oil to a new O-ring and the fitting surface of the air conditioner tube and accessory assembly.
- Compressor Oil:
ND-OIL 8 or equivalent
Install the O-ring to the air conditioner tube and accessory assembly.
Insert the air conditioner tube and accessory assembly to the air conditioning unit assembly.
Install the air conditioner tube and accessory assembly with the nut.
- Torque:
- 9.8 N*m (100 kgf*cm, 87 in.*lbf)
- NOTICE:
-
Do not deform the refrigerant lines.
Install the air conditioner tube and accessory assembly with the bolt.
- Torque:
- 9.8 N*m (100 kgf*cm, 87 in.*lbf)
- NOTICE:
-
Do not deform the refrigerant lines.
Engage the clamp to install the air conditioner tube and accessory assembly to the brake actuator assembly.
- NOTICE:
- ·
Do not deform the refrigerant lines.
·Do not damage the clamp.
Engage the clamp to install the air conditioner tube and accessory assembly.
- NOTICE:
- ·
Do not deform the refrigerant lines.
·Do not damage the clamp.
88704
12.INSTALL SUCTION HOSE SUB-ASSEMBLY
Remove the vinyl tape from the suction hose sub-assembly.
Sufficiently apply compressor oil to a new O-ring and the fitting surface of the suction hose sub-assembly.
- Compressor Oil:
ND-OIL 8 or equivalent
Install the O-ring to the suction hose sub-assembly.
Insert the suction hose sub-assembly to the air conditioning unit assembly.
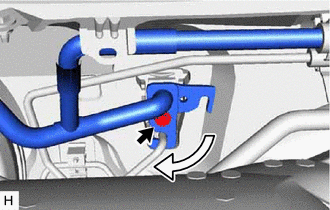
Rotate the hook connector as shown in the illustration.
Insert the tube joint into the fitting hole securely and install the bolt.
- Torque:
- 9.8 N*m (100 kgf*cm, 87 in.*lbf)
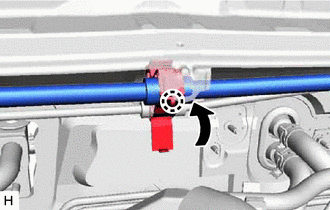
Install the suction hose sub-assembly to the piping clamp.
- NOTICE:
- ·
Do not deform the refrigerant lines.
·Do not damage the clamp.
Engage the claw to lock the piping clamp.
Install the suction hose sub-assembly to the suction hose clamp, and engage the claw to secure it.
- NOTICE:
- ·
Do not deform the refrigerant lines.
·Do not damage the clamp.
Engage the clamp to install the suction hose sub-assembly to the brake actuator assembly.
- NOTICE:
- ·
Do not deform the refrigerant lines.
·Do not damage the clamp.
Engage the clamp to install the suction hose sub-assembly.
- NOTICE:
- ·
Do not deform the refrigerant lines.
·Do not damage the clamp.
12313
13.INSTALL ENGINE MOVING CONTROL ROD BRACKET
12327A
14.INSTALL NO. 2 ENGINE MOUNTING STAY RH
44773F
15.CONNECT UNION TO CHECK VALVE HOSE
Connect the union to check valve hose to the brake booster assembly, and slide the clip to secure it.
47233
16.INSTALL RESERVOIR BRACKET
Install the reservoir bracket with the 2 nuts.
- Torque:
- 19 N*m (194 kgf*cm, 14 ft.*lbf)
Engage the clamp to install the engine room main wire.
47220D
17.INSTALL BRAKE MASTER CYLINDER RESERVOIR ASSEMBLY
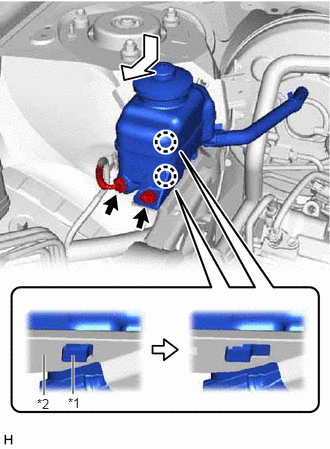
| *1 | Brake Master Cylinder Reservoir Assembly |
| *2 | Reservoir Bracket |
Move the brake master cylinder reservoir assembly as shown in the illustration to engage the 2 claws.
Connect the reservoir level switch connector and install the bolt.
- Torque:
- 9.0 N*m (92 kgf*cm, 80 in.*lbf)
82111
18.INSTALL ENGINE ROOM MAIN WIRE
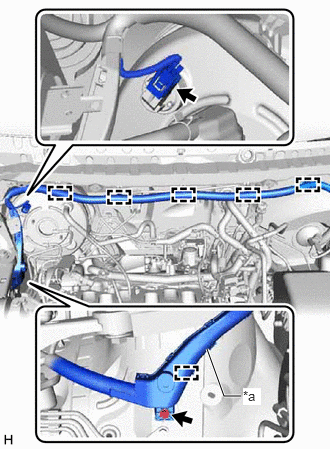
| *a | Wire Harness Protector |
Engage the 5 clamps to install the engine room main wire.
Engage the clamp to install the wire harness protector.
Install the bolt to secure the wire harness protector.
Connect the connector to the vacuum warning switch assembly.
19.INSTALL BRAKE MASTER CYLINDER SUB-ASSEMBLY WITH WAY
23100X
20.INSTALL FUEL PUMP ASSEMBLY
21.CHARGE AIR CONDITIONING SYSTEM WITH REFRIGERANT
22.WARM UP ENGINE
23.INSPECT FOR REFRIGERANT LEAK
24.INSPECT AND ADJUST BRAKE PEDAL