2GR-FKS ENGINE MECHANICAL ENGINE UNIT REASSEMBLY
PROCEDURE

 16322
1.INSTALL WATER INLET PIPE
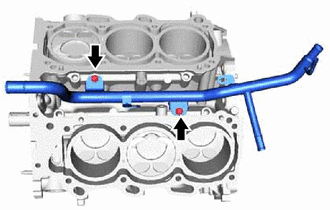
Install the water inlet pipe with the 2 bolts.
- Torque:
- 10 N*m (102 kgf*cm, 7 ft.*lbf)
11116
2.INSTALL NO. 2 CYLINDER HEAD GASKET
11102
3.INSTALL CYLINDER HEAD LH
Place the cylinder head LH onto the cylinder block sub-assembly.
- NOTICE:
- ·
Do not allow oil to adhere to the bottom of the cylinder head LH.
·Gently lower the cylinder head LH in order not to damage the No. 2 cylinder head gasket with the bottom of the cylinder head LH.
- HINT:
-
The cylinder head set bolts are tightened in 3 progressive steps.
Apply a light coat of engine oil to the threads and under the heads of the cylinder head set bolts.
Step 1:
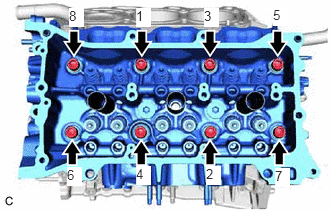
Using a 10 mm bi-hexagon socket wrench, install and uniformly tighten the 8 cylinder head set bolts with 8 cylinder head set plate washers in several steps in the order shown in the illustration.
- Torque:
- 36 N*m (367 kgf*cm, 27 ft.*lbf)
Step 2:
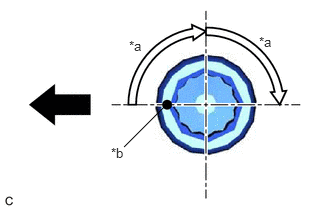
| *a | Turn 90° |
| *b | Paint Mark |

|
Front of Engine |
Mark each cylinder head set bolt head with paint as shown in the illustration.
Tighten the cylinder head set bolts 90° in the order shown in step 1.
Step 3:
Tighten the cylinder head set bolts an additional 90° in the order shown in step 1.
Check that the paint marks are now facing rearward.
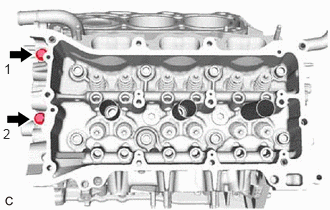
Tighten the 2 bolts in the order shown in the illustration.
- Torque:
- 30 N*m (306 kgf*cm, 22 ft.*lbf)
- HINT:
-
Perform Inspection After Repair after replacing the cylinder head LH.
-
Click hereEngine / Hybrid System>2GR-FKS (ENGINE CONTROL)>SFI SYSTEM>INITIALIZATION
11115
4.INSTALL CYLINDER HEAD GASKET
11101
5.INSTALL CYLINDER HEAD SUB-ASSEMBLY
Place the cylinder head sub-assembly onto the cylinder block sub-assembly.
- NOTICE:
- ·
Do not allow oil to adhere to the bottom of the cylinder head sub-assembly.
·Gently lower the cylinder head sub-assembly in order not to damage the cylinder head gasket with the bottom of the cylinder head sub-assembly.
- HINT:
-
The cylinder head set bolts are tightened in 3 progressive steps.
Apply a light coat of engine oil to the threads and under the heads of the cylinder head set bolts.
Step 1:
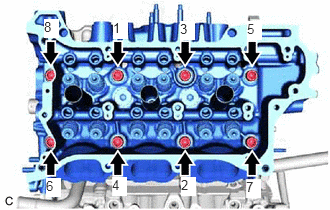
Using a 10 mm bi-hexagon socket wrench, install and uniformly tighten the 8 cylinder head set bolts with cylinder head set plate washers in several steps in the order shown in the illustration.
- Torque:
- 36 N*m (367 kgf*cm, 27 ft.*lbf)
Step 2:
| *a | Turn 90° |
| *b | Paint Mark |
|
|
Front of Engine |
Mark each cylinder head set bolt head with paint as shown in the illustration.
Tighten the cylinder head set bolts 90° in the order shown in step 1.
Step 3:
Tighten the cylinder head set bolts an additional 90° in the order shown in step 1.
Check that the paint marks are now facing rearward.
- HINT:
-
Perform Inspection After Repair after replacing the cylinder head sub-assembly.
-
Click hereEngine / Hybrid System>2GR-FKS (ENGINE CONTROL)>SFI SYSTEM>INITIALIZATION
11381A
6.INSTALL REAR ENGINE OIL SEAL
Place the rear engine oil seal retainer on wooden blocks.
Apply MP grease to the lip of a new rear engine oil seal.
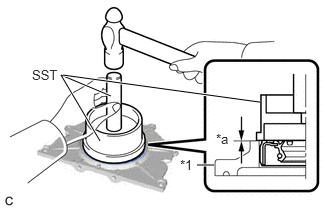
| *1 | Rear Engine Oil Seal Retainer |
| *a | Oil Seal Protrusion Height |
Using SST and a hammer, tap in the rear engine oil seal.
- SST
- 09223-15030
09950-70010 (09951-07100)
- Oil Seal Protrusion Height:
-0.5 to 0.5 mm (-0.0197 to 0.0197 in.)
- NOTICE:
- ·
Keep the lip free from foreign matter.
·Do not tap in the rear engine oil seal at an angle.
11381
7.INSTALL REAR ENGINE OIL SEAL RETAINER
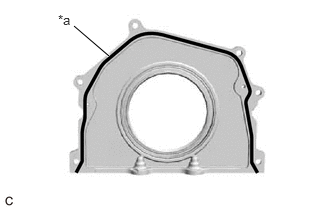
| *a | Seal Packing |
Apply seal packing in a continuous line as shown in the illustration.
- Seal Packing:
Toyota Genuine Seal Packing Black, Three Bond 1207B or equivalent
- Seal Packing Diameter:
2.0 to 3.0 mm (0.0787 to 0.118 in.)
- NOTICE:
- ·
Remove any oil from the contact surfaces.
·Install the rear engine oil seal retainer within 3 minutes of applying seal packing.
·Do not start the engine for at least 2 hours after installation.
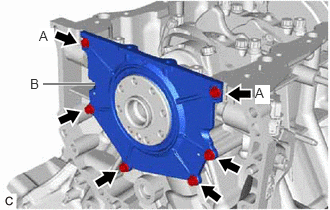
Install the rear engine oil seal retainer to the cylinder block sub-assembly with the 6 bolts.
- Torque:
- 10 N*m (102 kgf*cm, 7 ft.*lbf)
- Adhesive:
Toyota Genuine Adhesive 1324, Three Bond 1324 or equivalent
- NOTICE:
- ·
Be sure to apply adhesive to the bolts (A) before installing them.
·Wipe off any seal packing that seeped out from the crankshaft position sensor insert part (B).
82219A
8.INSTALL SENSOR WIRE
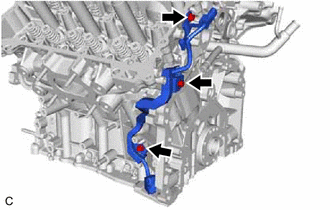
Install the sensor wire to the cylinder head LH and cylinder block sub-assembly with the 3 bolts.
- Torque:
- 10 N*m (102 kgf*cm, 7 ft.*lbf)
13716
9.INSTALL VALVE STEM CAP
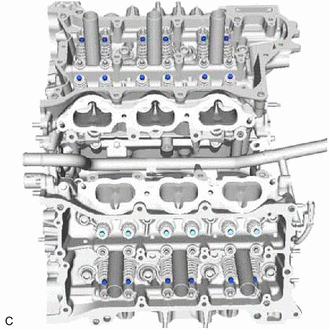
Install the 24 valve stem caps to the cylinder head sub-assembly and cylinder head LH.
- NOTICE:
- ·
Install each part to its original position.
·Do not drop the valve stem caps into the cylinder head sub-assembly.
13750
10.INSTALL VALVE LASH ADJUSTER ASSEMBLY
Inspect the valve lash adjuster assembly.
Click hereEngine / Hybrid System>2GR-FKS (ENGINE MECHANICAL)>ENGINE UNIT>INSPECTION
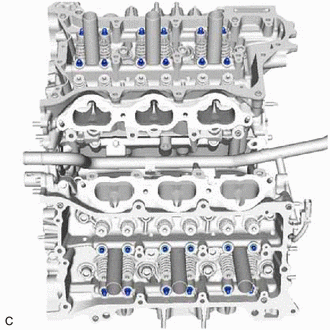
Install the 24 valve lash adjuster assemblies to the cylinder head sub-assembly and cylinder head LH.
- NOTICE:
-
Install each part to its original position.
13801
11.INSTALL NO. 1 VALVE ROCKER ARM SUB-ASSEMBLY
Apply engine oil to the valve lash adjuster assembly tip and valve stem cap end.
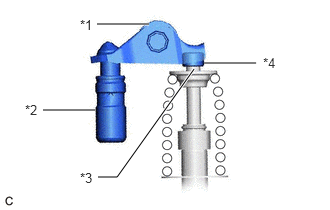
| *1 | No. 1 Valve Rocker Arm Sub-assembly |
| *2 | Valve Lash Adjuster Assembly |
| *3 | Valve Stem |
| *4 | Valve Stem Cap |
Install the 24 No. 1 valve rocker arm sub-assemblies as shown in the illustration.
- NOTICE:
-
Install each part to its original position.
11114A
12.INSTALL STRAIGHT PIN (for Bank 2)
- HINT:
-
It is not necessary to remove the straight pin unless it is being replaced.
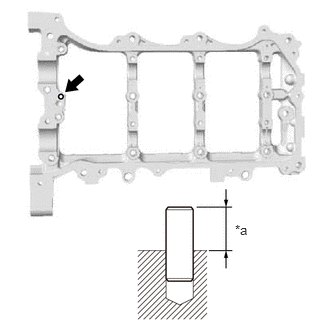
| *a | Protrusion Height |
Using a plastic hammer, tap in a new straight pin to the camshaft housing sub-assembly LH.
- Standard Protrusion Height:
7.7 to 8.3 mm (0.303 to 0.327 in.)
11151A
13.INSTALL CAMSHAFT BEARING CAP SETTING RING PIN (for Bank 2)
- HINT:
-
It is not necessary to remove the camshaft bearing cap setting ring pins unless they are being replaced.
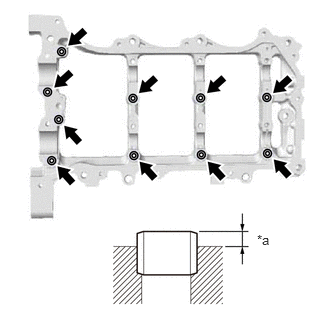
| *a | Protrusion Height |
Using a plastic hammer, tap 10 new camshaft bearing cap setting ring pins into the camshaft housing sub-assembly LH.
- Standard Protrusion Height:
2.7 to 3.3 mm (0.106 to 0.130 in.)
13053
14.INSTALL NO. 3 CAMSHAFT SUB-ASSEMBLY
Apply a light coat of engine oil to the No. 3 camshaft sub-assembly journals and camshaft housing sub-assembly LH.
Install the No. 3 camshaft sub-assembly to the camshaft housing sub-assembly LH.
- HINT:
-
Perform Inspection After Repair after replacing the No. 3 camshaft sub-assembly.
-
Click hereEngine / Hybrid System>2GR-FKS (ENGINE CONTROL)>SFI SYSTEM>INITIALIZATION
13054
15.INSTALL NO. 4 CAMSHAFT SUB-ASSEMBLY
Apply a light coat of engine oil to the No. 4 camshaft sub-assembly journals and camshaft housing sub-assembly LH.
Install the No. 4 camshaft sub-assembly to the camshaft housing sub-assembly LH.
- HINT:
-
Perform Inspection After Repair after replacing the No. 4 camshaft sub-assembly.
-
Click hereEngine / Hybrid System>2GR-FKS (ENGINE CONTROL)>SFI SYSTEM>INITIALIZATION
16.INSTALL CAMSHAFT BEARING CAP (for Bank 2)
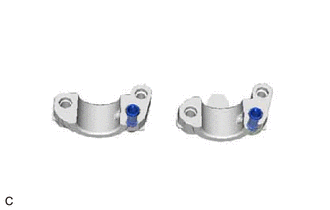
Install the 2 oil control valve filters to the 2 camshaft bearing caps.
Apply engine oil to the 5 camshaft bearing caps.
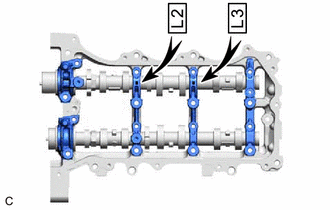
Install the 5 camshaft bearing caps to the camshaft housing sub-assembly LH.
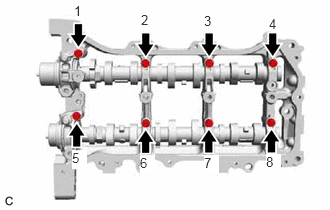
Temporarily install and tighten the 8 bolts in the order shown in the illustration.
- Torque:
- 10 N*m (102 kgf*cm, 7 ft.*lbf)
13560A
17.INSTALL NO. 3 CHAIN TENSIONER ASSEMBLY
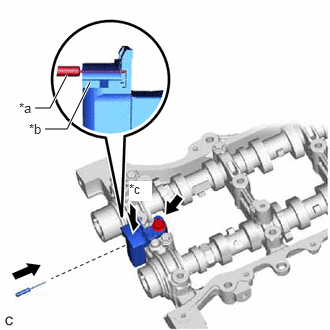
| *a | Pin |
| *b | Plunger |
| *c | Push |
Install the No. 3 chain tensioner assembly to the camshaft housing sub-assembly LH with the bolt.
- Torque:
- 21 N*m (214 kgf*cm, 15 ft.*lbf)
While pushing down the No. 3 chain tensioner assembly, insert a 1.0 mm (0.0394 in.) diameter pin into the hole to secure it.
13050
18.SET CAMSHAFT TIMING GEAR ASSEMBLY, CAMSHAFT TIMING EXHAUST GEAR ASSEMBLY AND NO. 2 CHAIN SUB-ASSEMBLY (for Bank 2)
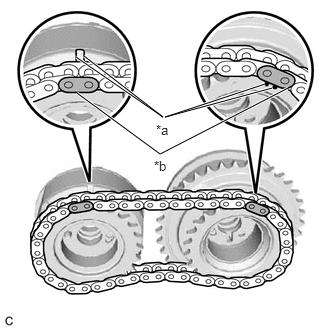
| *a | Timing Mark |
| *b | Mark Plate |
Align the mark plates (yellow) with the timing marks of the camshaft timing gear assembly and camshaft timing exhaust gear assembly as shown in the illustration.
Align the straight pins of the No. 3 camshaft sub-assembly and No. 4 camshaft sub-assembly with the pin holes of the camshaft timing gear assembly and camshaft timing exhaust gear assembly. Temporarily install the camshaft timing gear assembly and camshaft timing exhaust gear assembly with the No. 2 chain sub-assembly installed.
- NOTICE:
-
Be careful not to damage the contact surface of the camshaft timing gear assembly and camshaft timing exhaust gear assembly with the straight pins of the No. 3 camshaft sub-assembly and No. 4 camshaft sub-assembly.
- HINT:
-
Perform Inspection After Repair after replacing the camshaft timing gear assembly or camshaft timing exhaust gear assembly.
-
Click hereEngine / Hybrid System>2GR-FKS (ENGINE CONTROL)>SFI SYSTEM>INITIALIZATION
19.TEMPORARILY INSTALL CAMSHAFT TIMING GEAR BOLT (for Intake Side of Bank 2)
20.TEMPORARILY INSTALL CAMSHAFT TIMING GEAR BOLT (for Exhaust Side of Bank 2)
11104A
21.INSTALL CAMSHAFT HOUSING SUB-ASSEMBLY LH
| *1 | No. 1 Valve Rocker Arm Sub-assembly |
| *2 | Valve Lash Adjuster Assembly |
| *3 | Valve Stem |
| *4 | Valve Stem Cap |
Make sure that the No. 1 valve rocker arm sub-assemblies are installed as shown in the illustration.
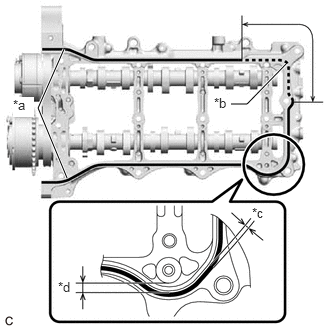
| *a | Continuous Line Area |
| *b | Dashed Line Area |
| *c | 3.0 to 4.0 mm |
| *d | Separated by 4.0 to 6.0 mm (0.157 to 0.236 in.) |
Apply seal packing as shown in the illustration.
- Seal Packing:
Toyota Genuine Seal Packing Black, Three Bond 1207B or equivalent
- Seal Packing Application Specification:
Area Seal Packing Diameter Continuous Line Area 3.0 to 4.0 mm (0.118 to 0.157 in.) Dashed Line Area 4.0 to 4.5 mm (0.157 to 0.177 in.)
- NOTICE:
- ·
Remove any oil from the contact surface.
·Install the camshaft housing sub-assembly LH within 3 minutes and tighten the bolts within 15 minutes of applying seal packing.
·Do not add engine oil for at least 2 hours after installation.
·Do not start the engine for at least 2 hours after installation.
Install the camshaft housing sub-assembly LH and tighten the 15 bolts in the order shown in the illustration.
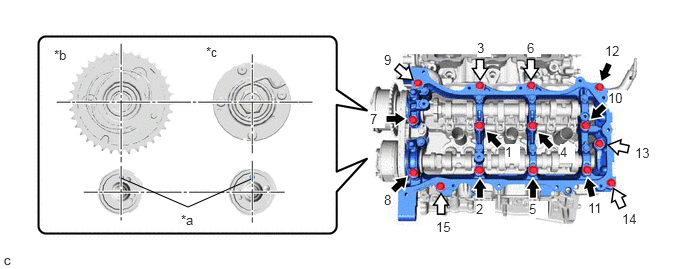
| *a | Straight Pin | *b | Intake Side |
| *c | Exhaust Side | - | - |
|
|
Bolt (A) | 
|
Bolt (B) |
- Torque:
- 28 N*m (286 kgf*cm, 21 ft.*lbf)
- NOTICE:
- ·
When installing the camshaft housing sub-assembly LH, correctly position the camshafts as shown in the illustration. Failure to do so may result in damage due to contact between the pistons and valves. If a camshaft is rotated, valve contact with a piston at TDC may occur.
·Make sure that the No. 1 valve rocker arm sub-assemblies are correctly installed.
·If it is necessary to loosen any of the bolts during installation, remove the camshaft housing sub-assembly LH, clean the installation surfaces, and reapply seal packing.
·If it is necessary to remove the camshaft housing sub-assembly LH during installation, make sure that the previously applied seal packing does not enter any oil passages.
- Bolt Length:
Item Length Bolt (A) 68 mm (2.68 in.) Bolt (B) 48 mm (1.89 in.)
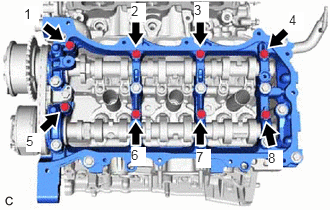
Tighten the 8 bolts in the order shown in the illustration.
- Torque:
- 16 N*m (163 kgf*cm, 12 ft.*lbf)
Remove any protruding seal packing black.
- NOTICE:
-
Be careful not to drop seal packing black into the cylinder head LH.
22.TIGHTEN CAMSHAFT TIMING GEAR BOLT (for Intake Side of Bank 2)
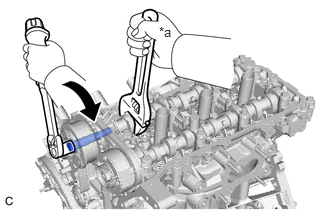
| *a | Hold |
|
|
Turn |
Using a wrench to hold the hexagonal portion of the No. 3 camshaft sub-assembly, tighten the camshaft timing gear bolt of the camshaft timing gear assembly.
- Torque:
- 95 N*m (969 kgf*cm, 70 ft.*lbf)
- NOTICE:
-
Be careful not to damage the No. 3 camshaft sub-assembly, camshaft housing sub-assembly LH or spark plug tube with the wrench.
23.TIGHTEN CAMSHAFT TIMING GEAR BOLT (for Exhaust Side of Bank 2)
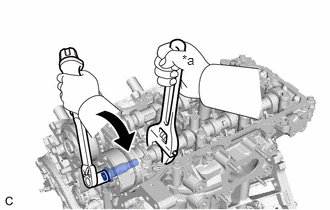
| *a | Hold |
|
|
Turn |
Using a wrench to hold the hexagonal portion of the No. 4 camshaft sub-assembly, tighten the camshaft timing gear bolt of the camshaft timing exhaust gear assembly.
- Torque:
- 95 N*m (969 kgf*cm, 70 ft.*lbf)
- NOTICE:
-
Be careful not to damage the No. 4 camshaft sub-assembly, camshaft housing sub-assembly LH or spark plug tube with the wrench.
Remove the pin from the No. 3 chain tensioner assembly.
11114A
24.INSTALL STRAIGHT PIN (for Bank 1)
- HINT:
-
It is not necessary to remove the straight pin unless it is being replaced.
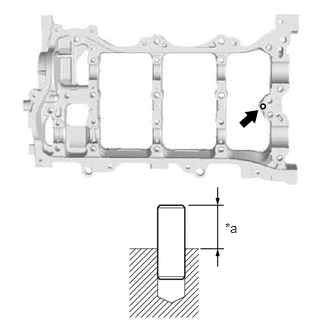
| *a | Protrusion Height |
Using a plastic hammer, tap in a new straight pin to the camshaft housing sub-assembly.
- Standard Protrusion Height:
7.7 to 8.3 mm (0.303 to 0.327 in.)
11151A
25.INSTALL CAMSHAFT BEARING CAP SETTING RING PIN (for Bank 1)
- HINT:
-
It is not necessary to remove the camshaft bearing cap setting ring pins unless they are being replaced.
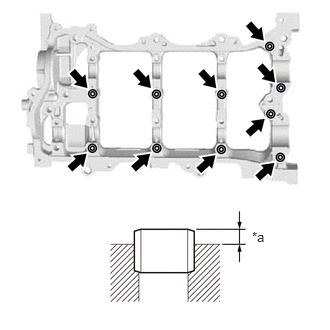
| *a | Protrusion Height |
Using a plastic hammer, tap 10 new camshaft bearing cap setting ring pins into the camshaft housing sub-assembly.
- Standard Protrusion Height:
2.7 to 3.3 mm (0.106 to 0.130 in.)
13511
26.INSTALL CAMSHAFT
Apply a light coat of engine oil to the camshaft journals and camshaft housing sub-assembly.
Install the camshaft to the camshaft housing sub-assembly.
- HINT:
-
Perform Inspection After Repair after replacing the camshaft.
-
Click hereEngine / Hybrid System>2GR-FKS (ENGINE CONTROL)>SFI SYSTEM>INITIALIZATION
13512
27.INSTALL NO. 2 CAMSHAFT
Apply a light coat of engine oil to the No. 2 camshaft journals and camshaft housing sub-assembly.
Install the No. 2 camshaft to the camshaft housing sub-assembly.
- HINT:
-
Perform Inspection After Repair after replacing the No. 2 camshaft.
-
Click hereEngine / Hybrid System>2GR-FKS (ENGINE CONTROL)>SFI SYSTEM>INITIALIZATION
28.INSTALL CAMSHAFT BEARING CAP (for Bank 1)
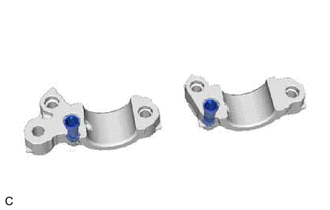
Install the 2 oil control valve filters to the 2 camshaft bearing caps.
Apply engine oil to the 5 camshaft bearing caps.
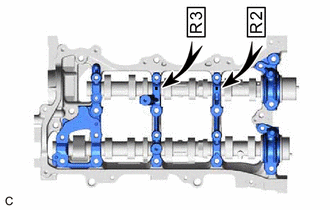
Install the 5 camshaft bearing caps to the camshaft housing sub-assembly.
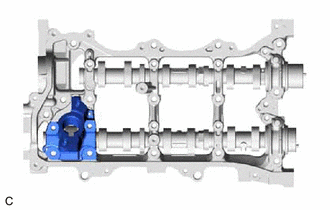
Install the fuel pump lifter housing to the camshaft housing sub-assembly.
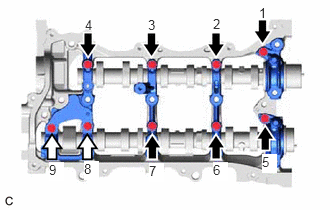
|
|
Bolt (A) |
|
|
Bolt (B) |
Temporarily install and tighten the 9 bolts in the order shown in the illustration.
- Torque:
- 10 N*m (102 kgf*cm, 7 ft.*lbf)
- Bolt Length:
Item Length Bolt (A) 40 mm (1.57 in.) Bolt (B) 58 mm (2.28 in.)
13550
29.INSTALL NO. 2 CHAIN TENSIONER ASSEMBLY
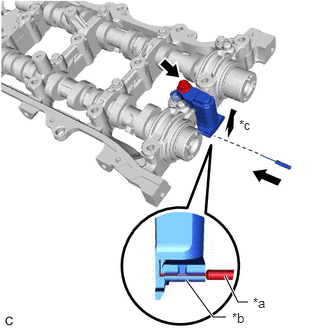
| *a | Pin |
| *b | Plunger |
| *c | Push |
Install the No. 2 chain tensioner assembly to the camshaft housing sub-assembly with the bolt.
- Torque:
- 21 N*m (214 kgf*cm, 15 ft.*lbf)
While pushing up the No. 2 chain tensioner assembly, insert a 1.0 mm (0.0394 in.) diameter pin into the hole to secure it.
13050
30.SET CAMSHAFT TIMING GEAR ASSEMBLY, CAMSHAFT TIMING EXHAUST GEAR ASSEMBLY AND NO. 2 CHAIN SUB-ASSEMBLY (for Bank 1)
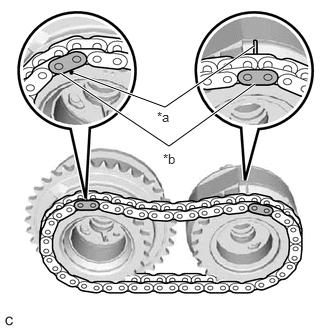
| *a | Timing Mark |
| *b | Mark Plate |
Align the mark plates (yellow) with the timing marks of the camshaft timing gear assembly and camshaft timing exhaust gear assembly as shown in the illustration.
Align the straight pins of the camshaft and No. 2 camshaft with the pin holes of the camshaft timing gear assembly and camshaft timing exhaust gear assembly. Temporarily install the camshaft timing gear assembly and camshaft timing exhaust gear assembly with the No. 2 chain sub-assembly installed.
- NOTICE:
-
Be careful not to damage the contact surface of the camshaft timing gear assembly and camshaft timing exhaust gear assembly with the straight pins of the camshaft and No. 2 camshaft.
- HINT:
-
Perform Inspection After Repair after replacing the camshaft timing gear assembly or camshaft timing exhaust gear assembly.
-
Click hereEngine / Hybrid System>2GR-FKS (ENGINE CONTROL)>SFI SYSTEM>INITIALIZATION
31.TEMPORARILY INSTALL CAMSHAFT TIMING GEAR BOLT (for Intake Side of Bank 1)
32.TEMPORARILY INSTALL CAMSHAFT TIMING GEAR BOLT (for Exhaust Side of Bank 1)
11103
33.INSTALL CAMSHAFT HOUSING SUB-ASSEMBLY
| *1 | No. 1 Valve Rocker Arm Sub-assembly |
| *2 | Valve Lash Adjuster Assembly |
| *3 | Valve Stem |
| *4 | Valve Stem Cap |
Make sure that the No. 1 valve rocker arm sub-assemblies are installed as shown in the illustration.
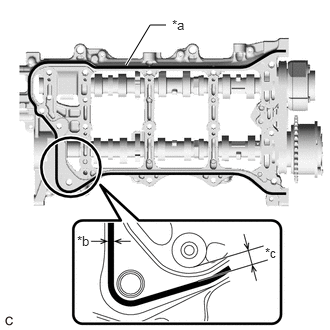
| *a | Seal Packing |
| *b | 3.0 to 4.0 mm |
| *c | Separated by 4.0 to 6.0 mm (0.157 to 0.236 in.) |
Apply seal packing as shown in the illustration.
- Seal Packing:
Toyota Genuine Seal Packing Black, Three Bond 1207B or equivalent
- Seal Packing Diameter:
3.0 to 4.0 mm (0.118 to 0.157 in.)
- NOTICE:
- ·
Remove any oil from the contact surface.
·Install the camshaft housing sub-assembly within 3 minutes and tighten the bolts within 15 minutes of applying seal packing.
·Do not add engine oil for at least 2 hours after installation.
·Do not start the engine for at least 2 hours after installation.
Install the camshaft housing sub-assembly and tighten the 15 bolts in the order shown in the illustration.
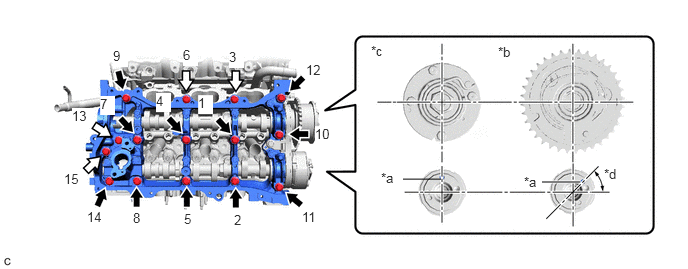
| *a | Straight Pin | *b | Intake Side |
| *c | Exhaust Side | *d | 45° |
|
|
Bolt (A) |
|
Bolt (B) |
- Torque:
- 28 N*m (286 kgf*cm, 21 ft.*lbf)
- NOTICE:
- ·
When installing the camshaft housing sub-assembly, correctly position the camshafts as shown in the illustration. Failure to do so may result in damage due to contact between the pistons and valves. If a camshaft is rotated, valve contact with a piston at TDC may occur.
·Make sure that the No. 1 valve rocker arm sub-assemblies are correctly installed.
·If it is necessary to loosen any of the bolts during installation, remove the camshaft housing sub-assembly, clean the installation surfaces, and reapply seal packing.
·If it is necessary to remove the camshaft housing sub-assembly during installation, make sure that the previously applied seal packing does not enter any oil passages.
- Bolt Length:
Item Length Bolt (A) 68 mm (2.68 in.) Bolt (B) 48 mm (1.89 in.)
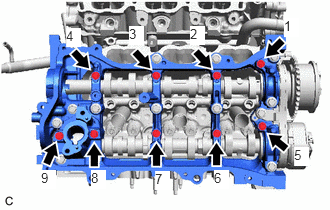
Tighten the 9 bolts in the order shown in the illustration.
- Torque:
- 16 N*m (163 kgf*cm, 12 ft.*lbf)
Remove any protruding seal packing black.
- NOTICE:
-
Be careful not to drop seal packing black into the cylinder head sub-assembly.
34.TIGHTEN CAMSHAFT TIMING GEAR BOLT (for Intake Side of Bank 1)
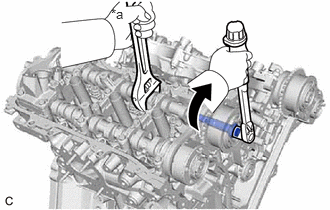
| *a | Hold |
|
|
Turn |
Using a wrench to hold the hexagonal portion of camshaft, tighten the camshaft timing gear bolt of the camshaft timing gear assembly.
- Torque:
- 95 N*m (969 kgf*cm, 70 ft.*lbf)
- NOTICE:
-
Be careful not to damage the camshaft, camshaft housing sub-assembly or spark plug tube with the wrench.
35.TIGHTEN CAMSHAFT TIMING GEAR BOLT (for Exhaust Side of Bank 1)
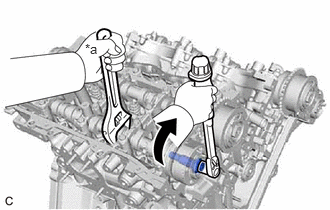
| *a | Hold |
|
|
Turn |
Using a wrench to hold the hexagonal portion of No. 2 camshaft, tighten the camshaft timing gear bolt of the camshaft timing exhaust gear assembly.
- Torque:
- 95 N*m (969 kgf*cm, 70 ft.*lbf)
- NOTICE:
-
Be careful not to damage the No. 2 camshaft, camshaft housing sub-assembly or spark plug tube with the wrench.
Remove the pin from the No. 2 chain tensioner assembly.
13521A
36.INSTALL CRANKSHAFT TIMING GEAR KEY
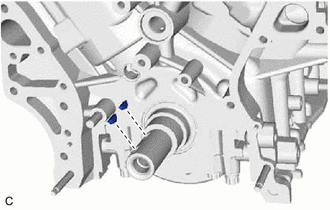
Install the 2 crankshaft timing gear keys to the crankshaft.
13521
37.INSTALL CRANKSHAFT TIMING SPROCKET
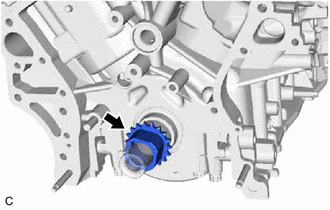
Install the crankshaft timing sprocket to the crankshaft.
13562
38.INSTALL NO. 2 CHAIN VIBRATION DAMPER
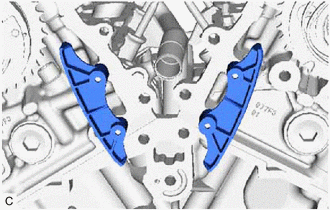
Install the 2 No. 2 chain vibration dampers to the cylinder head LH and cylinder head sub-assembly.
13561
39.INSTALL NO. 1 CHAIN VIBRATION DAMPER
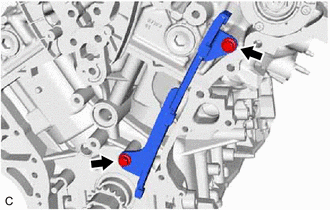
Install the No. 1 chain vibration damper to the cylinder head LH and cylinder block sub-assembly with the 2 bolts.
- Torque:
- 22.5 N*m (229 kgf*cm, 17 ft.*lbf)
13530
40.INSTALL IDLE SPROCKET ASSEMBLY
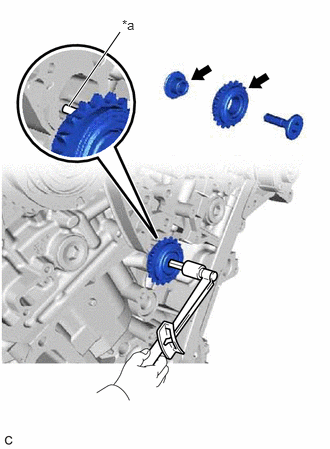
| *a | Knock Pin |
|
|
Light coat of engine oil |
Apply a light coat of engine oil to the rotating surface of the No. 1 idle gear shaft.
Temporarily install the No. 1 idle gear shaft and idle sprocket assembly with the No. 2 idle gear shaft while aligning the knock pin of the No. 1 idle gear shaft with the pin hole of the cylinder block sub-assembly.
- NOTICE:
-
Make sure to install the No. 1 idle gear shaft installation in the correct direction.
- HINT:
-
Check that there is no foreign matter on the No. 1 idle gear shaft or No. 2 idle gear shaft.
Using a 10 mm hexagon socket wrench, tighten the No. 2 idle gear shaft.
- Torque:
- 60 N*m (612 kgf*cm, 44 ft.*lbf)
- HINT:
-
After installing the idle sprocket assembly, check that the idle sprocket assembly turns smoothly.
13506
41.INSTALL CHAIN SUB-ASSEMBLY
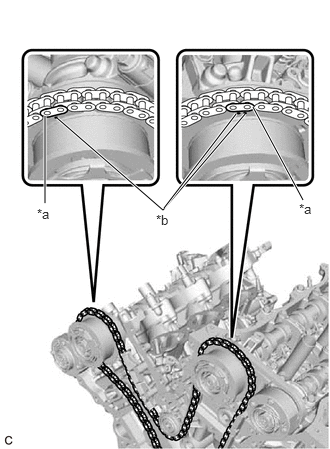
| *a | Mark Plate |
| *b | Timing Mark |
Align the mark plates and timing marks as shown in the illustration and install the chain sub-assembly.
- HINT:
-
The camshaft mark plates are yellow.
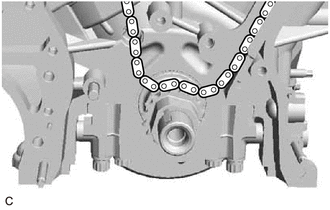
Temporarily place the chain sub-assembly on the crankshaft as shown in the illustration.
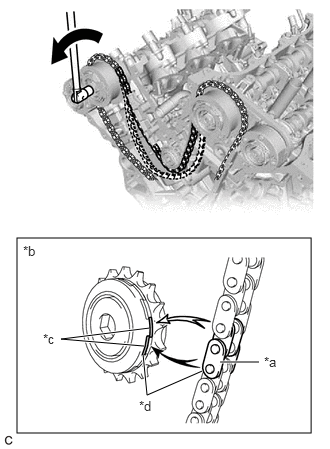
| *a | Chain Plate |
| *b | When the idle sprocket assembly is reused |
| *c | Mark |
| *d | Align |
|
|
Turn |
Turn the camshaft timing gear assembly on bank 1 counterclockwise to tighten the chain sub-assembly between the banks.
- NOTICE:
-
When reusing the idle sprocket assembly, align the chain plate with the mark where the mark plate had been in order to tighten the chain sub-assembly between the banks.
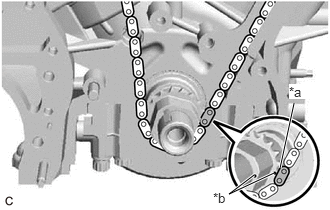
| *a | Mark Plate |
| *b | Timing Mark |
Align the mark plate and timing marks as shown in the illustration and install the chain sub-assembly around the crankshaft timing sprocket.
- HINT:
-
The crankshaft mark plate is pink.
Temporarily tighten the crankshaft pulley set bolt to the crankshaft.
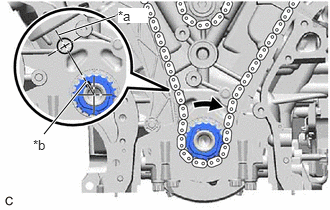
| *a | Center Line |
| *b | Key Groove |
Turn the crankshaft clockwise to set it to the center line of the block bore (for Bank 1) (TDC /compression).
13559
42.INSTALL CHAIN TENSIONER SLIPPER
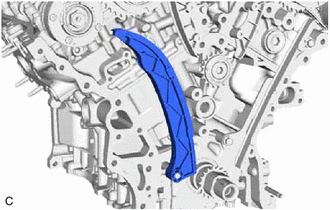
Install the chain tensioner slipper to the cylinder block sub-assembly.
13540
43.INSTALL NO. 1 CHAIN TENSIONER ASSEMBLY
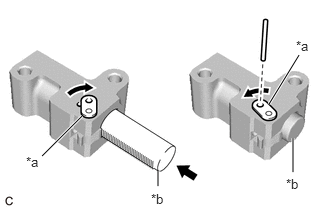
| *a | Stopper Plate |
| *b | Plunger |
Turn the stopper plate clockwise to release the lock, and push the plunger deep into the No. 1 chain tensioner assembly.
Turn the stopper plate counterclockwise to set the lock, and insert a 1.0 mm (0.0394 in.) diameter pin into the hole of the stopper plate.
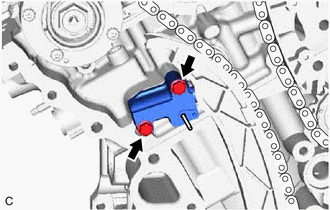
Install the No. 1 chain tensioner assembly with the 2 bolts.
- Torque:
- 10 N*m (102 kgf*cm, 7 ft.*lbf)
Remove the 1.0 mm (0.0394 in.) diameter pin from the No. 1 chain tensioner assembly.
44.INSPECT VALVE TIMING
Check the camshaft timing marks.
- NOTICE:
- ·
Check each timing mark from a viewpoint directly in line with the center of the camshaft and the timing mark on each camshaft timing gear assembly and each camshaft timing exhaust gear assembly.
·If the timing marks are checked from any other viewpoint, the valve timing may appear misaligned.
Check that each camshaft timing mark is positioned as shown in the illustration.
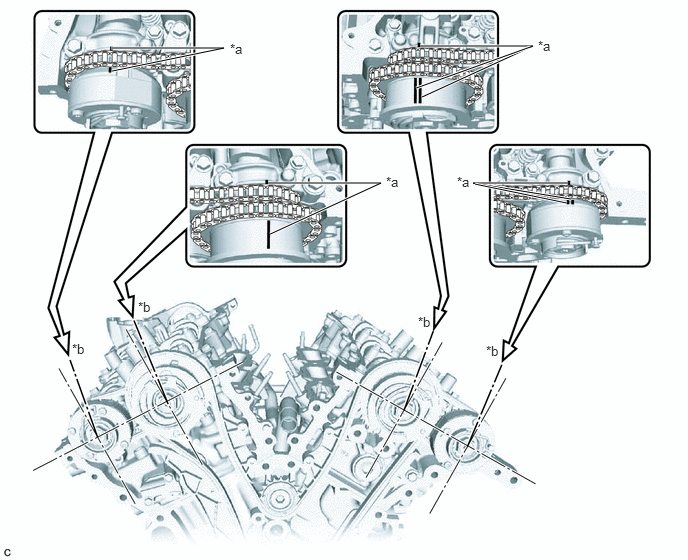
| *a | Timing Mark | *b | Viewpoint |
- HINT:
-
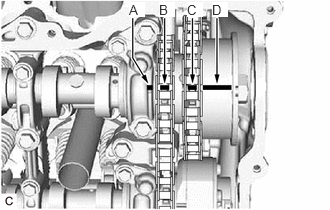 1.344,0.021 1.51,0.177 0.167,0.156 10 true A 1.656,0.021 1.823,0.177 0.167,0.156 10 true B 1.948,0.021 2.115,0.177 0.167,0.156 10 true C 2.208,0.021 2.375,0.177 0.167,0.156 10 true D
-
For the camshaft or No. 3 camshaft sub-assembly:
-
Be sure to check the mark (A) at the point where the marks (B), (C) and (D) are positioned in line. If the marks are checked from any other viewpoint, they cannot be checked correctly.
If the valve timing is misaligned, reinstall the chain sub-assembly.
Remove the crankshaft pulley set bolt from the crankshaft.
16100
45.INSTALL ENGINE WATER PUMP ASSEMBLY
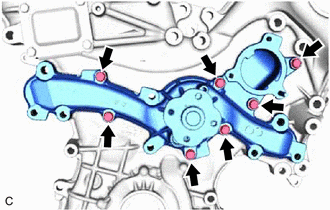
Install a new water pump gasket and the engine water pump assembly with the 7 bolts.
- Torque:
- 11 N*m (112 kgf*cm, 8 ft.*lbf)
11310
46.INSTALL TIMING CHAIN COVER ASSEMBLY
11301C
47.INSTALL TIMING CHAIN CASE OIL SEAL
11324
48.INSTALL TIMING CHAIN COVER PLATE
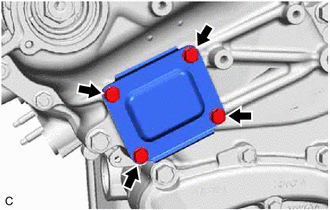
Install a new timing chain cover gasket and the timing chain cover plate to the timing chain cover assembly with the 4 bolts.
- Torque:
- 11 N*m (112 kgf*cm, 8 ft.*lbf)
12121
49.INSTALL NO. 1 OIL PAN BAFFLE PLATE
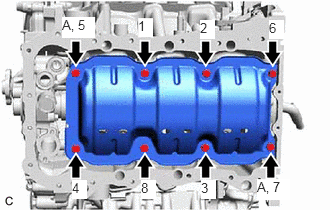
Install the No. 1 oil pan baffle plate to the crankshaft bearing cap set bolt.
Temporarily tighten the 2 bolts (A).
Fully tighten the 8 bolts order shown in the illustration.
- Torque:
- 10 N*m (102 kgf*cm, 7 ft.*lbf)
15679
50.INSTALL OIL FILTER BRACKET CLIP
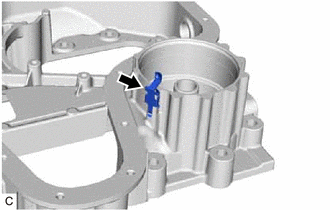
Install the oil filter bracket clip to the oil pan sub-assembly.
12101
51.INSTALL OIL PAN SUB-ASSEMBLY
- NOTICE:
-
If a stud bolt is deformed or its threads are damaged, replace it.
Using an E8 and E6 "TORX" socket wrench, install the 6 stud bolts to the oil pan sub-assembly and cylinder block sub-assembly.
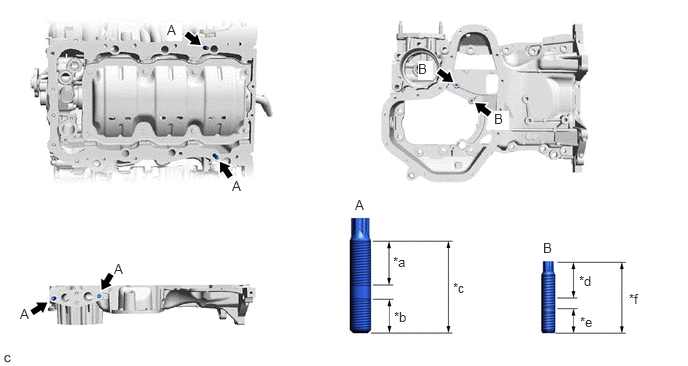
| *a | 20 mm (0.787 in.) | *b | 13 mm (0.512 in.) |
| *c | 35 mm (1.38 in.) | *d | 16 mm (0.630 in.) |
| *e | 9 mm (0.354 in.) | *f | 27 mm (1.06 in.) |
- Torque:
- Stud bolt (A) : 10 N*m (102 kgf*cm, 7 ft.*lbf)
- Stud bolt (B) : 4.0 N*m (41 kgf*cm, 35 in.*lbf)
Install the oil pan sub-assembly.
Click hereEngine / Hybrid System>2GR-FKS (ENGINE MECHANICAL)>CYLINDER HEAD GASKET>INSTALLATION
89491
52.INSTALL ENGINE OIL LEVEL SENSOR
15104
53.INSTALL OIL STRAINER SUB-ASSEMBLY
Apply a light coat of engine oil to a new oil strainer gasket.
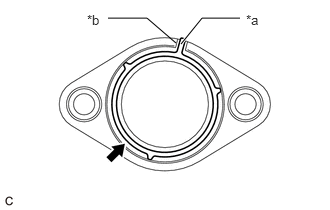
| *a | Protrusion |
| *b | Cutout |
Align the protrusion of the oil strainer gasket with the cutout of the oil strainer sub-assembly, and install the oil strainer gasket to the oil strainer sub-assembly.
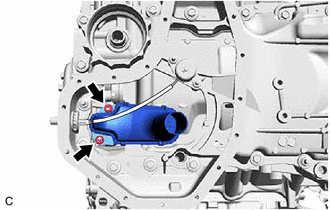
Install the oil strainer sub-assembly to the timing chain cover assembly with the 2 nuts.
- Torque:
- 10 N*m (102 kgf*cm, 7 ft.*lbf)
12102A
54.INSTALL NO. 2 OIL PAN SUB-ASSEMBLY
- NOTICE:
-
If a stud bolt is deformed or its threads are damaged, replace it.
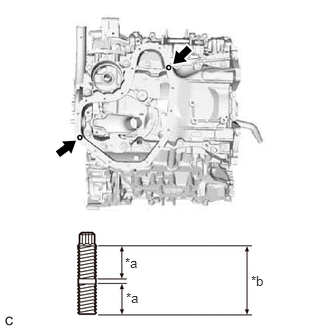
| *a | 9 mm (0.354 in.) |
| *b | 19 mm (0.748 in.) |
Using an E6 "TORX" socket wrench, install the 2 stud bolts to the oil pan sub-assembly as shown in the illustration.
- Torque:
- 4.0 N*m (41 kgf*cm, 35 in.*lbf)
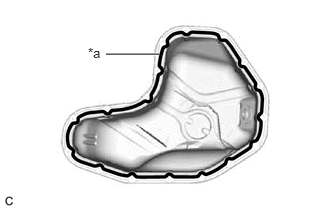
| *a | Seal Packing |
Apply seal packing in a continuous line as shown in the illustration.
- Seal Packing:
Toyota Genuine Seal Packing Black, Three Bond 1207B or equivalent
- Seal Packing Diameter:
3.0 to 4.0 mm (0.118 to 0.157 in.)
- NOTICE:
- ·
Remove any oil from the contact surfaces.
·Install the No. 2 oil pan sub-assembly within 3 minutes of applying seal packing.
·Do not start the engine for at least 2 hours after installation.
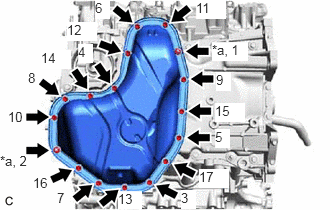
| *a | Nut |
Install the No. 2 oil pan sub-assembly with the 15 bolts and 2 nuts as shown in the illustration.
- Torque:
- 10 N*m (102 kgf*cm, 7 ft.*lbf)
83530
55.INSTALL ENGINE OIL PRESSURE SWITCH ASSEMBLY
15620
56.INSTALL OIL FILTER CAP ASSEMBLY
12101A
57.INSTALL OIL PAN DRAIN PLUG
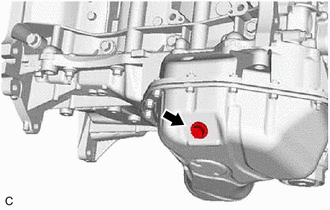
Install a new oil pan drain plug gasket and the oil pan drain plug to the No. 2 oil pan sub-assembly.
- Torque:
- 40 N*m (408 kgf*cm, 30 ft.*lbf)
11193
58.INSTALL SPARK PLUG TUBE GASKET
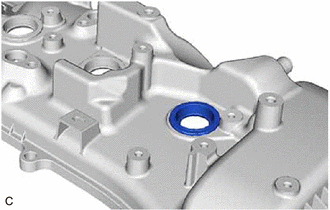
Install the 6 new spark plug tube gaskets to the cylinder head cover sub-assembly and cylinder head cover sub-assembly LH.
11202
59.INSTALL CYLINDER HEAD COVER SUB-ASSEMBLY LH
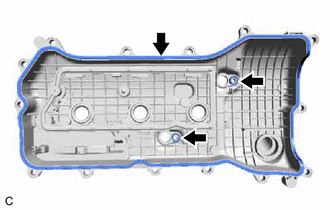
Install 3 new No. 2 cylinder head cover gaskets to the cylinder head cover sub-assembly LH.
- NOTICE:
-
Make sure that there is no oil or foreign matter inside the groove of the camshaft housing sub-assembly LH or on the contact surfaces of the cylinder head cover sub-assembly LH and timing chain cover assembly. Clean if necessary.
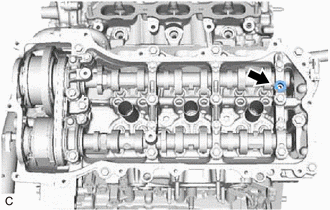
Install a new camshaft bearing cap oil hole gasket LH to the camshaft bearing cap.
Apply seal packing as shown in the illustration.
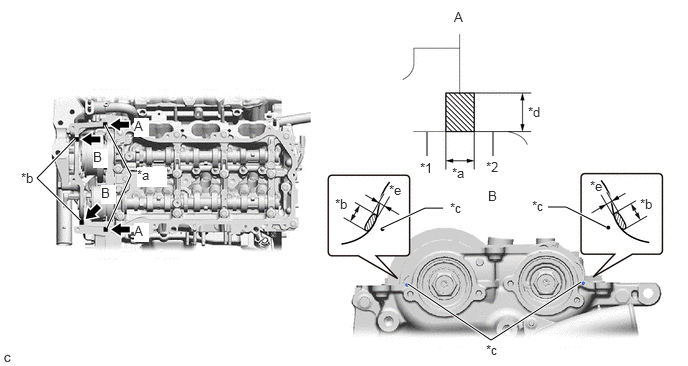
| *1 | Timing Chain Cover Assembly | *2 | Camshaft Housing Sub-assembly LH |
| *a | Seal Packing (Diameter 2.0 to 3.0 mm (0.0787 to 0.118 in.)) | *b | Seal Packing (Diameter 5.0 to 7.0 mm (0.197 to 0.276 in.)) |
| *c | Mark | *d | 5.0 to 10 mm (0.197 to 0.394 in.) |
| *e | Thickness: 1.0 to 3.0 mm (0.0394 to 0.118 in.) | - | - |
|
|
Seal Packing | - | - |
- Seal Packing:
Toyota Genuine Seal Packing Black, Three Bond 1207B or equivalent
- Seal Packing Application Specification:
Area Seal Packing Diameter (A) Thickness: 5 to 10 mm (0.197 to 0.394 in.)
Width: 2 to 3 mm (0.0787 to 0.118 in.)(B) Thickness: 1 to 3 mm (0.0394 to 0.118 in.)
Width: 5 to 7 mm (0.197 to 0.276 in.)
- NOTICE:
- ·
Remove any oil from the contact surfaces.
·Install the cylinder head cover sub-assembly LH within 3 minutes and tighten the bolts within 15 minutes of applying seal packing.
·Do not start the engine for at least 2 hours after installation.
Apply a light coat of engine oil to the 2 new O-rings of the 2 VVT sensors (for Exhaust Side of Bank 2 and for Intake Side of Bank 2).
- NOTICE:
-
If reusing the 2 VVT sensors (for Exhaust Side of Bank 2 and for Intake Side of Bank 2), be sure to inspect them before installation.
Clean the 2 bolts and 2 bolt holes of the VVT sensors (for Exhaust Side of Bank 2 and for Intake Side of Bank 2).
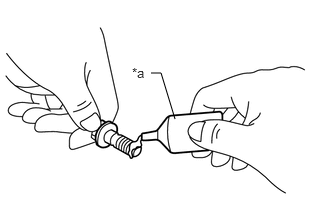
| *a | Adhesive |
Apply adhesive to 2 or 3 threads at the end of the 2 bolts of the VVT sensors (for Exhaust Side of Bank 2 and for Intake Side of Bank 2).
- Adhesive:
Toyota Genuine Adhesive 1324, Three Bond 1324 or equivalent
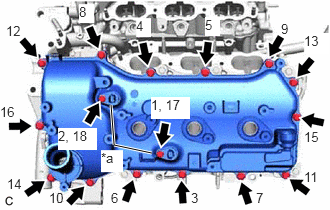
| *a | Bolt with VVT Sensor |
Install the cylinder head cover sub-assembly LH with the 16 bolts and 2 VVT sensors (for Exhaust Side of Bank 2 and for Intake Side of Bank 2) in the order shown in the illustration.
- Torque:
- 10 N*m (102 kgf*cm, 7 ft.*lbf)
- NOTICE:
- ·
If a VVT sensor (for Exhaust Side of Bank 2 and for Intake Side of Bank 2) has been struck or dropped, replace it.
·Make sure that the 2 O-rings are not cracked or moved out of place when installing the 2 VVT sensors (for Exhaust Side of Bank 2 and for Intake Side of Bank 2).
- HINT:
-
After tightening all bolts, check the tightening torque of the bolts (1) and (18). Retighten them if necessary.
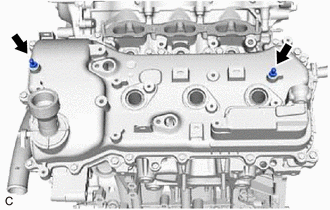
Install the 2 No. 1 V-bank cover brackets to the cylinder head cover sub-assembly LH.
- Torque:
- 10 N*m (102 kgf*cm, 7 ft.*lbf)
11201
60.INSTALL CYLINDER HEAD COVER SUB-ASSEMBLY
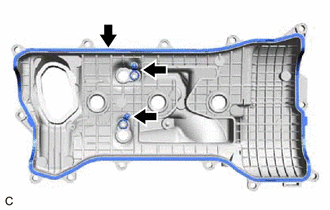
Install 3 new cylinder head cover gaskets to the cylinder head cover sub-assembly.
- NOTICE:
-
Make sure that there is no oil or foreign matter inside the groove of the camshaft housing sub-assembly or on the contact surfaces of the cylinder head cover sub-assembly and timing chain cover assembly. Clean if necessary.
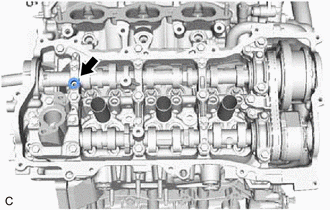
Install a new camshaft bearing cap oil hole gasket to the camshaft bearing cap.
Apply seal packing as shown in the illustration.
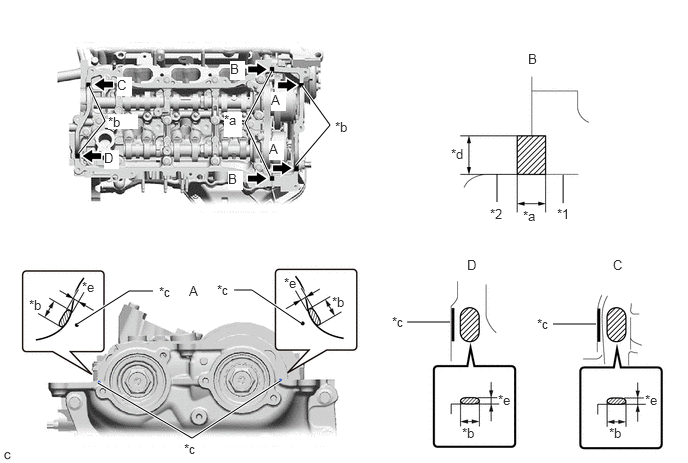
| *1 | Timing Chain Cover Assembly | *2 | Camshaft Housing Sub-assembly |
| *a | Seal Packing (Diameter 2.0 to 3.0 mm (0.0787 to 0.118 in.)) | *b | Seal Packing (Diameter 5.0 to 7.0 mm (0.197 to 0.276 in.)) |
| *c | Mark | *d | 5.0 to 10 mm (0.197 to 0.394 in.) |
| *e | Thickness: 1.0 to 3.0 mm (0.0394 to 0.118 in.) | - | - |
|
|
Seal Packing | - | - |
- Seal Packing:
Toyota Genuine Seal Packing Black, Three Bond 1207B or equivalent
- NOTICE:
- ·
Remove any oil from the contact surfaces.
·Install the cylinder head cover sub-assembly within 3 minutes and tighten the bolts within 15 minutes of applying seal packing.
·Do not start the engine for at least 2 hours after installation.
Apply a light coat of engine oil to the 2 new O-rings of the 2 VVT sensors (for Exhaust Side of Bank 1 and for Intake Side of Bank 1).
- NOTICE:
-
If reusing the 2 VVT sensors (for Exhaust Side of Bank 1 and for Intake Side of Bank 1), be sure to inspect them before installation.
Clean the 2 bolts and 2 bolt holes of the VVT sensors (for Exhaust Side of Bank 1 and for Intake Side of Bank 1).
| *a | Adhesive |
Apply adhesive to 2 or 3 threads at the end of the 2 bolts of the VVT sensors (for Exhaust Side of Bank 1 and for Intake Side of Bank 1).
- Adhesive:
Toyota Genuine Adhesive 1324, Three Bond 1324 or equivalent
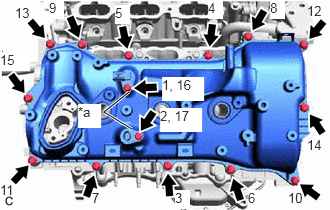
| *a | Bolt with VVT Sensor |
Install the cylinder head cover sub-assembly with the 15 bolts and 2 VVT sensors (for Exhaust Side of Bank 1 and for Intake Side of Bank 1) in the order shown in the illustration.
- Torque:
- 10 N*m (102 kgf*cm, 7 ft.*lbf)
- NOTICE:
- ·
If a VVT sensor (for Exhaust Side of Bank 1 and for Intake Side of Bank 1) has been struck or dropped, replace it.
·Make sure that the 2 O-rings are not cracked or moved out of place when installing the 2 VVT sensors (for Exhaust Side of Bank 1 and for Intake Side of Bank 1).
- HINT:
-
After tightening all bolts, check the tightening torque of the bolts (1) and (17). Retighten them if necessary.
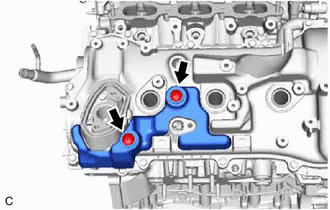
Install the No. 1 engine cover sub-assembly to the cylinder head cover sub-assembly with the 2 clips.
16331
61.INSTALL WATER OUTLET
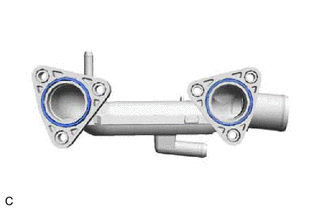
Install 2 new No. 2 water inlet housing gaskets to the water outlet.
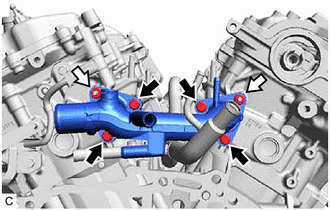
|
|
Bolt |
|
|
Nut |
Install the water outlet to the cylinder head sub-assembly and cylinder head LH with the 4 bolts and 2 nuts.
- Torque:
- 10 N*m (102 kgf*cm, 7 ft.*lbf)
89422
62.INSTALL ENGINE COOLANT TEMPERATURE SENSOR
15767
63.INSTALL OIL COOLER PIPE
- NOTICE:
-
If a stud bolt is deformed or its threads are damaged, replace it.
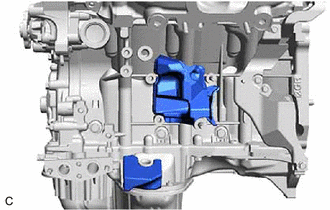
Install the No. 2 cylinder block insulator and No. 3 cylinder block insulator to the cylinder block sub-assembly and oil pan sub-assembly.
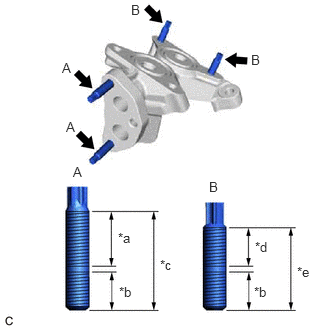
| *a | 20 mm (0.787 in.) |
| *b | 13 mm (0.512 in.) |
| *c | 35 mm (1.38 in.) |
| *d | 14 mm (0.551 in.) |
| *e | 29 mm (1.14 in.) |
Using an E8 "TORX" socket wrench, install the 4 stud bolts to the No. 1 oil cooler bracket as shown in the illustration.
- Torque:
- 10 N*m (102 kgf*cm, 7 ft.*lbf)
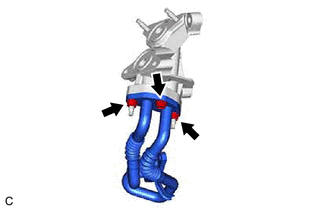
Install the oil cooler pipe and new oil cooler gasket to the No. 1 oil cooler bracket with the bolt and 2 nuts.
- Torque:
- 21 N*m (214 kgf*cm, 15 ft.*lbf)
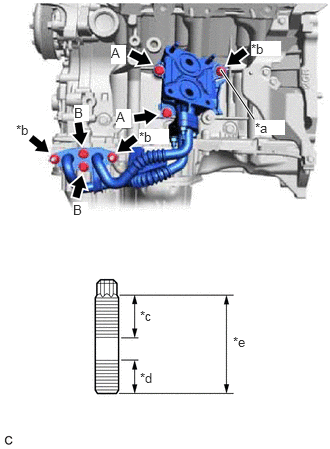
| *a | Stud Bolt |
| *b | Nut |
| *c | 22 mm (0.866 in.) |
| *d | 12 mm (0.472 in.) |
| *e | 39 mm (1.54 in.) |
Using an E7 "TORX" socket wrench, install the stud bolt to the cylinder block sub-assembly as shown in the illustration.
- Torque:
- 10 N*m (102 kgf*cm, 7 ft.*lbf)
Install a new oil hole cover gasket to the oil pan sub-assembly.
Install the oil cooler pipe with No. 1 oil cooler bracket with the 4 bolts and 3 nuts.
- Torque:
- 21 N*m (214 kgf*cm, 15 ft.*lbf)
- Bolt Length:
Item Length Bolt (A) 30 mm (1.18 in.) Bolt (B) 20 mm (0.787 in.)
16282
64.INSTALL NO. 5 WATER BY-PASS HOSE
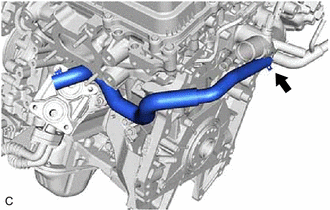
Install the No. 5 water by-pass hose to the water outlet and slide the clip to secure it.
16281
65.INSTALL NO. 4 WATER BY-PASS HOSE
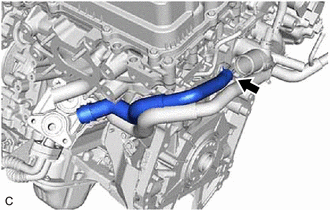
Install the No. 4 water by-pass hose to the water inlet pipe and slide the clip to secure it.
15710
66.INSTALL OIL COOLER ASSEMBLY
11401G
67.INSTALL CRANKSHAFT POSITION SENSOR
19312
68.INSTALL CRANKSHAFT POSITION SENSOR PROTECTOR
15370
69.INSTALL CAMSHAFT TIMING OIL CONTROL SOLENOID ASSEMBLY (for Intake Side of Bank 2)
15370
70.INSTALL CAMSHAFT TIMING OIL CONTROL SOLENOID ASSEMBLY (for Exhaust Side of Bank 2)
15370
71.INSTALL CAMSHAFT TIMING OIL CONTROL SOLENOID ASSEMBLY (for Exhaust Side of Bank 1)
15370
72.INSTALL CAMSHAFT TIMING OIL CONTROL SOLENOID ASSEMBLY (for Intake Side of Bank 1)
16031
73.INSTALL WATER INLET WITH THERMOSTAT SUB-ASSEMBLY
16261
74.INSTALL WATER BY-PASS HOSE
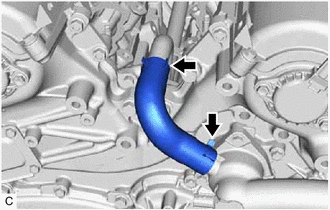
Install the water by-pass hose to the water inlet pipe and water inlet with thermostat sub-assembly and slide the 2 clips to secure it.
12315
75.INSTALL FRONT NO. 1 ENGINE MOUNTING BRACKET LH
- NOTICE:
-
If a stud bolt is deformed or its threads are damaged, replace it.
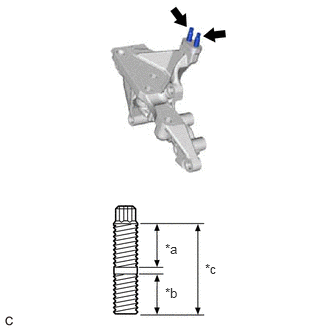
| *a | 14 mm (0.551 in.) |
| *b | 13 mm (0.512 in.) |
| *c | 29 mm (1.14 in.) |
Using an E8 "TORX" socket wrench, install the 2 stud bolts to the front No. 1 engine mounting bracket LH.
- Torque:
- 10 N*m (102 kgf*cm, 7 ft.*lbf)
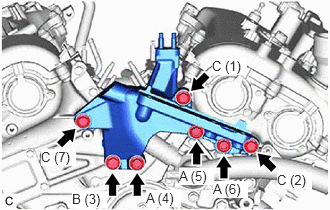
Install the front No. 1 engine mounting bracket LH to the timing chain cover assembly with the 7 bolts in the order shown in the illustration.
- Torque:
- 54 N*m (551 kgf*cm, 40 ft.*lbf)
- NOTICE:
-
Make sure that there is no oil on the threads of the bolts.
- Bolt Length:
Item Length Bolt (A) 115 mm (4.53 in.) Bolt (B) 85 mm (3.35 in.) Bolt (C) 40 mm (1.57 in.)
13471
76.INSTALL CRANKSHAFT PULLEY
11415
77.INSTALL CYLINDER BLOCK WATER DRAIN COCK SUB-ASSEMBLY
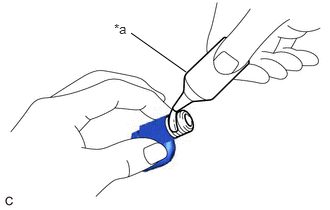
| *a | Adhesive |
Apply adhesive to the cylinder block water drain cock sub-assembly.
- Adhesive:
Toyota Genuine Adhesive 1324, Three Bond 1324 or equivalent
- NOTICE:
-
Install the cylinder block water drain cock sub-assembly within 3 minutes of applying adhesive.
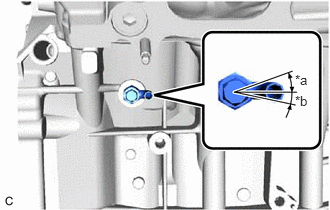
| *a | 20° |
| *b | 12° |
Install the cylinder block water drain cock sub-assembly to the cylinder block sub-assembly as shown in the illustration.
- Torque:
- 25 N*m (255 kgf*cm, 18 ft.*lbf)
- NOTICE:
- ·
Do not rotate the cylinder block water drain cock sub-assembly more than 1 revolution (360°) after tightening it to the specified torque.
·Do not loosen the cylinder block water drain cock sub-assembly after setting it to the correct position.
Install the cylinder block water drain cock plug to the cylinder block water drain cock sub-assembly.
- Torque:
- 12.7 N*m (130 kgf*cm, 9 ft.*lbf)
11415
78.INSTALL TAPER SCREW PLUG
w/ Taper screw plug:
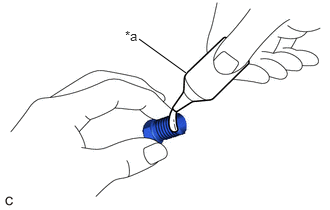
| *a | Adhesive |
Apply adhesive to the taper screw plug.
- Adhesive:
Toyota Genuine Adhesive 1324, Three Bond 1324 or equivalent
- NOTICE:
-
Install the taper screw plug within 3 minutes of applying adhesive.
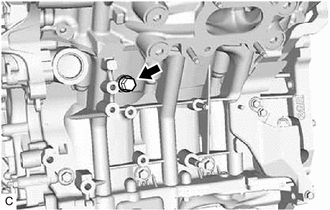
Install the taper screw plug to the cylinder block sub-assembly.
- Torque:
- 25 N*m (255 kgf*cm, 18 ft.*lbf)
12204
79.INSTALL PCV VALVE (VENTILATION VALVE SUB-ASSEMBLY)
19100P
80.INSTALL SPARK PLUG
12108
81.INSTALL OIL FILLER CAP SUB-ASSEMBLY
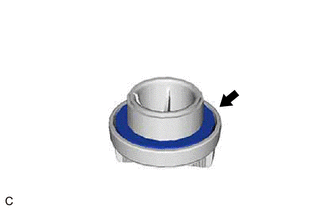
Install a new oil filler cap gasket to the oil filler cap sub-assembly.
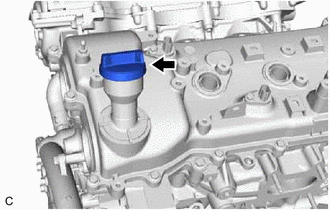
Install the oil filler cap sub-assembly to the cylinder head cover sub-assembly LH.