2GR-FKS ENGINE MECHANICAL CAMSHAFT REMOVAL
PROCEDURE

 1.INSTALL ENGINE ASSEMBLY TO ENGINE STAND
2.REMOVE ENGINE HANGERS
19500
3.REMOVE IGNITION COIL ASSEMBLY
29300
4.REMOVE VACUUM PUMP ASSEMBLY
11452
5.REMOVE ENGINE OIL LEVEL DIPSTICK GUIDE
6.REMOVE WIRE HARNESS CLAMP BRACKET
16587
7.REMOVE RADIATOR PIPE CLAMP
15370
8.REMOVE CAMSHAFT TIMING OIL CONTROL SOLENOID ASSEMBLY (for Intake Side of Bank 1)
15370
9.REMOVE CAMSHAFT TIMING OIL CONTROL SOLENOID ASSEMBLY (for Exhaust Side of Bank 1)
15370
10.REMOVE CAMSHAFT TIMING OIL CONTROL SOLENOID ASSEMBLY (for Exhaust Side of Bank 2)
15370
11.REMOVE CAMSHAFT TIMING OIL CONTROL SOLENOID ASSEMBLY (for Intake Side of Bank 2)
11401Q
12.REMOVE VVT SENSOR (for Intake Side of Bank 1)
11401M
13.REMOVE VVT SENSOR (for Exhaust Side of Bank 1)
11401M
14.REMOVE VVT SENSOR (for Intake Side of Bank 2)
11401M
15.REMOVE VVT SENSOR (for Exhaust Side of Bank 2)
11201
16.REMOVE CYLINDER HEAD COVER SUB-ASSEMBLY
11202
17.REMOVE CYLINDER HEAD COVER SUB-ASSEMBLY LH
11193
18.REMOVE SPARK PLUG TUBE GASKET
11324
19.REMOVE TIMING CHAIN COVER PLATE
20.SET NO. 1 CYLINDER TO TDC (COMPRESSION)
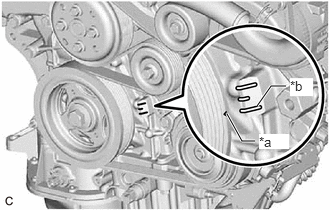
| *a | Timing Mark (Cutout) |
| *b | "0" Timing Mark |
Turn the crankshaft clockwise to align the timing mark (cutout) on the crankshaft pulley with the "0" timing mark on the timing chain cover assembly.
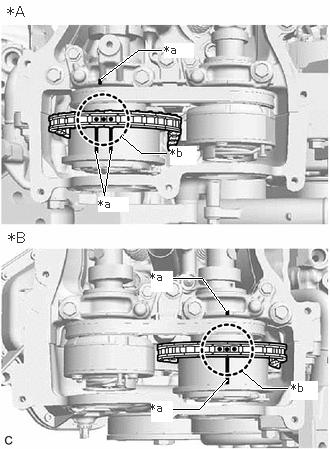
| *A | for Bank 2 |
| *B | for Bank 1 |
| *a | Timing Mark |
| *b | Paint Mark |
Check that the timing marks of the camshaft timing gear assemblies are aligned with the timing marks of the camshaft bearing caps as shown in the illustration.
- HINT:
-
If the marks are not aligned, turn the crankshaft again to align the marks.
Place paint marks on the timing marks and sprockets of each camshaft timing gear assembly and on the links of the chain sub-assembly.
- HINT:
-
Be sure to place the paint marks on 2 links of the chain sub-assembly and on the sprockets of the camshaft timing gear assemblies at the locations of the timing marks of the camshaft timing gear assemblies.
13540
21.REMOVE NO. 1 CHAIN TENSIONER ASSEMBLY
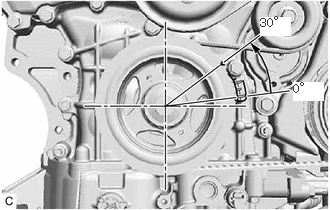
Turn the crankshaft approximately 30° counterclockwise so that there is some slack in the chain sub-assembly.
- HINT:
-
This prevents the valves and pistons from interfering with each other.
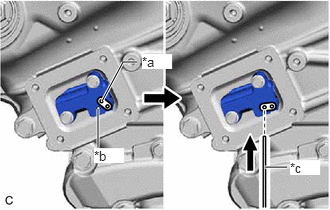
| *a | Lever Hole |
| *b | Tensioner Hole |
| *c | Pin |
Align the hole in the lever of the No. 1 chain tensioner assembly with the hole in the tensioner body as shown in the illustration, and then insert a pin with a diameter of 1.0 mm (0.0394 in.) into the hole.
- NOTICE:
-
Check that the pin is locked.
| *a | Timing Mark (Cutout) |
| *b | "0" Timing Mark |
Turn the crankshaft clockwise to align the timing mark (cutout) on the crankshaft pulley with the "0" timing mark on the timing chain cover assembly.
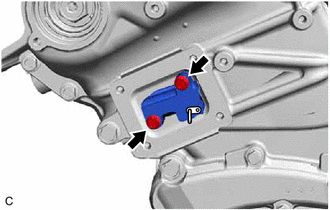
Remove the 2 bolts and No. 1 chain tensioner assembly from the cylinder head sub-assembly.
- NOTICE:
-
Do not drop the No. 1 chain tensioner assembly or bolts into the timing chain cover assembly.
13506
22.DISCONNECT CHAIN SUB-ASSEMBLY (for Bank 1)
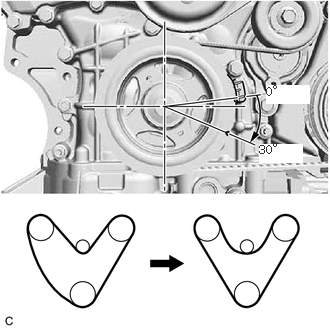
Turn the crankshaft clockwise until it is in the position shown in the illustration so that there is some slack in the chain sub-assembly between the banks.
- CAUTION:
-
As the camshafts may turn suddenly, do not touch the camshafts or camshaft timing gears.
- HINT:
-
When turning the crankshaft, engine oil may spray out of the oil holes.
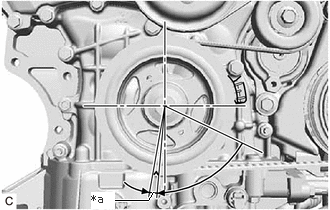
| *a | 5 to 10° |
Turn the crankshaft clockwise until it is in the position shown in the illustration so that the chain sub-assembly can be removed easily.
- HINT:
-
When turning the crankshaft, engine oil may spray out of the oil holes.
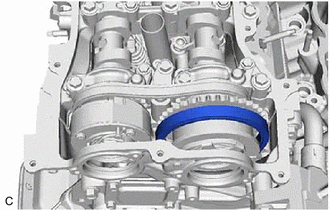
Remove the chain sub-assembly from the sprocket of the camshaft timing gear assembly and set it on the camshaft timing gear assembly.
- CAUTION:
-
As the camshaft may turn suddenly and pinch your fingers when the chain sub-assembly is removed, pinch the chain sub-assembly and lift it upward to remove it from the sprocket.
13550
23.SEPARATE NO. 2 CHAIN TENSIONER ASSEMBLY
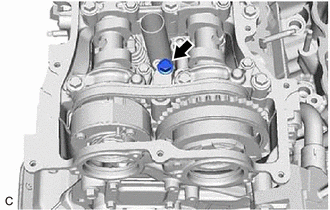
Remove the bolt to separate the No. 2 chain tensioner assembly from the camshaft housing sub-assembly LH.
24.REMOVE CAMSHAFT TIMING GEAR BOLT (for Intake Side of Bank 1)
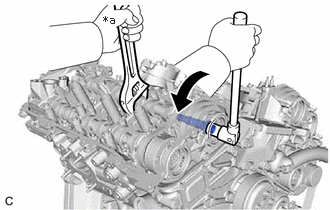
| *a | Hold |

|
Turn |
Hold the hexagonal portion of the camshaft with a wrench and remove the camshaft timing gear bolt from the camshaft timing gear assembly.
- NOTICE:
- ·
Be careful not to damage the camshaft, camshaft housing sub-assembly or spark plug tube with the wrench.
·If the camshaft timing gear bolt has been struck or dropped, replace it.
25.REMOVE CAMSHAFT TIMING GEAR BOLT (for Exhaust Side of Bank 1)
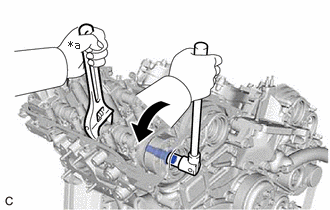
| *a | Hold |
|
|
Turn |
Hold the hexagonal portion of the No. 2 camshaft with a wrench and remove the camshaft timing gear bolt from the camshaft timing exhaust gear assembly.
- NOTICE:
- ·
Be careful not to damage the camshaft, camshaft housing sub-assembly or spark plug tube with the wrench.
·If the camshaft timing gear bolt has been struck or dropped, replace it.
26.REMOVE CAMSHAFT BEARING CAP (for Bank 1)
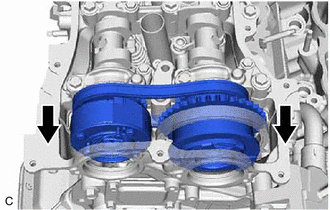
Slide the camshaft timing gear assembly and camshaft timing exhaust gear assembly as shown in the illustration.
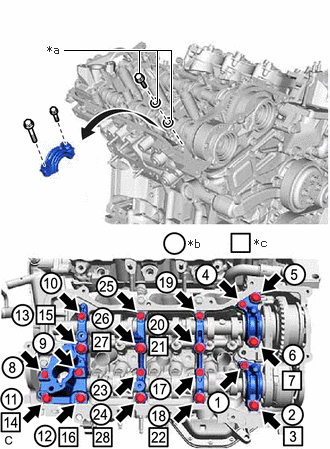
| *a | Replacement Bolt and Washer |
| *b | Part Removal |
| *c | Replacement Bolt and Washer Installation |
Remove the bolts and camshaft bearing caps in the order shown in the illustration. Immediately after removing a camshaft bearing cap, install replacement bolts and washers in the order shown in the illustration.
- Torque:
- 10 N*m (102 kgf*cm, 7 ft.*lbf)
- NOTICE:
- ·
Do not install the camshaft bearing caps when installing replacement bolts and washers.
·Be sure to follow the numerical order when performing this procedure.
·Do not allow replacement bolts or washers to contact the camshaft.
·Do not drop replacement bolts or washers into the cylinder head sub-assembly.
- HINT:
- ·
Arrange the removed parts so that they can be reinstalled in their original locations.
·Part number for replacement bolts: 91551-F0850 (9 bolts)
·Part number for replacement washers: 90201-12028 (18 washers)
13512
27.REMOVE NO. 2 CAMSHAFT
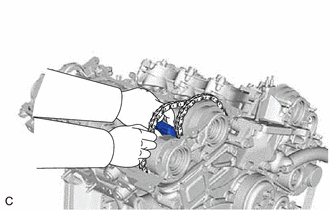
While lifting up the camshaft timing exhaust gear assembly, remove the No. 2 chain tensioner assembly.
Lift up the rear of the No. 2 camshaft so that it is at an angle.
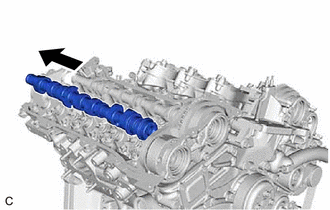
Pull the No. 2 camshaft as shown in the illustration to remove it from the camshaft timing exhaust gear assembly.
13511
28.REMOVE CAMSHAFT
Lift up the rear of the camshaft so that it is at an angle.
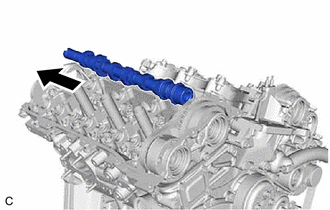
Pull the camshaft as shown in the illustration to remove it from the camshaft timing gear assembly.
13070A
29.REMOVE CAMSHAFT TIMING EXHAUST GEAR ASSEMBLY (for Bank 1)
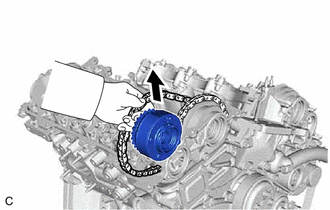
Remove the camshaft timing exhaust gear assembly.
13050
30.REMOVE CAMSHAFT TIMING GEAR ASSEMBLY (for Bank 1)
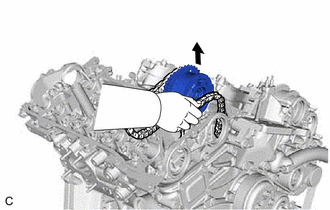
Remove the camshaft timing gear assembly and No. 2 chain sub-assembly.
- NOTICE:
-
Do not drop the chain sub-assembly into the gap between the engine and timing chain cover assembly.
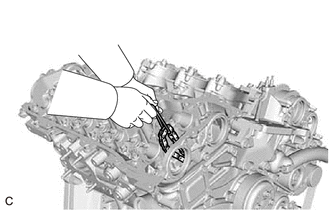
Suspend the chain sub-assembly with a string or equivalent.
13506
31.DISCONNECT CHAIN SUB-ASSEMBLY (for Bank 2)
| *a | Timing Mark (Cutout) |
| *b | "0" Timing Mark |
Turn the crankshaft counterclockwise to align the timing mark (cutout) on the crankshaft pulley with the "0" timing mark on the timing chain cover assembly.
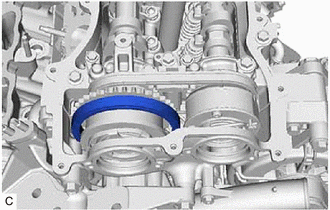
Remove the chain sub-assembly from the sprocket of the camshaft timing gear assembly and set it on the camshaft timing gear assembly.
- CAUTION:
-
As the camshaft may turn suddenly and pinch your fingers when the chain sub-assembly is removed, pinch the chain sub-assembly and lift it upward to remove it from the sprocket.
13560A
32.SEPARATE NO. 3 CHAIN TENSIONER ASSEMBLY
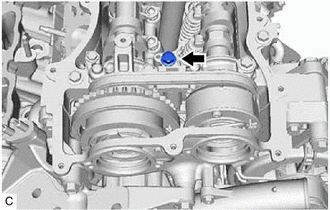
Remove the bolt of the No. 3 chain tensioner assembly.
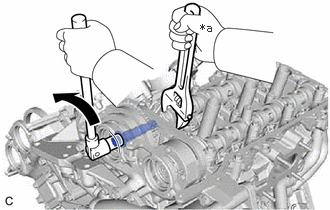
33.REMOVE CAMSHAFT TIMING GEAR BOLT (for Intake Side of Bank 2)
| *a | Hold |
|
|
Turn |
Hold the hexagonal portion of the No. 3 camshaft sub-assembly with a wrench and remove the camshaft timing gear bolt from the camshaft timing gear assembly.
- NOTICE:
- ·
Be careful not to damage the No. 3 camshaft sub-assembly, camshaft housing sub-assembly LH or spark plug tube with the wrench.
·If the camshaft timing gear bolt has been struck or dropped, replace it.
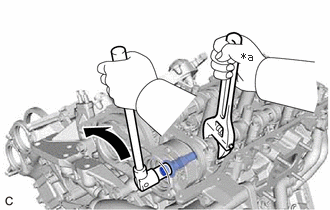
34.REMOVE CAMSHAFT TIMING GEAR BOLT (for Exhaust Side of Bank 2)
| *a | Hold |
|
|
Turn |
Hold the hexagonal portion of the No. 4 camshaft sub-assembly with a wrench and remove the camshaft timing gear bolt from the camshaft timing exhaust gear assembly.
- NOTICE:
- ·
Be careful not to damage the No. 4 camshaft sub-assembly, camshaft housing sub-assembly LH or spark plug tube with the wrench.
·If the camshaft timing gear bolt has been struck or dropped, replace it.
35.REMOVE CAMSHAFT BEARING CAP (for Bank 2)
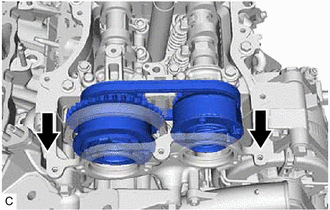
Slide the camshaft timing gear assembly and camshaft timing exhaust gear assembly as shown in the illustration.
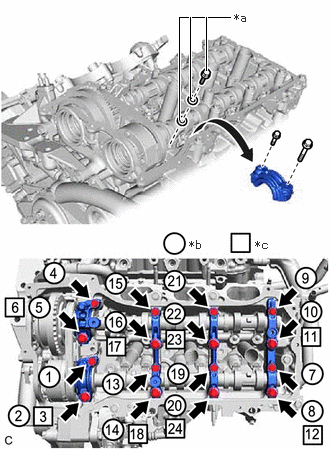
| *a | Replacement Bolt and Washer |
| *b | Part Removal |
| *c | Replacement Bolt and Washer Installation |
Remove the bolts and camshaft bearing caps in the order shown in the illustration. Immediately after removing a camshaft bearing cap, install replacement bolts and washers in the order shown in the illustration.
- Torque:
- 10 N*m (102 kgf*cm, 7 ft.*lbf)
- NOTICE:
- ·
Do not install the camshaft bearing caps when installing replacement bolts and washers.
·Be sure to follow the numerical order when performing this procedure.
·Do not allow replacement bolts or washers to contact the camshaft.
·Do not drop replacement bolts or washers into the cylinder head LH.
- HINT:
- ·
Arrange the removed parts so that they can be reinstalled in their original locations.
·Part number for replacement bolts: 91551-F0850 (8 bolts)
·Part number for replacement washers: 90201-12028 (16 washers)
13054
36.REMOVE NO. 4 CAMSHAFT SUB-ASSEMBLY
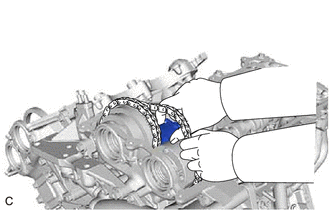
While lifting up the camshaft timing exhaust gear assembly, remove the No. 3 chain tensioner assembly.
Lift up the rear of the No. 4 camshaft sub-assembly so that it is at an angle.
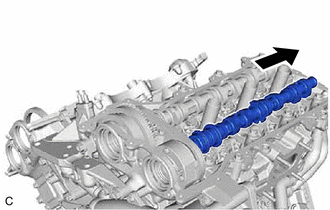
Pull the No. 4 camshaft sub-assembly as shown in the illustration to remove it from the camshaft timing exhaust gear assembly.
13053
37.REMOVE NO. 3 CAMSHAFT SUB-ASSEMBLY
Lift up the rear of the No. 3 camshaft sub-assembly so that it is at an angle.
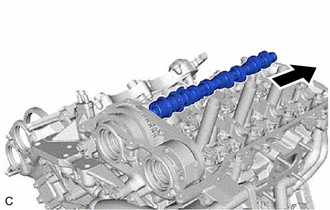
Pull the No. 3 camshaft sub-assembly as shown in the illustration to remove it from the camshaft timing gear assembly.
13070A
38.REMOVE CAMSHAFT TIMING EXHAUST GEAR ASSEMBLY (for Bank 2)
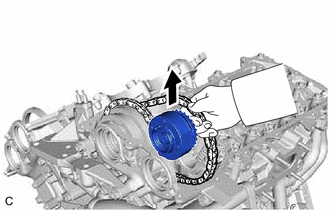
Remove the camshaft timing exhaust gear assembly.
13050
39.REMOVE CAMSHAFT TIMING GEAR ASSEMBLY (for Bank 2)
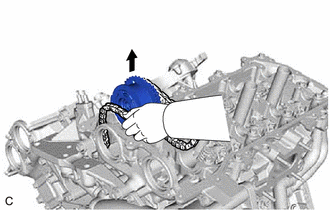
Remove the camshaft timing gear assembly and No. 2 chain sub-assembly.
- NOTICE:
-
Do not drop the chain sub-assembly into the gap between the engine and timing chain cover assembly.
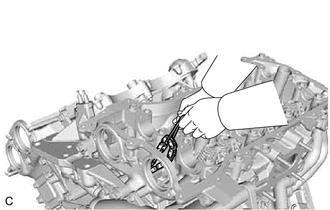
Suspend the chain sub-assembly with a string or equivalent.