UA80F AUTOMATIC TRANSMISSION / TRANSAXLE AUTOMATIC TRANSAXLE ASSEMBLY(When Not Using the Engine Support Bridge) REMOVAL
PROCEDURE

 11361J
1.REMOVE FLYWHEEL HOUSING UNDER COVER
32101A
2.REMOVE DRIVE PLATE AND TORQUE CONVERTER ASSEMBLY SETTING BOLT
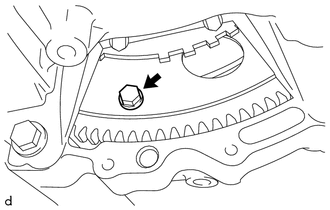
Turn the crankshaft to gain access to the 6 drive plate and torque converter assembly setting bolts and remove each drive plate and torque converter assembly setting bolt while holding the crankshaft pulley bolt with a wrench.
- HINT:
-
There will be one black colored drive plate and torque converter assembly setting bolt.
3.REMOVE ENGINE ASSEMBLY WITH TRANSAXLE
82121
4.DISCONNECT ENGINE WIRE
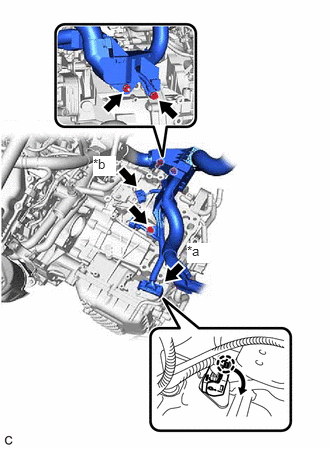
| *a | Transmission Wire Connector |
| *b | Park/Neutral Position Switch Assembly Connector |
Disconnect the park/neutral position switch assembly connector.
Disengage the claw, rotate the lever and disconnect the connector of the transmission wire connector.
Remove the 2 bolts and nut, and disconnect the engine wire from the automatic transaxle case sub-assembly.
35104V
5.SEPARATE BREATHER PLUG HOSE
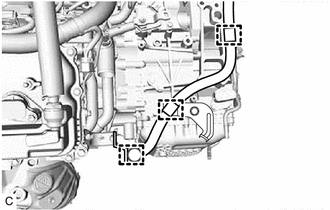
Disengage the 3 hose clamps to separate the breather plug hose.
6.INSTALL ENGINE HANGERS
48829A
7.REMOVE FRONT NO. 1 STABILIZER BRACKET LH
48824A
8.REMOVE FRONT NO. 1 STABILIZER BRACKET RH
- HINT:
-
Use the same procedure as for the LH side.
48811
9.REMOVE FRONT STABILIZER BAR
10.REMOVE STEERING LINK ASSEMBLY
51100G
11.REMOVE FRONT FRAME ASSEMBLY
43410
12.REMOVE FRONT DRIVE SHAFT ASSEMBLY RH
17118
13.REMOVE MANIFOLD STAY
36118A
14.REMOVE TRANSFER STIFFENER PLATE RH
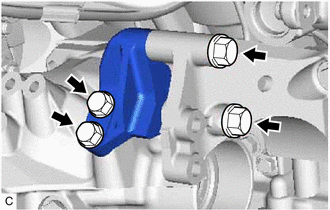
Remove the 4 bolts and transfer stiffener plate RH.
30500
15.REMOVE AUTOMATIC TRANSAXLE ASSEMBLY
Support the automatic transaxle assembly with a transmission jack.
- NOTICE:
-
Secure the automatic transaxle assembly to the transmission jack using a suitable adapter, such as a rope or attachment.
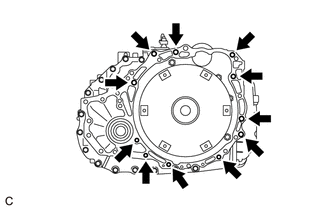
Remove the 11 bolts and automatic transaxle assembly.
- NOTICE:
-
To prevent damage to the knock pins, do not pry between the automatic transaxle assembly and engine assembly.
36100
16.REMOVE TRANSFER ASSEMBLY
16281K
17.DISCONNECT NO. 4 WATER BY-PASS HOSE
16267H
18.DISCONNECT NO. 3 WATER BY-PASS HOSE
19.DISCONNECT INLET NO. 2 OIL COOLER HOSE
20.DISCONNECT OUTLET NO. 3 OIL COOLER HOSE
33493A
21.REMOVE TRANSMISSION OIL COOLER
32942
22.DISCONNECT OUTLET NO. 1 OIL COOLER HOSE
32907C
23.REMOVE NO. 1 OIL COOLER TUBE SUB-ASSEMBLY WITHOUT HOSE
16570
24.REMOVE RADIATOR PIPE ASSEMBLY
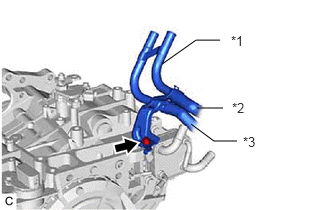
| *1 | Radiator Pipe Assembly |
| *2 | No. 3 Water By-pass Hose |
| *3 | No. 4 Water By-pass Hose |
Remove the bolt and radiator pipe assembly from the automatic transaxle assembly.
Slide the clip and remove the No. 4 water by-pass hose from the radiator pipe assembly.
Slide the clip and remove the No. 3 water by-pass hose from the radiator pipe assembly.
12311A
25.REMOVE FRONT ENGINE MOUNTING BRACKET
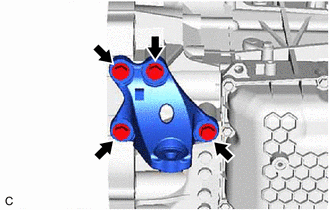
Remove the 4 bolts and front engine mounting bracket from the automatic transaxle assembly.
12325A
26.REMOVE ENGINE MOUNTING BRACKET LH
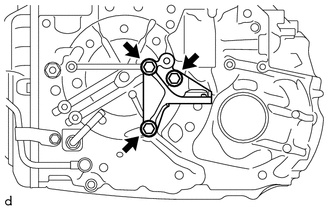
Remove the 3 bolts and engine mounting bracket LH from the automatic transaxle case sub-assembly.
27.REMOVE NO. 1 TRANSMISSION CONTROL CABLE BRACKET
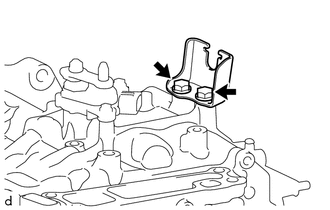
Remove the 2 bolts and No. 1 transmission control cable bracket from the automatic transaxle case sub-assembly.
35150
28.REMOVE TRANSMISSION CASE PLUG ASSEMBLY
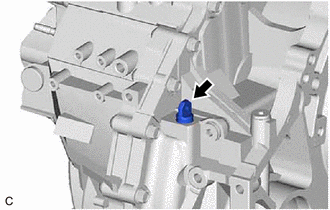
Remove the transmission case plug assembly from the automatic transaxle assembly.
29.REMOVE WIRE HARNESS CLAMP BRACKET
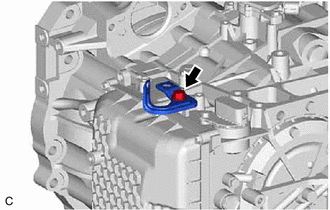
Remove the bolt and wire harness clamp bracket from the automatic transaxle case sub-assembly.
35104V
30.REMOVE BREATHER PLUG HOSE
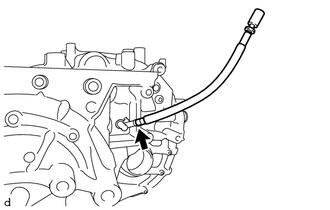
Using a screwdriver, remove the breather plug hose from the No. 1 breather plug (ATM).
- NOTICE:
-
Be careful not to damage the No. 1 breather plug (ATM).
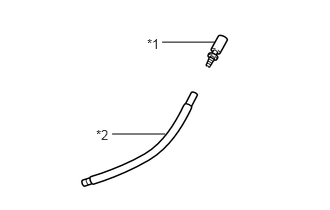
| *1 | Breather Plug Sub-assembly |
| *2 | Breather Plug Hose |
Remove the breather plug sub-assembly from the breather plug hose.
- NOTICE:
-
Be careful not to damage the breather plug sub-assembly.
32000
31.REMOVE TORQUE CONVERTER ASSEMBLY
Remove the torque converter assembly from the automatic transaxle assembly.
32000
32.INSPECT TORQUE CONVERTER ASSEMBLY
32101
33.INSPECT DRIVE PLATE AND RING GEAR SUB-ASSEMBLY