UA80F AUTOMATIC TRANSMISSION / TRANSAXLE TRANSMISSION WIRE(When Using the Engine Support Bridge) INSTALLATION
PROCEDURE

 82125J
1.INSTALL TRANSMISSION WIRE
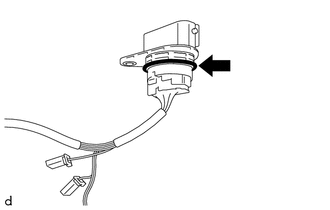
Coat the O-ring of the transmission wire with Toyota Genuine ATF WS.
Install the transmission wire to the automatic transaxle case sub-assembly with the bolt.
- Torque:
- 5.4 N*m (55 kgf*cm, 48 in.*lbf)
Connect the transmission revolution sensor (NT) connector and transmission revolution sensor (NC) connector.
Install the temperature sensor to the transmission valve body assembly with the bolt and temperature sensor clamp.
- Torque:
- 10.8 N*m (110 kgf*cm, 8 ft.*lbf)
- NOTICE:
-
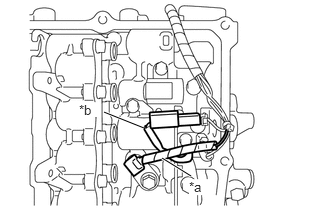 1.688,1.646 1.99,1.833 true 1.083,1.167 1.5,1.333 true 1.969,1.865 2.198,2.031 0.229,0.167 10 true *a 0.823,1.063 1.052,1.219 0.229,0.156 10 true *b
*a Transmission Wire (Temperature Sensor Wire) *b Transmission Revolution Sensor (NC) Wire
-
To prevent it from being pinched between the transmission valve body assembly and the transmission case side cover, pass the transmission revolution sensor (NC) wire under the transmission wire (temperature sensor wire) as shown in the illustration.
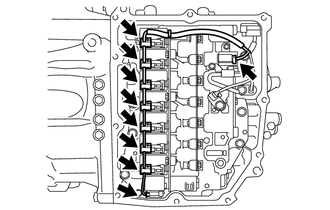
Connect the 9 solenoid valve connectors.
- NOTICE:
-
 0,0 0,0 false

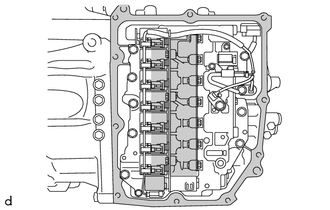
Do not let transmission wire protrude into this area.
- ·
To prevent it from being pinched between the transmission valve body assembly and the transmission case side cover, do not let the transmission wire ride up over the area shown in the illustration.
·To prevent it from being pinched between the transmission case side cover and the automatic transaxle case sub-assembly, do not let the transmission wire protrude toward the transmission case side cover installation surface.
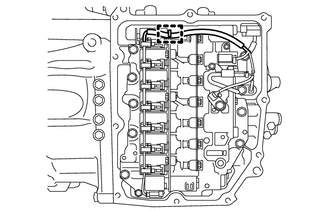
Engage the clamp, and connect the transmission wire to the solenoid lock plate.
35151F
2.INSTALL TRANSMISSION CASE SIDE COVER (for TMC Made)
- HINT:
-
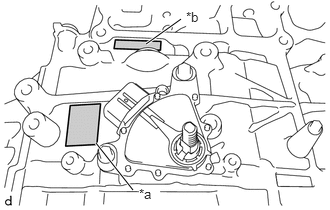 1.521,0.458 1.885,0.198 true 1,1.49 1.385,1.979 true 1.448,1.938 1.667,2.146 0.219,0.208 10 true *a 1.938,0.094 2.177,0.302 0.24,0.208 10 true *b
*a TMC Made *b AW Made
-
TMC (TOYOTA) Made and AW (AISIN AW) Made components can be identified by the differing locations where the serial number is stamped.
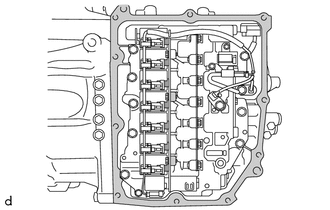
|
|
Area to be cleaned |
Clean the transmission case side cover installation surface of the automatic transaxle case sub-assembly.
- NOTICE:
-
Completely remove any oil or grease from the contact surfaces of the automatic transaxle case sub-assembly.
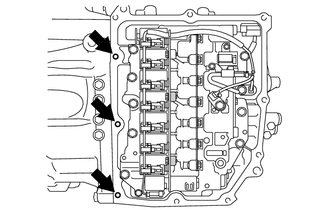
Clean the 3 bolt holes shown in the illustration.
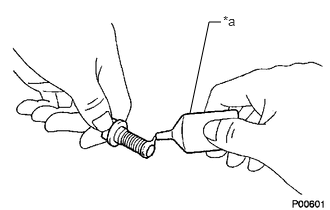
| *a | Adhesive |
Apply adhesive to 2 or 3 threads on the end of the bolt (A) and 2 bolts (D).
- Adhesive:
Toyota Genuine Adhesive 1324, Three Bond 1324 or equivalent
- NOTICE:
-
Make sure to install the bolts immediately after applying adhesive to prevent foreign matter from attaching to them.
- HINT:
-
The bolt (A) and 2 bolts (D) are in the locations shown in the following step.
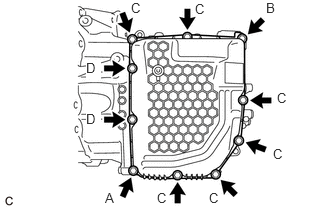
Temporarily install a new transmission case side cover to the automatic transaxle case sub-assembly with the 2 bolts ((A) and (B)).
- NOTICE:
- ·
Bolt (A) is an adhesive-coated bolt.
·To avoid damaging the gasket, prevent it from contacting the surrounding area during installation procedures.
Temporarily install the 6 bolts (C) and 2 bolts (D).
- NOTICE:
-
Bolt (D) is an adhesive-coated bolt.
Operate the engine support bridge and the jack to lower the engine and automatic transaxle assembly.
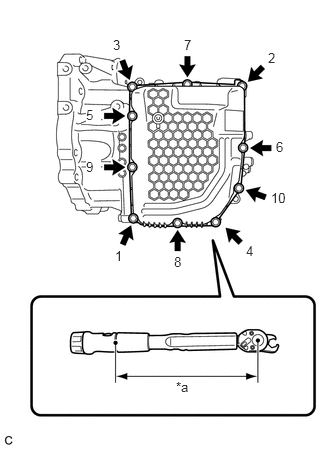
| *a | Torque Wrench Fulcrum Length |
Fully tighten the 10 bolts in the order shown in the illustration.
- Torque:
- Specified tightening torque for Bolt (A) and Bolt (D) : 6.5 N*m (66 kgf*cm, 58 in.*lbf)
- Specified tightening torque for Bolt (B) and Bolt (C) : 7.0 N*m (71 kgf*cm, 62 in.*lbf)
- HINT:
- ·
If a socket wrench will not fit, use a union nut wrench.
·Calculate the torque wrench reading when changing the fulcrum length of the torque wrench.
Click hereGeneral>INTRODUCTION>REPAIR INSTRUCTION>PRECAUTION
·When using a union nut wrench (fulcrum length of 22 mm (0.866 in.)) + torque wrench (fulcrum length of 162 mm (6.38 in.)) Bolt (A) and Bolt (D):
5.7 N*m (58 kgf*cm, 50 in.*lbf)
·When using a union nut wrench (fulcrum length of 22 mm (0.866 in.)) + torque wrench (fulcrum length of 162 mm (6.38 in.)) Bolt (B) and Bolt (C):
6.2 N*m (63 kgf*cm, 55 in.*lbf)
Tighten the engine mounting insulator LH with the nut.
- Torque:
- 95 N*m (969 kgf*cm, 70 ft.*lbf)
Tighten the front engine mounting insulator assembly with the bolt.
- Torque:
- 87 N*m (887 kgf*cm, 64 ft.*lbf)
Connect the transmission wire connector.
35151F
3.INSTALL TRANSMISSION CASE SIDE COVER (for AISIN AW Made)
- HINT:
-
1.521,0.458 1.885,0.198 true 1,1.49 1.385,1.979 true 1.448,1.938 1.667,2.146 0.219,0.208 10 true *a 1.938,0.094 2.177,0.302 0.24,0.208 10 true *b
*a TMC Made *b AW Made
-
TMC (TOYOTA) Made and AW (AISIN AW) Made components can be identified by the differing locations where the serial number is stamped.
|
|
Area to be cleaned |
Clean the transmission case side cover installation surface of the automatic transaxle case sub-assembly.
- NOTICE:
-
Completely remove any oil or grease from the contact surfaces of the automatic transaxle case sub-assembly.
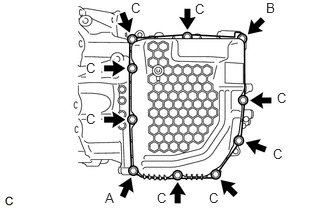
Temporarily install a new transmission case side cover to the automatic transaxle case sub-assembly with the 2 bolts (A and B).
- NOTICE:
-
To avoid damaging the gasket, prevent it from contacting the surrounding area during installation procedures.
Temporarily install the 8 bolts (C).
Operate the engine support bridge and the jack to lower the engine and automatic transaxle assembly.
| *a | Torque Wrench Fulcrum Length |
Fully tighten the 10 bolts in the order shown in the illustration.
- Torque:
- Specified tightening torque : 7.0 N*m (71 kgf*cm, 62 in.*lbf)
- HINT:
- ·
If a socket wrench will not fit, use a union nut wrench.
·Calculate the torque wrench reading when changing the fulcrum length of the torque wrench.
Click hereGeneral>INTRODUCTION>REPAIR INSTRUCTION>PRECAUTION
·When using a union nut wrench (fulcrum length of 22 mm (0.866 in.)) + torque wrench (fulcrum length of 162 mm (6.38 in.)):
6.2 N*m (63 kgf*cm, 55 in.*lbf)
Tighten the engine mounting insulator LH with the nut.
- Torque:
- 95 N*m (969 kgf*cm, 70 ft.*lbf)
Tighten the front engine mounting insulator assembly with the bolt.
- Torque:
- 87 N*m (887 kgf*cm, 64 ft.*lbf)
Connect the transmission wire connector.
32901C
4.CONNECT OIL COOLER UNION SUB-ASSEMBLY
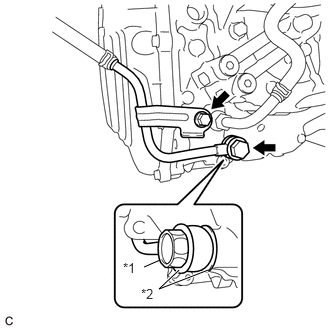
| *1 | Oil Cooler Union Bolt |
| *2 | Gasket |
Pass the oil cooler union sub-assembly through 2 new gaskets and temporarily install it to the automatic transaxle case sub-assembly.
Temporarily install the oil cooler union sub-assembly bracket portion to the automatic transaxle case sub-assembly with the bolt.
Fully tighten the oil cooler union bolt.
- Torque:
- 22.6 N*m (230 kgf*cm, 17 ft.*lbf)
Fully tighten the bolt.
- Torque:
- 12 N*m (122 kgf*cm, 9 ft.*lbf)
32942
5.CONNECT OUTLET NO. 1 OIL COOLER HOSE
32971
6.CONNECT TRANSMISSION OIL THERMOSTAT
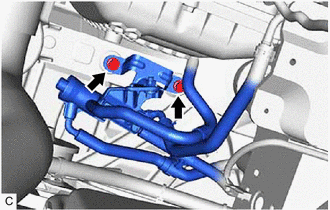
Connect the transmission oil thermostat to the front frame assembly with the 2 bolts.
- Torque:
- 19.5 N*m (199 kgf*cm, 14 ft.*lbf)
7.REMOVE ENGINE SUPPORT BRIDGE
8.REMOVE ENGINE HANGER
9.INSTALL WIRE HARNESS CLAMP BRACKET
47220D
10.INSTALL BRAKE MASTER CYLINDER RESERVOIR ASSEMBLY (for LHD)
17176
11.INSTALL AIR SURGE TANK TO INTAKE MANIFOLD GASKET
17190
12.INSTALL INTAKE AIR SURGE TANK ASSEMBLY
25860
13.CONNECT PURGE VALVE (PURGE VSV)
22030
14.INSTALL THROTTLE BODY WITH MOTOR ASSEMBLY
12261
15.CONNECT VENTILATION HOSE
28800
16.INSTALL BATTERY
17700
17.INSTALL AIR CLEANER ASSEMBLY WITH AIR CLEANER HOSE
17750A
18.INSTALL INLET AIR CLEANER ASSEMBLY
53295E
19.INSTALL COOL AIR INTAKE DUCT SEAL
53298E
20.INSTALL RADIATOR SIDE SEAL RH
53299D
21.INSTALL RADIATOR SIDE DEFLECTOR SEAL LH
55701J
22.INSTALL OUTER COWL TOP PANEL SUB-ASSEMBLY (for LHD)
55701J
23.INSTALL OUTER COWL TOP PANEL SUB-ASSEMBLY (for RHD)
24.INSTALL WINDSHIELD WIPER MOTOR AND LINK ASSEMBLY
25.CONNECT CABLE TO NEGATIVE BATTERY TERMINAL
- NOTICE:
-
When disconnecting the cable, some systems need to be initialized after the cable is reconnected.
-
Click hereGeneral>INTRODUCTION>REPAIR INSTRUCTION>INITIALIZATION
26.ADD AUTOMATIC TRANSAXLE FLUID
53737B
27.INSTALL FRONT FENDER APRON SEAL LH
53736
28.INSTALL FRONT FENDER APRON SEAL RH
53876A
29.INSTALL FRONT FENDER LINER LH
53875A
30.INSTALL FRONT FENDER LINER RH
51441
31.INSTALL NO. 1 ENGINE UNDER COVER
11209
32.INSTALL V-BANK COVER SUB-ASSEMBLY
33.INSTALL FRONT WHEELS