1AR-FE INTAKE / EXHAUST INTAKE MANIFOLD INSTALLATION
PROCEDURE

 17111
1.INSTALL INTAKE MANIFOLD
Install the wire harness clamp bracket to the intake manifold with the bolt.
- Torque:
- 10 N*m (102 kgf*cm, 7 ft.*lbf)
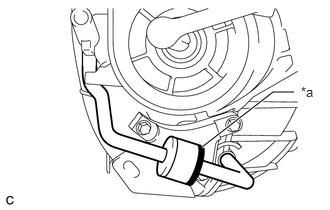
| *a | Black |
Connect the 2 vacuum hoses and check that the No. 1 check valve is installed as shown in the illustration.
Check the 4 tumble control valves (TCV).
- NOTICE:
-
The 4 tumble control valves (TCV) may be damaged if they are not closed before installing the intake manifold.
- HINT:
-
Connect the battery to the terminals of the intake air control valve actuator (for TCV) to operate the motor and close the 4 tumble control valves (TCV).
-
Click hereEngine / Hybrid System>1AR-FE INTAKE / EXHAUST>INTAKE SYSTEM>ON-VEHICLE INSPECTION
Install a new intake manifold gasket to the intake manifold.
Temporarily install the intake manifold with the 6 bolts.
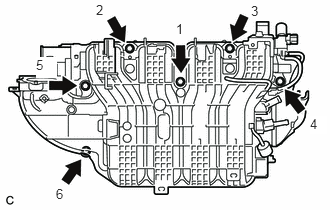
Tighten the 6 bolts in the order shown in the illustration.
- Torque:
- 28 N*m (286 kgf*cm, 21 ft.*lbf)
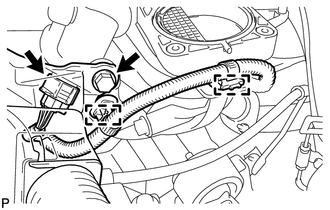
Connect the intake air control valve actuator (for TCV) connector.
Engage the 2 wire harness clamps.
Connect the wire harness with the bolt.
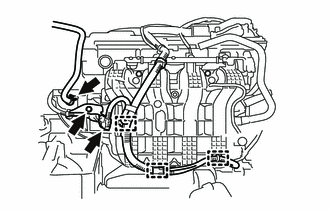
Install the wire harness clamp bracket to the intake manifold with the bolt.
- Torque:
- 10 N*m (102 kgf*cm, 7 ft.*lbf)
Connect the sensor wire connector.
Engage the 3 wire harness clamps.
Connect the fuel vapor feed hose to the intake manifold.
Install the 2 wire harness clamp brackets to the intake manifold with the 2 bolts.
- Torque:
- 10 N*m (102 kgf*cm, 7 ft.*lbf)
23814B
2.INSTALL FUEL DELIVERY PIPE
82121
3.CONNECT ENGINE WIRE
23901
4.CONNECT FUEL TUBE SUB-ASSEMBLY
44774
5.CONNECT UNION TO VACUUM TUBE HOSE
Connect the union to vacuum tube hose to the intake manifold and slide the clip to secure it.
12262
6.CONNECT NO. 2 VENTILATION HOSE
Connect the No. 2 ventilation hose to the intake manifold and slide the clip to secure it.
17650
7.INSTALL VACUUM SWITCHING VALVE ASSEMBLY (for ACIS)
Install the vacuum switching valve assembly (for ACIS) to the intake manifold with the bolt.
- Torque:
- 9.0 N*m (92 kgf*cm, 80 in.*lbf)
Connect the vacuum switching valve assembly (for ACIS) connector.
Connect the 2 vacuum hoses.
Engage the wire harness clamp.
Connect the union to vacuum tube hose to the vacuum hose clamp.
22030
8.INSTALL THROTTLE BODY WITH MOTOR ASSEMBLY
55701J
9.INSTALL OUTER COWL TOP PANEL SUB-ASSEMBLY
10.INSTALL WINDSHIELD WIPER MOTOR AND LINK ASSEMBLY
11.CONNECT CABLE FROM NEGATIVE BATTERY TERMINAL
- NOTICE:
-
When disconnecting the cable, some systems need to be initialized after the cable is reconnected.
-
Click hereGeneral>INTRODUCTION>REPAIR INSTRUCTION>INITIALIZATION
12.INSPECT FOR FUEL LEAK