AXLE AND DIFFERENTIAL REAR DIFFERENTIAL CARRIER OIL SEAL(for Dynamic Torque Control AWD) REPLACEMENT
CAUTION / NOTICE / HINT
The necessary procedures (adjustment, calibration, initialization, or registration) that must be performed after parts are removed and installed, or replaced during rear differential carrier oil seal and transmission coupling dust seal replacement are shown below.
| Replaced Part or Performed Procedure | Necessary Procedure | Effect/Inoperative Function when Necessary Procedure not Performed | Link |
|---|---|---|---|
| Rear wheel alignment adjustment | 1.
Perform "Reset Memory". 2.
Perform "Calibration". |
·
VSC is disabled or malfunctions ·
DTCs are output ·
Slip indicator light illuminates ·
ABS warning light illuminates |
( ) |
| Suspension, tires, etc.
(The vehicle height changes because of suspension or tire replacement) |
·
Measurement of ultrasonic sensor detection angle ·
Ultrasonic sensor detection angle registration |
Parking Support Brake System | ()
|
| Rear television camera assembly optical axis (Back camera position setting) | Parking Assist Monitor System | ()
|
|
·
Parking assist ECU initialization ·
Adjust steering angle |
Panoramic View Monitor System | ()
|
|
| Gas leak from exhaust system | Perform Inspection After Repair | ·
Poor idle, etc. ·
Engine start function, etc. |
()
|
| Rear differential carrier assembly | ·
ECU data initialization ·
Disconnect system function check |
Dynamic Torque Control AWD System | ()
|
PROCEDURE

 52380C
1.REMOVE REAR NO. 2 DIFFERENTIAL SUPPORT
41173
2.REMOVE DIFFERENTIAL DISCONNECT COVER
31364D
3.REMOVE CLUTCH CONTROL SOLENOID WIRE
41303
4.REMOVE ELECTRO MAGNETIC CONTROL COUPLING SUB-ASSEMBLY
41381A
5.REMOVE CONICAL SPRING WASHER
41252D
6.REMOVE REAR DIFFERENTIAL DUST DEFLECTOR
41330M
7.REMOVE TRANSMISSION COUPLING DUST SEAL
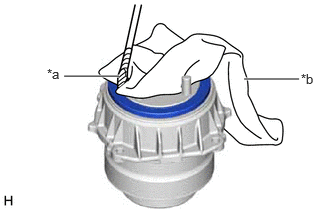
| *a | Protective Tape |
| *b | Cloth |
Using a piece of cloth and a screwdriver, remove the transmission coupling dust seal.
- NOTICE:
- ·
Do not damage the end surface of the electro magnetic control coupling sub-assembly.
·Do not damage the contact surface of the transmission coupling dust seal and electro magnetic control coupling sub-assembly.
- HINT:
-
Tape the screwdriver tip before use.
If the end surface or contact surface of the electro magnetic control coupling sub-assembly is damaged while removing the transmission coupling dust seal, replace the electro magnetic control coupling sub-assembly with a new one.
41201C
8.REMOVE REAR DIFFERENTIAL CARRIER OIL SEAL
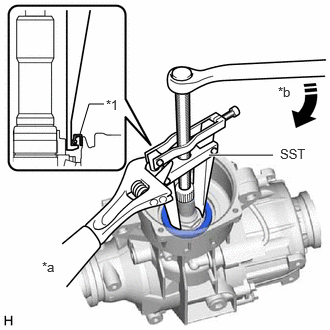
| *1 | Rear Differential Carrier Oil Seal |
| *a | Hold |
| *b | Turn |
Using SST, remove the rear differential carrier oil seal from the rear differential carrier assembly.
- SST
- 09308-55010
41201C
9.INSTALL REAR DIFFERENTIAL CARRIER OIL SEAL
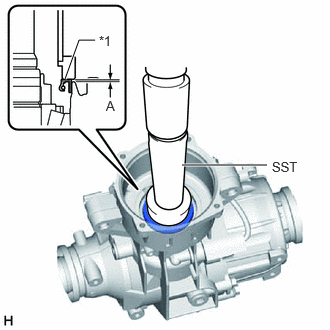
| *1 | Rear Differential Carrier Oil Seal |
Using SST and a press, install a new rear differential carrier oil seal to the rear differential carrier assembly.
- SST
- 09351-40010 (09351-04010)
- NOTICE:
- ·
Install the rear differential carrier oil seal uniformly.
·Press fit the rear differential carrier oil seal straight.
·Do not damage the rear differential carrier oil seal.
·Do not excessively press in the rear differential carrier oil seal.
·Make sure to install the rear differential carrier oil seal as specified, otherwise a malfunction such as an oil leak may occur.
- Standard Distance (A):
-0.3 to 0.3 mm (-0.0118 to 0.0118 in.)
Apply a light coat of MP grease to the lip of the rear differential carrier oil seal.
41330M
10.INSTALL TRANSMISSION COUPLING DUST SEAL
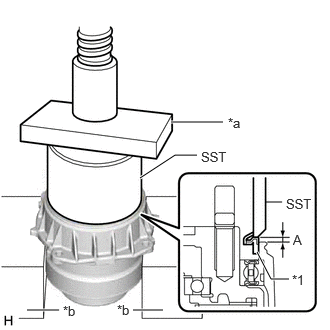
| *1 | Transmission Coupling Dust Seal |
| *a | Steel Plate |
| *b | V-block |
Using SST, a steel plate, V-blocks and a press, install a new transmission coupling dust seal.
- SST
- 09570-48010
- Standard Distance (A):
-0.2 to 0.4 mm (-0.0079 to 0.0157 in.)
- NOTICE:
- ·
Make sure that the electro magnetic control coupling sub-assembly is supported as shown in the illustration.
·Make sure to fully install the transmission coupling dust seal to the electro magnetic control coupling sub-assembly.
·Do not damage the end surface of the electro magnetic control coupling sub-assembly.
If the end surface of the electro magnetic control coupling sub-assembly is damaged while installing the transmission coupling dust seal, replace the electro magnetic control coupling sub-assembly with a new one.
Apply a light coat of MP grease to the lip of the transmission coupling dust seal.
41252D
11.INSTALL REAR DIFFERENTIAL DUST DEFLECTOR
41381A
12.INSTALL CONICAL SPRING WASHER
41303
13.INSTALL ELECTRO MAGNETIC CONTROL COUPLING SUB-ASSEMBLY
31364D
14.INSTALL CLUTCH CONTROL SOLENOID WIRE
41173
15.INSTALL DIFFERENTIAL DISCONNECT COVER
52380C
16.TEMPORARILY INSTALL REAR NO. 2 DIFFERENTIAL SUPPORT