HEATING / AIR CONDITIONING FRONT AIR CONDITIONING UNIT(for Gasoline Model) INSTALLATION
PROCEDURE

 1.TEMPORARILY INSTALL AIR CONDITIONER UNIT ASSEMBLY
55835A
2.INSTALL CENTER HEATER TO REGISTER DUCT
3.INSTALL INSTRUMENT PANEL REINFORCEMENT ASSEMBLY WITH AIR CONDITIONER UNIT ASSEMBLY
55307C
4.INSTALL NO. 2 INSTRUMENT PANEL BRACE SUB-ASSEMBLY
55306A
5.INSTALL NO. 1 INSTRUMENT PANEL BRACE SUB-ASSEMBLY
6.INSTALL AIR CONDITIONER UNIT ASSEMBLY
7.CONNECT INSTRUMENT PANEL WIRE (for LHD)
Connect the earth wire with the bolt.
- Torque:
- 10 N*m (102 kgf*cm, 7 ft.*lbf)
Engage each clamp.
Connect the 2 connectors.
Engage each clamp.
Install the 2 nuts.
- Torque:
- 5.0 N*m (51 kgf*cm, 44 in.*lbf)
Connect the connector holder with the bolt (B).
- Torque:
- 12.5 N*m (127 kgf*cm, 9 ft.*lbf)
Connect the 5 earth wires with the 5 bolts (A).
- Torque:
- 8.5 N*m (87 kgf*cm, 75 in.*lbf)
Connect the 2 connectors.
8.CONNECT INSTRUMENT PANEL WIRE (for RHD)
Connect the earth wire with the bolt.
- Torque:
- 10 N*m (102 kgf*cm, 7 ft.*lbf)
Engage each clamp.
Connect the 2 connectors.
Engage each clamp.
Connect the connector holder with the nut (B).
- Torque:
- 5.0 N*m (51 kgf*cm, 44 in.*lbf)
Install the 2 nuts (A).
- Torque:
- 5.0 N*m (51 kgf*cm, 44 in.*lbf)
Connect the 4 earth wires with the 4 bolts.
- Torque:
- 8.5 N*m (87 kgf*cm, 75 in.*lbf)
Connect the connector.
55837C
9.INSTALL CENTER HEATER TO REGISTER SUB DUCT
55215D
10.INSTALL NO. 3 DASH PANEL INSULATOR PAD
87212G
11.INSTALL REAR NO. 3 AIR DUCT
87212H
12.INSTALL REAR NO. 4 AIR DUCT
87212
13.INSTALL REAR NO. 1 AIR DUCT
87212F
14.INSTALL REAR NO. 2 AIR DUCT
78111
15.INSTALL ACCELERATOR PEDAL
78118
16.INSTALL ACCELERATOR PEDAL PAD
88625Q
17.INSTALL COOLER (ROOM TEMP. SENSOR) THERMISTOR
89343C
18.INSTALL NO. 1 CLEARANCE WARNING BUZZER (for LHD)
19.INSTALL PARKING ASSIST ECU WITH BRACKET
82877
20.INSTALL ECU INTEGRATION BOX RH (for LHD)
82877
21.INSTALL ECU INTEGRATION BOX RH (for RHD)
45250
22.INSTALL STEERING COLUMN ASSEMBLY
87201L
23.INSTALL NO. 4 AIR DUCT SUB-ASSEMBLY
8598A
24.INSTALL DOOR CONTROL BATTERY (w/ Door Control Battery)
83108
25.INSTALL METER MIRROR SUB-ASSEMBLY (w/ Headup Display)
26.INSTALL INSTRUMENT PANEL JUNCTION BLOCK ASSEMBLY WITH MAIN BODY ECU
27.INSTALL FRONT SEAT ASSEMBLY RH (for Manual Seat)
28.INSTALL FRONT SEAT ASSEMBLY (for Power Seat)
87245B
29.CONNECT INLET HEATER WATER HOSE B
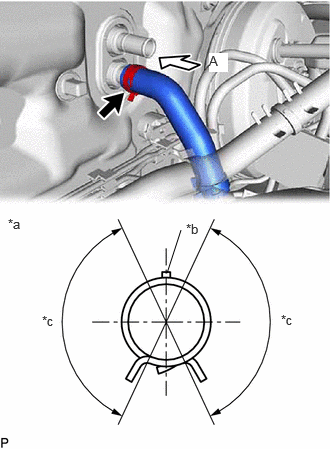
| *a | View A |
| *b | Marking (Green) |
| *c | Clip Installation Angle (60 to 120°) |
Connect the inlet heater water hose B with the marking facing up and engage the clip within the area shown in the illustration.
- NOTICE:
-
Do not apply excessive force to the inlet heater water hose B.
87209
30.CONNECT WATER HOSE SUB-ASSEMBLY
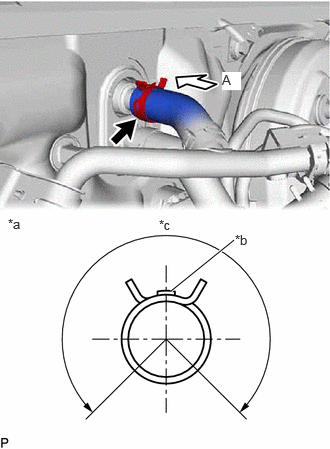
| *a | View A |
| *b | Marking (Green) |
| *c | Clip Installation Angle (270°) |
Connect the water hose sub-assembly with the marking facing up and engage the clip within the area shown in the illustration.
- NOTICE:
-
Do not apply excessive force to the water hose sub-assembly.
88710G
31.CONNECT NO. 2 AIR CONDITIONER TUBE AND ACCESSORY ASSEMBLY
Remove the vinyl tape from the No. 2 air conditioner tube and accessory assembly.
Sufficiently apply compressor oil to 2 new O-rings and the fitting surfaces of the No. 2 air conditioner tube and accessory assembly.
- Compressor Oil:
ND-OIL 12 or equivalent
Install the 2 O-rings to the No. 2 air conditioner tube and accessory assembly.
- NOTICE:
-
Keep the O-rings and O-ring fitting surfaces free from dirt and foreign matter.
Connect the No. 2 air conditioner tube and accessory assembly.
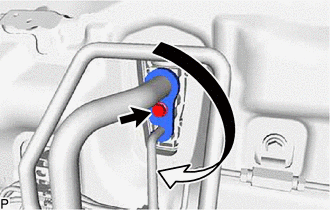
Rotate the hook connector as shown in the illustration.
Insert the tube joint into the fitting hole securely and install the bolt.
- Torque:
- 9.8 N*m (100 kgf*cm, 87 in.*lbf)
55704B
32.INSTALL COWL VENTILATOR PANEL SUB-ASSEMBLY (for LHD)
55704B
33.INSTALL COWL VENTILATOR PANEL SUB-ASSEMBLY (for RHD)
53608A
34.INSTALL FRONT UPPER SUSPENSION TO COWL BRACE SUB-ASSEMBLY LH
53607B
35.INSTALL FRONT UPPER SUSPENSION TO COWL BRACE SUB-ASSEMBLY RH
- HINT:
-
Perform the same procedure as for the LH side.
53892C
36.INSTALL FRONT FENDER SPLASH SHIELD SEAL FRONT LH
53891C
37.INSTALL FRONT FENDER SPLASH SHEILD SEAL FRONT RH
- HINT:
-
Perform the same procedure as for the LH side.
53808A
38.INSTALL FENDER SPLASH SHIELD SUB-ASSEMBLY REAR LH
53807A
39.INSTALL FENDER SPLASH SHIELD SUB-ASSEMBLY REAR RH
- HINT:
-
Perform the same procedure as for the LH side.
40.INSTALL WINDSHIELD WIPER MOTOR AND LINK ASSEMBLY
41.ADD ENGINE COOLANT
42.INSPECT FOR COOLANT LEAK
43.CHARGE AIR CONDITIONING SYSTEM WITH REFRIGERANT
44.WARM UP ENGINE
45.INSPECT FOR REFRIGERANT LEAK