AXLE AND DIFFERENTIAL REAR AXLE CARRIER(for 2WD) REMOVAL
CAUTION / NOTICE / HINT
The necessary procedures (adjustment, calibration, initialization, or registration) that must be performed after parts are removed and installed, or replaced during rear axle carrier sub-assembly removal/installation are shown below.
| Replaced Part or Performed Procedure | Necessary Procedure | Effect/Inoperative Function when Necessary Procedure not Performed | Link |
|---|---|---|---|
|
*1: Learning can also be performed using the GTS. Click here( |
|||
for HV Model
Auxiliary battery terminal is disconnected/reconnected |
Perform steering sensor zero point calibration | Lane Control System | ( ) |
| Parking Support Brake System*1 | |||
| Pre-collision System | |||
| Memorize steering angle neutral point | Parking Assist Monitor System | ()
|
|
| Panoramic View Monitor System | ()
|
||
| Initialize back door lock | Power Door Lock Control System | ()
|
|
| Reset back door close position | Power Back Door System | ()
|
|
| Suspension, tires, etc.
(The vehicle height changes because of suspension or tire replacement) |
·
Measurement of ultrasonic sensor detection angle ·
Ultrasonic sensor detection angle registration |
Parking Support Brake System | ()
|
| Rear television camera assembly optical axis (Back camera position setting) | Parking Assist Monitor System | ()
|
|
·
Parking assist ECU initialization ·
Adjust steering angle |
Panoramic View Monitor System | ()
|
|
| Rear wheel alignment adjustment | for HV Model
Perform "Calibration". |
·
DTCs are stored ·
ABS warning light illuminates ·
Brake system warning light (yellow indicator) illuminates ·
Slip indicator light illuminates ·
VSC disabled or malfunctions |
()
|
for Gasoline Model
1.
Perform "Reset Memory". 2.
Perform "Calibration". |
·
VSC is disabled or malfunctions ·
DTCs are output ·
Slip indicator light illuminates ·
ABS warning light illuminates |
()
|
|
- NOTICE:
- for HV Model·
After the ignition switch is turned off, the radio and display receiver assembly or the radio receiver assembly records various types of memory and settings. As a result, after turning the ignition switch off, make sure to wait at least 120 seconds before disconnecting the cable from the negative (-) auxiliary battery terminal.
·When removing or installing the rear disc brake cylinder assembly, pushing back the disc brake piston may cause a large clearance between the brake pads and brake disc. When the brake pedal is depressed with a large clearance between the brake pads and the brake disc, DTC C13DB00, C13DC00, C13DD00, C13DE00, C140000 and/or C140A00 related to abnormal brake fluid pressure may be stored. Make sure to clear any DTCs after performing this procedure.
·While the auxiliary battery is connected, even if the ignition switch is off, the brake control system activates when the brake pedal is depressed or any door courtesy switch turns on. Therefore, when servicing the brake system components, do not operate the brake pedal or open/close the doors while the auxiliary battery is connected.
- HINT:
- ·
Use the same procedure for the RH side and LH side.
·The following procedure is for the LH side.
PROCEDURE

 1.DISABLE BRAKE CONTROL (for HV Model)
Click hereBrake>BRAKE (REAR)>REAR BRAKE>REMOVAL
2.REMOVE REAR WHEEL
48738
3.REMOVE REAR SUSPENSION ARM COVER
47319F
4.SEPARATE REAR FLEXIBLE HOSE
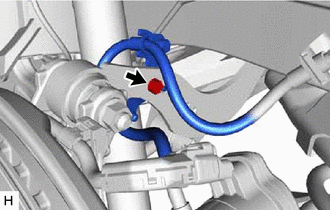
Remove the bolt and separate the rear flexible hose from the rear upper control arm assembly.
890C0A
5.SEPARATE NO. 2 PARKING BRAKE WIRE ASSEMBLY
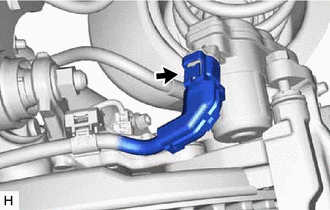
Disconnect the No. 2 parking brake wire assembly connector from the parking brake actuator assembly.
- NOTICE:
- ·
Remove any dirt or foreign matter on and around the No. 2 parking brake wire assembly connector before performing this step.
·Do not allow water, oil or dirt to enter the No. 2 parking brake wire assembly connector.
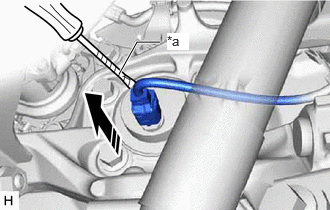
| *a | Protective Tape |
Using a screwdriver with its tip wrapped with protective tape, disconnect the No. 2 parking brake wire assembly connector from the rear axle hub and bearing assembly.
- NOTICE:
- ·
Remove any dirt or foreign matter on and around the No. 2 parking brake wire assembly connector before performing this step.
·Do not allow water, oil or dirt to enter the No. 2 parking brake wire assembly connector.
·Be careful not to damage the rear axle hub and bearing assembly or connector cover.
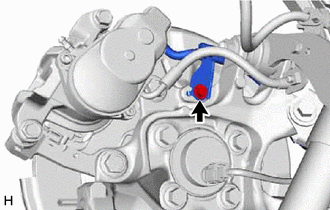
Remove the bolt and separate the No. 2 parking brake wire assembly from the rear axle carrier sub-assembly.
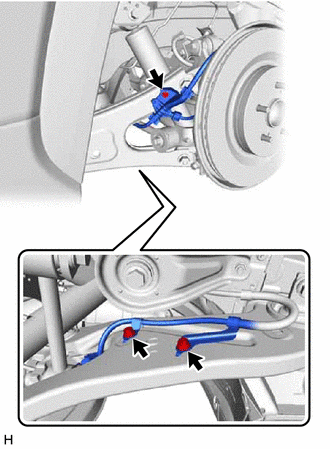
Remove the 3 bolts and separate the No. 2 parking brake wire assembly from the rear trailing arm assembly.
47850
6.SEPARATE REAR DISC BRAKE CYLINDER ASSEMBLY
7.REMOVE REAR DISC BRAKE CYLINDER MOUNTING WITH BRAKE PAD
42431
8.REMOVE REAR DISC
Click hereBrake>BRAKE (REAR)>REAR BRAKE>REMOVAL
42450B
9.REMOVE REAR AXLE HUB AND BEARING ASSEMBLY
48780E
10.REMOVE REAR TRAILING ARM ASSEMBLY
42305
11.REMOVE REAR AXLE CARRIER SUB-ASSEMBLY
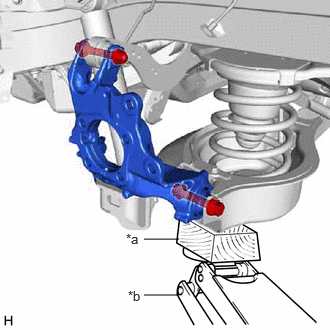
| *a | Wooden Block |
| *b | Jack |
Using a jack and a wooden block, support the rear No. 2 suspension arm assembly.
- NOTICE:
- ·
When jacking up the rear No. 2 suspension arm assembly, be sure to jack it up slowly.
·Keep supporting the rear No. 2 suspension arm assembly until the installation of the rear axle carrier sub-assembly has been completed.
·Make sure to perform this operation with the vehicle kept as low as possible.
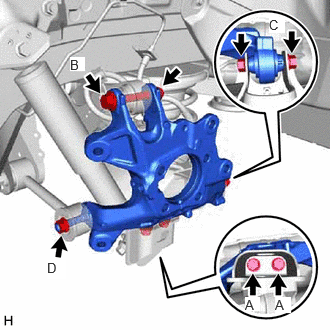
Remove the 2 bolts (A), and separate the rear lower shock absorber bracket sub-assembly from the rear axle carrier sub-assembly.
Remove the bolt (B) and nut, and separate the rear upper control arm assembly from the rear axle carrier sub-assembly.
- NOTICE:
-
Because the nut has its own stopper, do not turn the nut. Loosen the bolt with the nut secured.
Remove the bolt (C) and nut, and separate the rear axle carrier sub-assembly from the rear No. 2 suspension arm assembly.
- NOTICE:
-
Because the nut has its own stopper, do not turn the nut. Loosen the bolt with the nut secured.
Remove the nut (D), spacer and rear axle carrier sub-assembly from the rear No. 1 suspension arm assembly.
48759
12.REMOVE LOWER CONTROL ARM PIN
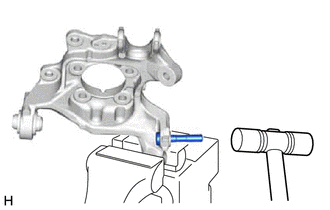
Secure the rear axle carrier sub-assembly in a vise using aluminum plates.
- NOTICE:
-
Do not overtighten the vise.
Using a hammer, remove the lower control arm pin from the rear axle carrier sub-assembly.