INSTALLATION
Removal / installation · Vehicles built Jun 2011 – Jul 2012
Versions by build date: Jun 2011 – Jul 2012 Aug 2012 – Jul 2013 from Aug 2013
| 1. INSTALL DIFFERENTIAL PRESSURE SENSOR (for DPF) |

Install the sensor bracket with the bolt.
- Torque:
- 8.0 N*m{ 82 kgf*cm , 71 in.*lbf }
| 2. INSPECT TORQUE CONVERTER CLUTCH ASSEMBLY |
Inspect the torque converter clutch assembly (Click here).
| 3. INSTALL TORQUE CONVERTER CLUTCH ASSEMBLY |
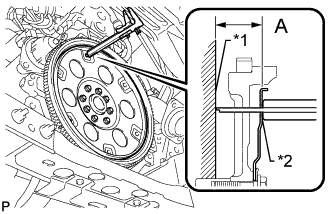  |
Install the torque converter clutch to the automatic transmission.
Using a vernier caliper measure dimension A between the transmission surface of the engine that contacts the transmission*1, and the surface of the drive plate that contacts the converter*2. (#)
Using a vernier caliper and straightedge, measure dimension B shown in the illustration. Check that B is greater than A measured in the step labeled #.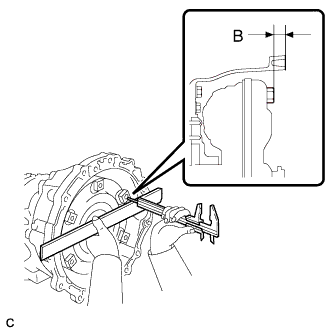
- Standard:
- B = A + 1.00 mm (0.0394 in.) or more
| 4. INSTALL TRANSFER ASSEMBLY |
Install the transfer assembly (Click here).
| 5. INSTALL AUTOMATIC TRANSMISSION ASSEMBLY |
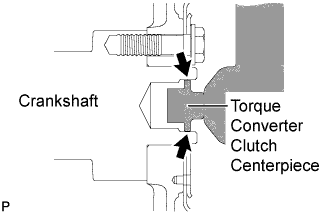 |
Apply clutch spline grease to the surface of the crankshaft that contacts the torque converter clutch centerpiece.
- Clutch spline grease:
- Toyota Genuine Clutch Spline Grease or equivalent
- Maximum grease amount:
- Approximately 1.0 g (0.0353 oz)
Install the transmission to the engine with the 5 bolts.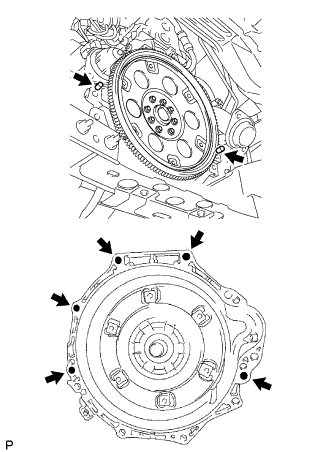
- Torque:
- 71 N*m{ 724 kgf*cm , 52 ft.*lbf }
- NOTICE:
- Confirm that the 2 knock pins are installed to the surface of the engine cylinder block that contacts the transmission before installing the transmission.
Turn the crankshaft to gain access to the installation locations of the 6 torque converter clutch setting bolts and install each bolt through the hole of the flywheel while holding the crankshaft pulley bolt with a wrench.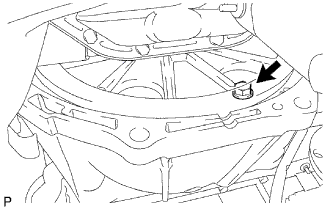
- Torque:
- 48 N*m{ 489 kgf*cm , 35 ft.*lbf }
- NOTICE:
- First install the black colored bolt and then the remaining 5 bolts.
| 6. INSTALL STIFFENER PLATE |
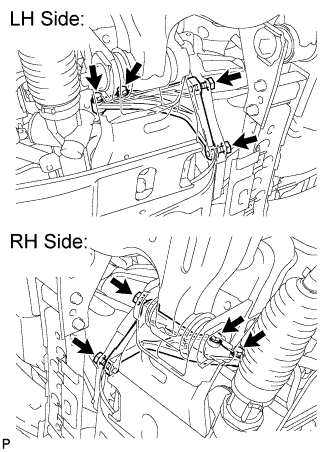 |
Install the No. 2 end plate.
Install the No. 4 cylinder block insulator.
Install the stiffener plate LH to the engine and transmission with the 4 bolts.
- Torque:
- 71 N*m{ 724 kgf*cm , 52 ft.*lbf }
Install the stiffener plate RH (with oil cooler tube clamp) to the engine and transmission with the 4 bolts.
- Torque:
- 71 N*m{ 724 kgf*cm , 52 ft.*lbf }
| 7. INSTALL STARTER ASSEMBLY |
for 2.2 kW Type:
Install the starter assembly (Click here).
for 2.7 kW Type:
Install the starter assembly (Click here).
| 8. CONNECT WIRE HARNESS |
except DPF:
Connect the park/neutral position switch connector.
Connect the transmission wire connector.
Connect the 2 speed sensor connectors.
Connect the No. 1 indicator switch connector.
Connect the No. 2 indicator switch connector.
Connect the No. 3 indicator switch connector.
Connect the speed sensor connector.
Attach the 7 clamps.
Connect the wire harness to the automatic transmission housing with the bolt.
- Torque:
- 13 N*m{ 128 kgf*cm , 9 ft.*lbf }
for DPF:
Connect the park/neutral position switch connector.
Connect the transmission wire connector.
Connect the 2 speed sensor connectors.
Connect the differential pressure sensor connector.
Connect the No. 1 indicator switch connector.
Connect the No. 2 indicator switch connector.
Connect the No. 3 indicator switch connector.
Connect the speed sensor connector.
Attach the 10 clamps.
Connect the wire harness to the automatic transmission housing with the bolt.
- Torque:
- 13 N*m{ 128 kgf*cm , 9 ft.*lbf }
Connect the ground cable with the nut.
- Torque:
- 5.5 N*m{ 56 kgf*cm , 49 in.*lbf }
| 9. INSTALL REAR NO. 1 ENGINE MOUNTING INSULATOR |
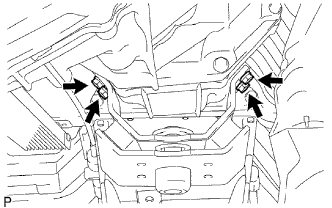 |
Install the engine mounting insulator to the transmission with the 4 bolts.
- Torque:
- 47 N*m{ 479 kgf*cm , 35 ft.*lbf }
| 10. INSTALL NO. 3 FRAME CROSSMEMBER SUB-ASSEMBLY |
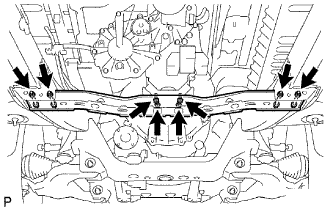 |
Install the frame crossmember to the engine mounting insulator with the 4 set bolts.
- Torque:
- 17 N*m{ 173 kgf*cm , 13 ft.*lbf }
Connect the ends of the frame crossmember to the vehicle with the 4 bolts and 4 nuts.
- Torque:
- 50 N*m{ 510 kgf*cm , 37 ft.*lbf }
| 11. INSTALL NO. 1 TRANSMISSION CONTROL CABLE BRACKET |
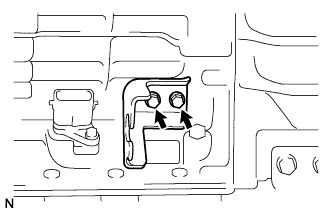 |
Install the control cable bracket with the 2 bolts.
- Torque:
- 14 N*m{ 143 kgf*cm , 10 ft.*lbf }
| 12. CONNECT TRANSMISSION CONTROL CABLE ASSEMBLY |
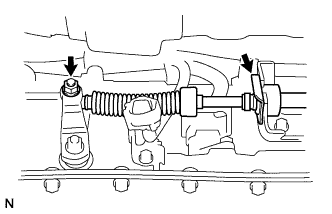 |
Connect the control cable with a new clip.
Connect the control cable with the nut.
- Torque:
- 14 N*m{ 143 kgf*cm , 10 ft.*lbf }
| 13. CONNECT OIL COOLER TUBE |
Connect the end of the inlet oil cooler tube to the automatic transmission by hand.
Connect the end of the outlet oil cooler tube to the automatic transmission by hand.
Install the 3 clamps with the 3 bolts.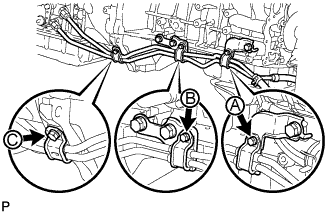
- Torque:
- for bolt A and B:
- 5.0 N*m{ 50 kgf*cm , 43 in.*lbf }
- for bolt C:
- 12 N*m{ 122 kgf*cm , 9 ft.*lbf }
Using a union nut wrench, tighten the inlet and outlet tubes.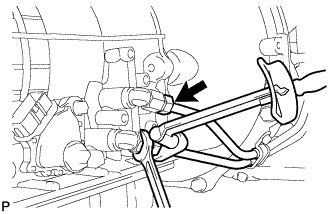
- Torque:
- 34 N*m{ 346 kgf*cm , 25 ft.*lbf }
- NOTICE:
- Use the formula to calculate special torque values for situations where a union nut wrench is combined with a torque wrench (Click here).
| 14. INSTALL PROPELLER SHAFT WITH CENTER BEARING ASSEMBLY |
for TMT Made:
Install the propeller shaft with center bearing assembly (Click here).
for TSAM Made:
Install the propeller shaft with center bearing assembly (Click here).
| 15. INSTALL FRONT PROPELLER SHAFT ASSEMBLY |
for TMT Made:
Install the front propeller shaft assembly (Click here).
for TSAM Made:
Install the front propeller shaft assembly (Click here).
| 16. INSTALL NO. 2 TURBINE OUTLET ELBOW (for DPF) |
Install a new gasket and the No. 2 turbine outlet elbow with 3 new nuts.
- Torque:
- 30 N*m{ 306 kgf*cm , 22 ft.*lbf }
| 17. INSTALL TURBINE OUTLET ELBOW STAY (for DPF) |
Install the turbine outlet elbow stay with the bolt and nut.
- Torque:
- 60 N*m{ 612 kgf*cm , 44 ft.*lbf }
Attach the wire harness clamp.
| 18. INSTALL NO. 3 EXHAUST MANIFOLD HEAT INSULATOR (for DPF) |
Install the No. 3 exhaust manifold heat insulator with the 2 bolts.
- Torque:
- 12 N*m{ 122 kgf*cm , 9 ft.*lbf }
| 19. INSTALL NO. 2 EXHAUST MANIFOLD HEAT INSULATOR (for DPF) |
Install the No. 2 exhaust manifold heat insulator with the 2 bolts.
- Torque:
- 13 N*m{ 133 kgf*cm , 10 ft.*lbf }
| 20. INSTALL FRONT EXHAUST PIPE ASSEMBLY |
for DPF:
Install the exhaust pipe (Click here).
except DPF:
Install the exhaust pipe (Click here).
| 21. INSTALL TRANSFER CASE LOWER PROTECTOR |
Install the protector with the 4 bolts.
- Torque:
- 18 N*m{ 283 kgf*cm , 13 ft.*lbf }
| 22. INSTALL TRANSFER HIGH AND LOW SHIFT LEVER ASSEMBLY |
While pushing the select return spring to the left with the end of the transfer high and low shift lever, insert the end of the shift lever into the shift fork.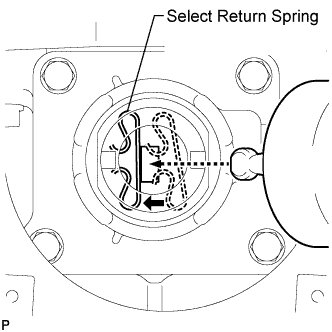
While holding down the shift lever cap, install the snap ring to install the transfer high and low shift lever.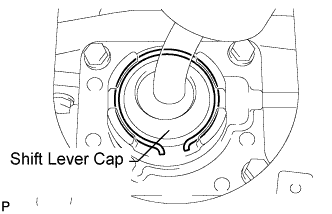
Return the transfer front drive shift boot to its original position.
| 23. INSTALL SHIFT LEVER BOOT ASSEMBLY |
Install the shift lever boot with the 4 screws.
| 24. INSTALL CONSOLE BOX ASSEMBLY |
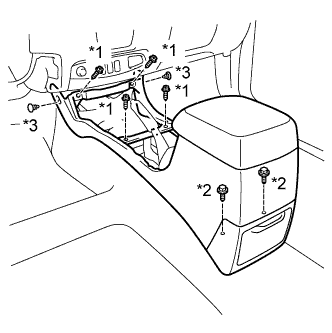 |
Install the console box with the 4 screws and 2 bolts.
Install the 2 clips.
Text in Illustration *1
Screw
*2
Bolt
*3
Clip
| 25. INSTALL UPPER CONSOLE PANEL SUB-ASSEMBLY |
Attach the 12 claws to install the upper console panel.
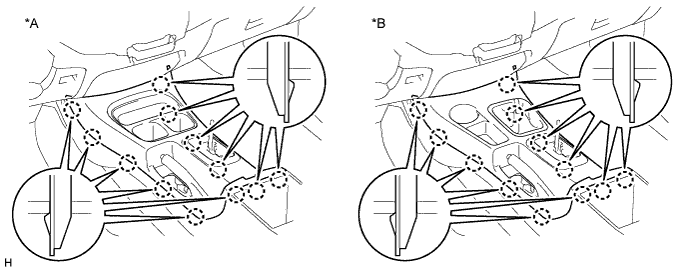
Text in Illustration *A
for 2WD
*B
for 4WD
| 26. INSTALL PARKING BRAKE HOLE COVER SUB-ASSEMBLY |
Attach the 4 claws to install the parking brake hole cover.
| 27. INSTALL SHIFT LEVER KNOB SUB-ASSEMBLY |
| 28. CONNECT CABLE TO NEGATIVE BATTERY TERMINAL |
- NOTICE:
- Certain systems need to be initialized after disconnecting and reconnecting the cable to the negative (-) battery terminal.
| 29. ADD AUTOMATIC TRANSMISSION FLUID |
Add automatic transmission fluid (Click here).
| 30. INSPECT SHIFT LEVER POSITION |
When moving the shift lever from P to R with the ignition switch ON and the brake pedal depressed, make sure that the shift lever moves smoothly and correctly into position.
Start the engine and make sure that the vehicle moves forward after moving the shift lever from N to D, and moves in reverse after shifting to R.
If the results are not as specified, inspect the park/ neutral position switch and check the shift lever.
| 31. PERFORM INITIALIZATION |
Perform initialization (Click here).
| 32. INSPECT FOR EXHAUST GAS LEAK |
- If gas is leaking, tighten the areas necessary to stop the leak. Replace damaged parts as necessary.
| 33. INSTALL NO. 2 ENGINE UNDER COVER |
- Torque:
- 28 N*m{ 285 kgf*cm , 21 ft.*lbf }
| 34. INSTALL NO. 1 ENGINE UNDER COVER |
- Torque:
- 28 N*m{ 285 kgf*cm , 21 ft.*lbf }