2KD-FTV ENGINE MECHANICAL CYLINDER HEAD GASKET(w/o DPF) REMOVAL
CAUTION / NOTICE / HINT
- NOTICE:
- ·
When replacing the injectors (including shuffling the injectors between the cylinders), common rail or cylinder head, it is necessary to replace the injection pipes with new ones.
·When replacing the fuel supply pump, common rail, cylinder block, cylinder head, cylinder head gasket or timing gear case, it is necessary to replace the fuel inlet pipe with a new one.
·After removing the injection pipes, clean them with a brush and compressed air.
PROCEDURE

 1. PRECAUTION
- NOTICE:
-
After turning the ignition switch off, waiting time may be required before disconnecting the cable from the battery terminal. Therefore, make sure to read the disconnecting the cable from the battery terminal notice before proceeding with work (See page General>INTRODUCTION>REPAIR INSTRUCTION>PRECAUTION).
2.DISCONNECT CABLE FROM NEGATIVE BATTERY TERMINAL
- NOTICE:
-
When disconnecting the cable, some systems need to be initialized after the cable is reconnected (See page General>INTRODUCTION>REPAIR INSTRUCTION>INITIALIZATION).
3.DRAIN ENGINE OIL
4.REMOVE INTAKE MANIFOLD
w/ EGR Cooler: (See page Engine / Hybrid System>2KD-FTV INTAKE / EXHAUST>INTAKE MANIFOLD(w/ EGR Cooler)>REMOVAL)
w/o EGR Cooler: (See page Engine / Hybrid System>2KD-FTV INTAKE / EXHAUST>INTAKE MANIFOLD(w/o EGR Cooler)>REMOVAL)
5.REMOVE GLOW PLUG ASSEMBLY
6.REMOVE INJECTOR ASSEMBLY
7.REMOVE COMMON RAIL ASSEMBLY
8.REMOVE EXHAUST MANIFOLD WITH TURBOCHARGER
w/ EGR Cooler: (See page Engine / Hybrid System>2KD-FTV INTAKE / EXHAUST>EXHAUST MANIFOLD W/ TURBOCHARGER(w/ EGR Cooler)>REMOVAL)
w/o EGR Cooler: (See page Engine / Hybrid System>2KD-FTV INTAKE / EXHAUST>EXHAUST MANIFOLD W/ TURBOCHARGER(w/o EGR Cooler)>REMOVAL)
9.REMOVE FAN SHROUD
10.DISCONNECT COOLER COMPRESSOR ASSEMBLY (w/ Air Conditioning System)
11.REMOVE NO. 1 COMPRESSOR MOUNTING BRACKET (w/ Air Conditioning System)
12.REMOVE TIMING BELT
13.REMOVE CAMSHAFT TIMING PULLEY
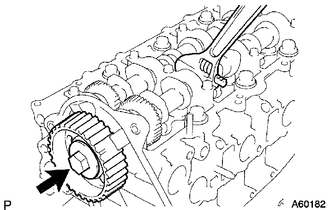
Remove the bolt of the camshaft timing pulley while holding the camshaft with a wrench.
- NOTICE:
-
Make sure to remove the bolt of the camshaft timing pulley with the timing belt not installed.
Remove the camshaft timing pulley.
14.REMOVE NO. 2 TIMING BELT COVER
Remove the 4 bolts, nut and timing belt cover.
15.REMOVE CYLINDER BLOCK INSULATOR (w/ EGR Cooler)
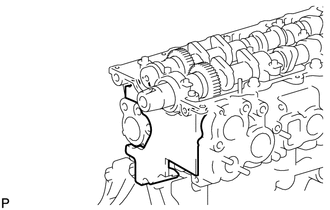
Remove the cylinder block insulator from the cylinder head.
16.REMOVE CAMSHAFT
17.REMOVE VALVE LIFTER
18.REMOVE CYLINDER HEAD SUB-ASSEMBLY
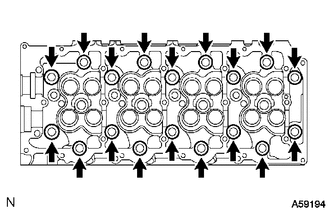
Uniformly loosen the 18 cylinder head bolts in several passes in the sequence shown in the illustration. Then remove the 18 cylinder head bolts and 18 washers.
- NOTICE:
-
Head warpage or cracking could result from removing bolts in the incorrect order.
Lift the cylinder head from the dowels on the cylinder block, and place the cylinder head on wooden blocks on a bench.
- NOTICE:
-
Be careful not to damage the contact surfaces of the cylinder head and cylinder block.
- HINT:
-
If the cylinder head is difficult to lift, use a screwdriver to pry between the cylinder head and block.
19.REMOVE CYLINDER HEAD GASKET