2KD-FTV ENGINE MECHANICAL ENGINE UNIT(w/ DPF) INSTALLATION
CAUTION / NOTICE / HINT
- NOTICE:
- ·
When replacing the injectors (including shuffling the injectors between the cylinders), common rail or cylinder head, it is necessary to replace the injection pipes with new ones.
·When replacing the fuel supply pump, common rail, cylinder block, cylinder head, cylinder head gasket or timing gear case, it is necessary to replace the fuel inlet pipe with a new one.
·After removing the injection pipes, clean them with a brush and compressed air.
PROCEDURE

 1.INSTALL FRONT NO. 1 ENGINE MOUNTING BRACKET LH
Install the front No. 1 engine mounting bracket with the 4 bolts.
- Torque:
- 68 N*m (693 kgf*cm, 50 ft.*lbf)
2.INSTALL FRONT NO. 1 ENGINE MOUNTING BRACKET RH
Install the front No. 1 engine mounting bracket with the 4 bolts.
- Torque:
- 68 N*m (693 kgf*cm, 50 ft.*lbf)
3.INSTALL ENGINE COOLANT TEMPERATURE SENSOR
4.INSTALL CAMSHAFT POSITION SENSOR
5.INSTALL CRANKSHAFT POSITION SENSOR
6.INSTALL VANE PUMP ASSEMBLY
Install a new O-ring to the vane pump.
Install the vane pump with the 2 nuts.
- Torque:
- 41 N*m (418 kgf*cm, 30 ft.*lbf)
7.INSTALL VACUUM PUMP ASSEMBLY
Install 2 new O-rings to the vacuum pump.
Install the vacuum pump with the 2 nuts.
- Torque:
- 21 N*m (210 kgf*cm, 15 ft.*lbf)
8.INSTALL OIL COOLER COVER SUB-ASSEMBLY
9.INSTALL FUEL SUPPLY PUMP ASSEMBLY
10.INSTALL COMMON RAIL ASSEMBLY
11.INSTALL OIL FILTER SUB-ASSEMBLY
12.INSTALL NO. 2 CYLINDER HEAD COVER SUB-ASSEMBLY
13.INSTALL FUEL HOSE BRACKET
Install the fuel hose bracket with the bolt.
- Torque:
- 20 N*m (204 kgf*cm, 15 ft.*lbf)
14.INSTALL NO. 1 FUEL PIPE
Install the No. 1 fuel pipe.
15.INSTALL FUEL HOSE PROTECTOR
Install the fuel hose protector with the bolt and nut.
- Torque:
- 8.0 N*m (82 kgf*cm, 71 in.*lbf)
16.INSTALL GLOW PLUG ASSEMBLY
17.INSTALL INTAKE MANIFOLD
18.INSTALL ELECTRIC EGR CONTROL VALVE ASSEMBLY
19.INSTALL DIESEL THROTTLE BODY ASSEMBLY
20.INSTALL WATER OUTLET
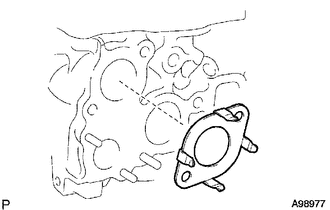
| *1 | Claw |
Install a new gasket to the cylinder head as shown in the illustration.
- HINT:
-
Make sure the claws of the gasket face the water outlet.
Install the water outlet with the 2 bolts.
- Torque:
- 19 N*m (194 kgf*cm, 14 ft.*lbf)
21.INSTALL THERMOSTAT
22.INSTALL WATER INLET
23.INSTALL EXHAUST MANIFOLD
Temporarily install a new gasket, the exhaust manifold, 8 new collars and the 8 plate washers to the cylinder head with 8 new nuts.
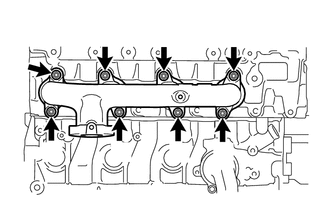
Tighten the 8 nuts in the order shown in the illustration.
- Torque:
- 40 N*m (408 kgf*cm, 30 ft.*lbf)
- NOTICE:
-
Make sure that the side of the collar with the smaller diameter faces the exhaust manifold.
24.INSTALL TURBOCHARGER SUB-ASSEMBLY
25.INSTALL NO. 1 COMPRESSOR MOUNTING BRACKET (w/ Air Conditioning System)
Install the No. 1 compressor mounting bracket with the 4 bolts.
- Torque:
- 45 N*m (459 kgf*cm, 33 ft.*lbf)
26.INSTALL V-RIBBED BELT TENSIONER ASSEMBLY
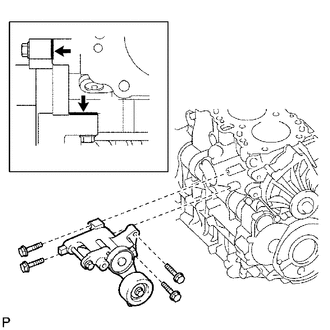
| *1 | Cylinder Block |
| *2 | V-ribbed Belt Tensioner |
Install the V-ribbed belt tensioner with the 4 bolts.
- Torque:
- 21 N*m (214 kgf*cm, 15 ft.*lbf)
- HINT:
-
Firmly press and hold the V-ribbed belt tensioner against the cylinder block to eliminate any gaps in the areas labeled A in the illustration. Then uniformly tighten the 4 bolts.
27.INSTALL GENERATOR BRACKET
Install the generator bracket with the bolt.
- Torque:
- 25 N*m (255 kgf*cm, 18 ft.*lbf)
28.INSTALL GENERATOR ASSEMBLY
29.INSTALL NO. 2 IDLE PULLEY ASSEMBLY
Install the spacer, No. 2 idle pulley and pulley plate with the bolt.
- Torque:
- 45 N*m (459 kgf*cm, 33 ft.*lbf)
30.INSTALL NO. 1 INTERCOOLER SUPPORT BRACKET
Install the No. 1 intercooler support bracket with the 2 bolts.
- Torque:
- 32 N*m (326 kgf*cm, 24 ft.*lbf)
31.INSTALL NO. 2 INTERCOOLER SUPPORT BRACKET
Install the No. 2 intercooler support bracket with the 2 bolts.
- Torque:
- 32 N*m (326 kgf*cm, 24 ft.*lbf)
32.INSTALL CRANKSHAFT PULLEY
Align the keyway of the pulley with the key located on the crankshaft, and then slide the pulley into place to install it.
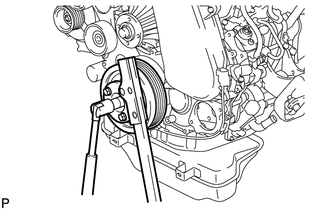
Using SST, install the pulley bolt.
- SST
- 09213-58014
09330-00021
- Torque:
- 365 N*m (3722 kgf*cm, 269 ft.*lbf)
33.INSTALL NO. 1 TIMING BELT IDLER SUB-ASSEMBLY
34.INSTALL TIMING BELT
35.INSTALL NO. 1 TIMING BELT COVER