2TR-FE ENGINE MECHANICAL ENGINE ASSEMBLY REMOVAL
PROCEDURE

 1.DISCHARGE FUEL SYSTEM PRESSURE
2. PRECAUTION
- NOTICE:
-
After turning the ignition switch off, waiting time may be required before disconnecting the cable from the battery terminal. Therefore, make sure to read the disconnecting the cable from the battery terminal notice before proceeding with work (See page General>INTRODUCTION>REPAIR INSTRUCTION>PRECAUTION).
3.DISCONNECT CABLE FROM NEGATIVE BATTERY TERMINAL
- NOTICE:
-
When disconnecting the cable, some systems need to be initialized after the cable is reconnected (See page General>INTRODUCTION>REPAIR INSTRUCTION>INITIALIZATION).
4.REMOVE NO. 1 ENGINE UNDER COVER
5.REMOVE NO. 2 ENGINE UNDER COVER
6.DRAIN ENGINE COOLANT
7.DRAIN ENGINE OIL
8.DRAIN MANUAL TRANSMISSION OIL
9.REMOVE INTAKE AIR CONNECTOR AND AIR CLEANER ASSEMBLY
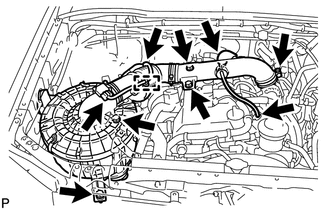
Disconnect the vacuum hose.
Disconnect the No. 2 PCV hose.
Disconnect the mass air flow meter connector and detach the wire harness clamps.
Loosen the hose clamp and remove the 4 bolts, air cleaner and intake air connector assembly.
10.REMOVE RADIATOR GRILLE
11.DISCONNECT RADIATOR HOSE INLET
12.DISCONNECT RADIATOR HOSE OUTLET
13.REMOVE FAN AND GENERATOR V BELT
14.REMOVE AIR PUMP INLET (w/ Secondary Air Injection System)
15.REMOVE FAN SHROUD
16.REMOVE FAN PULLEY
17.REMOVE RADIATOR ASSEMBLY
18.DISCONNECT HEATER WATER HOSE
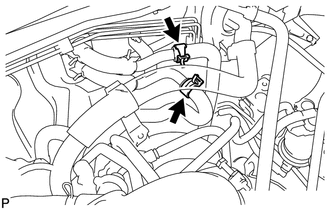
Disconnect the heater water inlet hose and heater water outlet hose from the heater pipe.
19.DISCONNECT HOSE
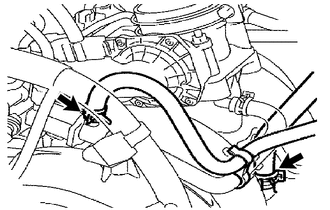
Disconnect the vacuum hose (for the brake master cylinder).
Disconnect the purge line hose.
20.DISCONNECT NO. 4 AIR INJECTION SYSTEM HOSE (w/ Secondary Air Injection System)
21.DISCONNECT NO. 2 FUEL HOSE
22.DISCONNECT NO. 1 FUEL HOSE
23.DISCONNECT ENGINE WIRE
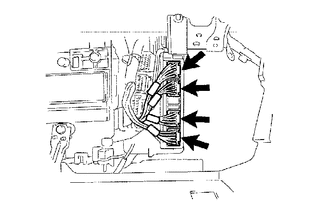
Disconnect the ECM connectors from the cabin.
Remove the glove compartment door.
Disconnect the 4 ECM connectors.
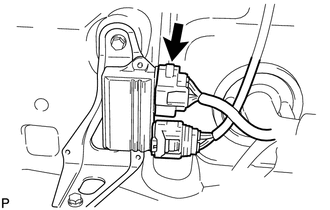
w/ Secondary Air Injection System:
Disconnect the air injection driver connector.
Detach the wire harness clamp.
Remove the bolt and disconnect the ground wire.
Pull out the engine wire from the cabin.
w/ Secondary Air Injection System:
Disconnect the air fuel ratio sensor connector.
w/o Secondary Air Injection System:
Disconnect the heated oxygen sensor connector.
Remove the bolt and disconnect the sensor bracket from the right side of the frame.
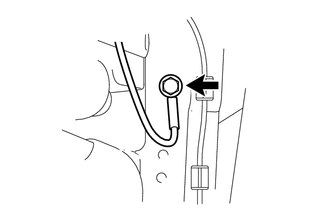
Remove the bolt and disconnect the ground wire from the left side of the frame.
Remove the nut and disconnect the ground wire from the body.
Remove the engine room relay block cover (upper).
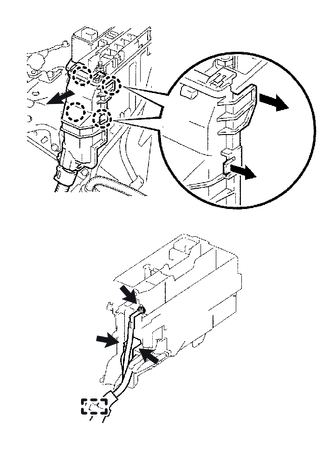
| *a | Pull |
Remove the engine room relay block cover (side).
Using a screwdriver, detach the 4 claws and remove the relay block cover.
- HINT:
-
Tape the screwdriver tip before use.
Remove the nut and disconnect the cable from the engine room junction block.
Disconnect the 2 engine room junction block connectors and wire clamp.
Remove the bolt and disconnect the wire clamp from the front engine mounting bracket LH.
24.DISCONNECT VANE PUMP ASSEMBLY
Disconnect the oil pressure switch connector.
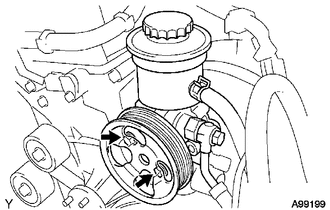
Remove the 2 bolts and disconnect the vane pump from the engine.
Support the vane pump securely.
25.REMOVE ENGINE OIL LEVEL DIPSTICK
26.REMOVE ENGINE OIL LEVEL DIPSTICK GUIDE
Remove the bolt, engine oil level dipstick guide and O-ring.
- NOTICE:
-
Cover the dipstick guide hole to prevent foreign matter from entering it.
27.DISCONNECT COOLER COMPRESSOR ASSEMBLY (w/ Air Conditioning System)
28.REMOVE HOOD ASSEMBLY
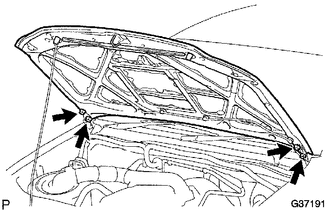
Disconnect the washer nozzle hose.
Remove the 4 bolts and hood.
- NOTICE:
-
Be careful not to damage the vehicle.
29.REMOVE FRONT EXHAUST PIPE ASSEMBLY
30.REMOVE FRONT PROPELLER SHAFT ASSEMBLY (for 4WD)
31.REMOVE PROPELLER SHAFT WITH CENTER BEARING ASSEMBLY (for 4WD)
32.REMOVE PROPELLER SHAFT WITH CENTER BEARING ASSEMBLY (for Pre-Runner)
33.REMOVE STARTER ASSEMBLY
34.REMOVE CLUTCH RELEASE CYLINDER ASSEMBLY
35.REMOVE MANUAL TRANSMISSION UNIT ASSEMBLY
36.REMOVE REAR NO. 1 ENGINE MOUNTING INSULATOR
- HINT:
-
Perform this procedure only when replacement of the rear No. 1 engine mounting insulator is necessary.
Remove the 4 bolts and rear No. 1 engine mounting insulator.
37.REMOVE CLUTCH COVER ASSEMBLY
38.REMOVE CLUTCH DISC ASSEMBLY
39.REMOVE FLYWHEEL SUB-ASSEMBLY
40.REMOVE REAR END PLATE
Remove the bolt and disconnect the No. 1 water by-pass pipe from the rear end plate.
Remove the bolt and rear end plate.
41.INSTALL ENGINE HANGER
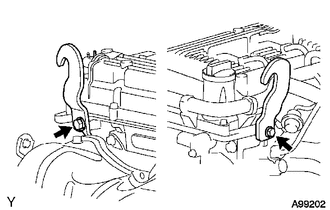
| *a | Rear Side |
| *b | Front Side |
Install 2 engine hangers with 2 bolts.
- Torque:
- 42 N*m (428 kgf*cm, 31 ft.*lbf)
- HINT:
No. 1 Engine Hanger 12281-0C010 Bolt 90105-T0129
42.REMOVE ENGINE ASSEMBLY
Attach an engine sling device to the engine hangers.
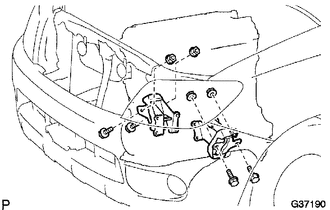
Remove the 4 bolts and 4 nuts holding the engine mounting brackets to the frame.
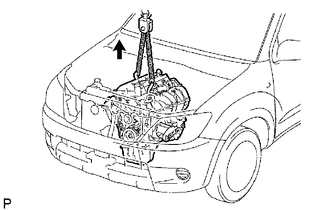

|
Lift |
Lift the engine out of the vehicle slowly and carefully.
- NOTICE:
-
Make sure to disconnect all the wires, hoses and cables from the engine. Keep the disconnected wires, hoses and cables off of the engine.
43.INSTALL ENGINE TO ENGINE STAND
Install the engine to an engine stand with bolts.
- NOTICE:
- ·
Pay attention to the angle of the sling device as the engine assembly or engine hangers may be damaged or deformed if the angle is incorrect.
·With the exception of installing the engine assembly to an engine stand or removing the engine assembly from an engine stand, do not perform any work on the engine while it is suspended, as doing so is dangerous.
Remove the 2 bolts and 2 engine hangers.