AXLE AND DIFFERENTIAL REAR DIFFERENTIAL CARRIER ASSEMBLY(w/ Differential Lock) REASSEMBLY
PROCEDURE

 1.ASSEMBLE DIFFERENTIAL CASE
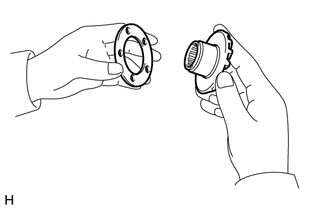
Install the side gear thrust washer to the side gear.
Install the 4 rear differential pinion gear thrust washers to the 4 rear drive pinion gears.
Install the 4 rear differential pinion gear thrust washers and 4 rear drive pinion gears to the spider.
Secure the differential case RH.
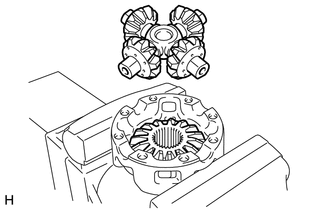
Install the rear differential side gear and rear differential spider to the differential case RH.
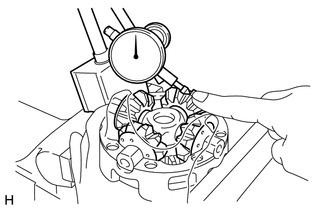
Using a dial indicator, measure the differential case RH backlash while holding the pinion toward the case.
- Standard backlash:
0.05 to 0.20 mm (0.00197 to 0.00787 in.)
Remove the rear differential spider from the differential case RH.
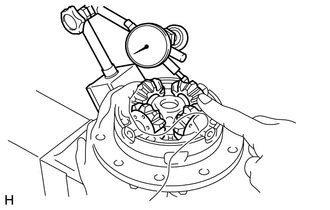
Install the rear differential side gear and rear differential spider to the differential case LH.
Using a dial indicator, measure the differential case LH backlash while holding the pinion toward the case.
- Standard backlash:
0.05 to 0.20 mm (0.00197 to 0.00787 in.)
- HINT:
-
Using the table below, select 2 thrust washers which will ensure that the backlash is within the specifications.
- Standard Washer Thickness:
Thickness mm (in.) Thickness mm (in.) 0.88 to 0.92 (0.0347 to 0.0362) 1.18 to 1.22 (0.0465 to 0.0480) 0.98 to 1.02 (0.0386 to 0.0401) 1.28 to 1.32 (0.0504 to 0.0519) 1.08 to 1.12 (0.0426 to 0.0440) -
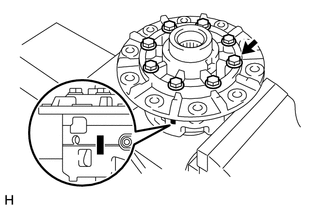
| *a | Matchmark |
Align the matchmarks and assemble the RH and LH cases.
Using a plastic-faced hammer, install the differential case.
Install the 8 bolts.
- Torque:
- 54 N*m (547 kgf*cm, 40 ft.*lbf)
Install the rear differential lock sleeve to the differential case LH.
2.INSTALL DIFFERENTIAL RING GEAR
Clean the contact surfaces of the differential case and ring gear.
Heat the ring gear in boiling water that is approximately 100°C (212°F).
Carefully remove the ring gear from the boiling water.
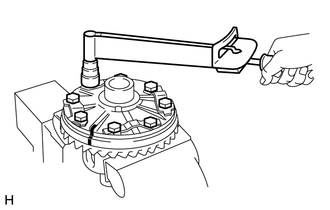
| *a | Matchmark |
After the moisture on the ring gear has completely evaporated, quickly align the matchmarks on the ring gear and differential case and install the ring gear to the differential case.
Temporarily install 5 new lock plates and the 10 bolts.
After the ring gear cools down, diametrically tighten the 10 bolts uniformly in several passes.
- Torque:
- 87 N*m (891 kgf*cm, 64 ft.*lbf)
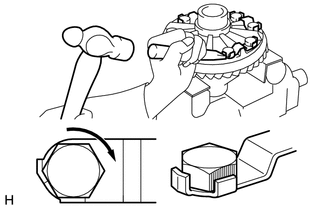
Using a chisel and hammer, stake the 5 lock plates.
- HINT:
-
Strike the tab labeled A so that it is flush with the flat surface of the bolt. Strike the tab labeled B so that half of the tab contacts the bolt as shown in the illustration.
3.INSTALL REAR DIFFERENTIAL CASE BEARING
4.INSPECT DIFFERENTIAL RING GEAR RUNOUT
5.INSTALL DIFFERENTIAL OIL STORAGE RING
6.INSTALL REAR DRIVE PINION FRONT TAPERED ROLLER BEARING
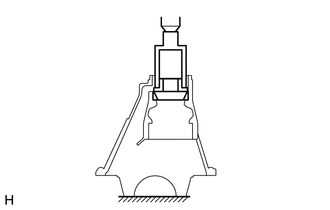
Using SST and a press, press the bearing (outer) into the carrier.
- SST
- 09316-60011 (09316-00011, 09316-00021)
7.INSTALL REAR DRIVE PINION REAR TAPERED ROLLER BEARING
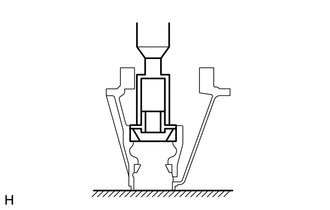
Using SST and a press, press the bearing (outer) into the carrier.
- SST
- 09316-60011 (09316-00011, 09316-00041)
8.INSTALL REAR DRIVE PINION REAR TAPERED ROLLER BEARING
Install the plate washer to the drive pinion.
- HINT:
-
First, install a washer that has the same thickness as the removed washer. After checking the tooth contact pattern, replace the washer with one of a different thickness if necessary.
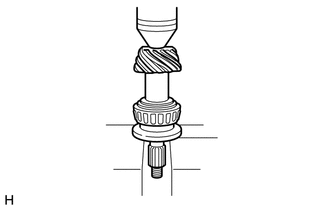
Using SST and a press, press the bearing (inner) onto the drive pinion.
- SST
- 09506-30012
9.ADJUST DIFFERENTIAL DRIVE PINION PRELOAD
10.INSTALL DIFFERENTIAL CASE ASSEMBLY

|
MP grease |
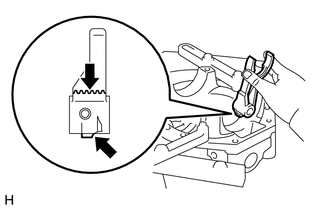
Apply MP grease to the rack of the shift fork and connecting part of the indicator switch.
Insert the shift fork into the differential carrier as shown in the illustration.
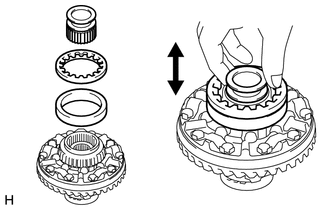
Place the outer race and adjusting nut on the left side of the sleeve.
- HINT:
-
Check that the sleeve moves smoothly.
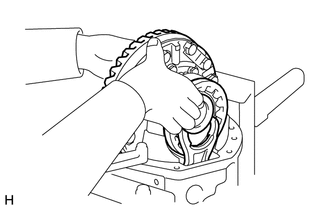
Insert the shift fork into the groove of the sleeve while holding the sleeve by hand, and install the case to the carrier.
- HINT:
-
Make sure that there is backlash between the ring gear and drive pinion.
11.INSTALL REAR DIFFERENTIAL BEARING ADJUSTING NUT
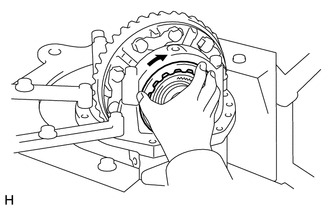
Install the 2 adjusting nuts to the carrier, making sure the nuts are threaded properly.
12.INSPECT AND ADJUST DIFFERENTIAL RING GEAR AND DIFFERENTIAL DRIVE PINION BACKLASH
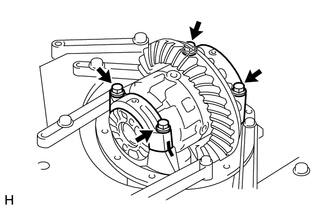
| *a | Matchmark |
Align the matchmarks on the cap and carrier.
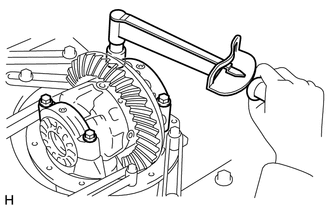
Install the right and left bearing caps with the 4 bolts.
- Torque:
- 85 N*m (870 kgf*cm, 63 ft.*lbf)
If the bearing cap does not fit tightly on the carrier, the adjusting nuts are not threaded properly.
- HINT:
-
Reinstall the adjusting nuts if necessary.
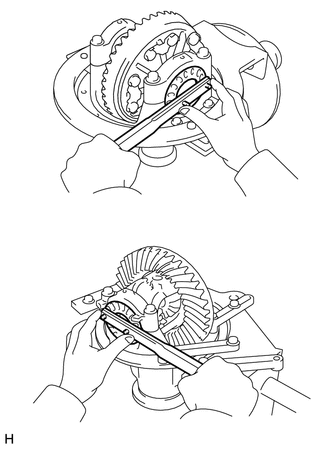
| *a | for LH Side |
| *b | for RH Side |
Loosen the 4 bearing cap bolts to the point where the adjusting nuts can be turned by SST.
Using SST, tighten the adjusting nut on the ring gear side until the ring gear has a backlash of about 0.2 mm (0.00787 in.).
- SST
- 09504-00011
09960-10010 (09962-01000, 09963-00700)
While turning the ring gear, use SST to tighten the adjusting nut on the drive pinion side. After the bearings have settled, loosen the adjusting nut on the drive pinion side.
- SST
- 09504-00011
09960-10010 (09962-01000, 09963-00700)
Using SST, tighten the adjusting nut 1 to 1.5 notches from the 0 preload position.
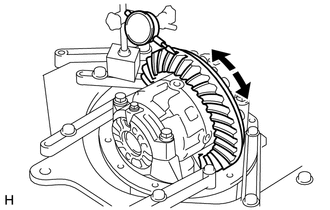
Using a dial indicator, adjust the ring gear backlash until it is within the specification.
- Standard backlash:
0.13 to 0.18 mm (0.00512 to 0.00708 in.)
- HINT:
- ·
The backlash is adjusted by turning the left and right adjusting nuts by an equal amount. For example, loosen the nut on the right side one notch and loosen the nut on the left side one notch.
·Perform the measurement at 3 or more positions around the circumference of the ring gear.
Tighten the bearing cap bolts.
- Torque:
- 85 N*m (870 kgf*cm, 63 ft.*lbf)
13.INSPECT TOTAL PRELOAD
14.INSPECT TOOTH CONTACT BETWEEN RING GEAR AND DRIVE PINION
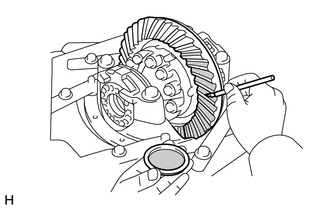
Coat 3 or 4 teeth at 3 different positions on the ring gear with Prussian blue.
Hold the companion flange firmly in place and rotate the ring gear in both directions.
Inspect the tooth contact pattern.
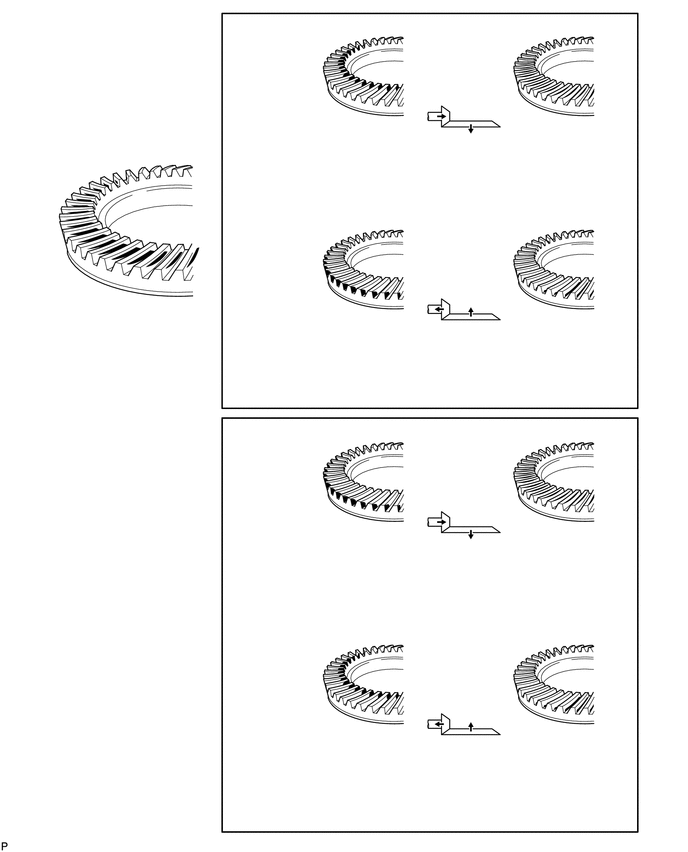
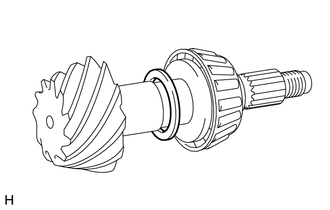
| *1 | Plate Washer |
If the teeth are not contacting properly, use the following chart to select a proper washer.
- Standard Plate Washer Thickness:
Thickness mm (in.) Thickness mm (in.) 1.69 to 1.71 (0.0666 to 0.0673) 2.02 to 2.04 (0.0796 to 0.0803) 1.72 to 1.74 (0.0678 to 0.0685) 2.05 to 2.07 (0.0807 to 0.0814) 1.75 to 1.77 (0.0689 to 0.0696) 2.08 to 2.10 (0.0819 to 0.0826) 1.78 to 1.80 (0.0701 to 0.0708) 2.11 to 2.13 (0.0831 to 0.0838) 1.81 to 1.83 (0.0713 to 0.0720) 2.14 to 2.16 (0.0843 to 0.0850) 1.84 to 1.86 (0.0725 to 0.0732) 2.17 to 2.19 (0.0855 to 0.0862) 1.87 to 1.89 (0.0737 to 0.0744) 2.20 to 2.22 (0.0867 to 0.0874) 1.90 to 1.92 (0.0748 to 0.0755) 2.23 to 2.25 (0.0878 to 0.0885) 1.93 to 1.95 (0.0760 to 0.0767) 2.26 to 2.28 (0.0890 to 0.0897) 1.96 to 1.98 (0.0772 to 0.0779) 2.29 to 2.31 (0.0902 to 0.0909) 1.99 to 2.01 (0.0784 to 0.0791) 2.32 to 2.34 (0.0914 to 0.0921)
15.REMOVE REAR DRIVE PINION NUT
16.REMOVE REAR DRIVE PINION COMPANIONFLANGE SUB-ASSEMBLY WITH DUST DEFLECTOR
17.REMOVE REAR DIFFERENTIAL DRIVE PINION OIL SLINGER
18.REMOVE REAR DRIVE PINION FRONT TAPERED ROLLER BEARING
19.INSTALL REAR DIFFERENTIAL DRIVE PINION BEARING SPACER
20.INSTALL REAR DRIVE PINION FRONT TAPERED ROLLER BEARING
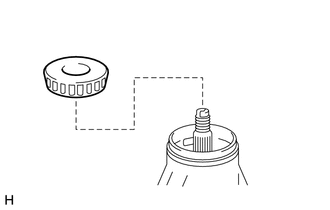
Install the bearing (inner) to the drive pinion.
21.INSTALL REAR DIFFERENTIAL DRIVE PINION OIL SLINGER
22.INSTALL REAR DIFFERENTIAL CARRIER OIL SEAL
23.INSTALL REAR DRIVE PINION COMPANION FLANGE SUB-ASSEMBLY WITH DUST DEFLECTOR
24.INSPECT TOTAL PRELOAD
25.INSPECT DIFFERENTIAL RING GEAR BACKLASH
26.INSPECT REAR DRIVE PINION COMPANION FLANGE SUB-ASSEMBLY
27.STAKE DRIVE PINION NUT
28.INSTALL REAR DIFFERENTIAL BEARING ADJUSTING NUT LOCK
29.INSTALL REAR DIFFERENTIAL LOCK SHIFT FORK SHAFT
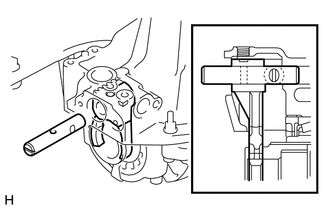
| *1 | Groove |
| *2 | Hole |
Apply MP grease to the outer circuit of the fork shaft.
Install the fork shaft so that the hole of the shift fork aligns with that of the shift fork shaft.
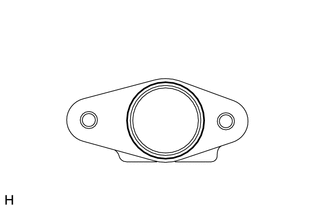
| *1 | Seal packing |
Remove any seal packing material.
- NOTICE:
-
Be careful not to drop oil on the contact surface of the differential carrier and shaft retainer.
Apply seal packing to the carrier as shown in the illustration.
- Seal packing:
Toyota Genuine Seal Packing 1281, Three Bond 1281 or equivalent
- HINT:
-
Install the shaft retainer within 3 minutes after applying seal packing.
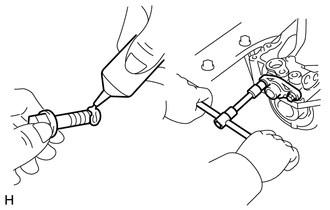
Clean the threads of the bolts and retainer bolts holes with toluene or trichloroethylene.
Apply adhesive to 2 or 3 threads at the end of the mounting bolt.
- Adhesive:
Toyota Genuine Adhesive 1344, Three Bond 1344 or equivalent
Tighten the shaft retainer with the 2 bolts.
- Torque:
- 23 N*m (237 kgf*cm, 17 ft.*lbf)
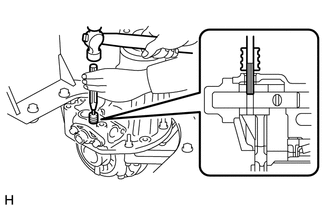
Using a 5 mm pin punch and hammer, tap in the slotted spring pin to the shift fork.
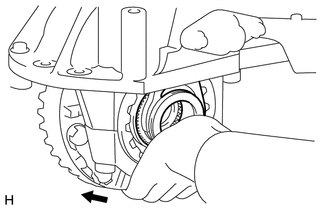
| *1 | Lock |
Shift the fork to the lock side.
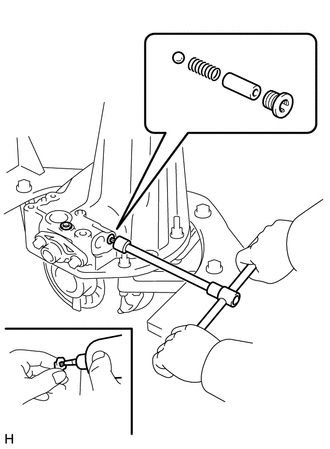
| *1 | Steel Ball |
| *2 | Spring |
| *3 | Spring Seat |
| *4 | Screw Plug |
Install the steel ball, spring and spring seat.
Clean the threads of the 2 plug holes with toluene or trichloroethylene.
Apply adhesive to the plug threads.
- Adhesive:
Toyota Genuine Adhesive 1344, Three Bond 1344 or equivalent
Using a 6 mm hexagon wrench, install the screw plugs.
- Torque:
- 23 N*m (237 kgf*cm, 17 ft.*lbf)
30.INSPECT REAR DIFFERENTIAL LOCK SLEEVE
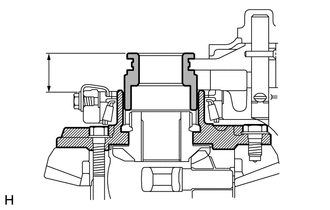
Measure the distance between the sleeve and tip of the differential case when the differential is free, and when it is locked.
- Standard Distance:
Position Specified Condition Lock 17.44 to 18.86 mm (0.6866 to 0.7425 in.) Free 32.40 to 33.90 mm (1.2756 to 1.3346 in.)
31.INSTALL NO. 4 TRANSFER INDICATOR SWITCH
32.INSTALL DIFFERENTIAL LOCK SHIFT ACTUATOR