2TR-FE ENGINE MECHANICAL ENGINE UNIT DISASSEMBLY
PROCEDURE

 1.REMOVE SPARK PLUG
2.REMOVE ENGINE OIL PRESSURE SWITCH ASSEMBLY
3.REMOVE KNOCK SENSOR
4.REMOVE ENGINE COOLANT TEMPERATURE SENSOR
5.REMOVE OIL FILLER CAP SUB-ASSEMBLY
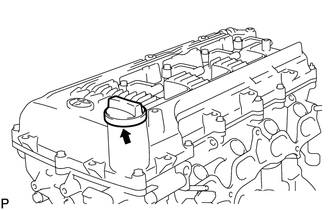
Remove the oil filler cap.
Remove the gasket from the oil filler cap.
6.REMOVE PCV VALVE SUB-ASSEMBLY
7.REMOVE CAMSHAFT POSITION SENSOR
8.REMOVE CRANKSHAFT POSITION SENSOR
9.REMOVE CAMSHAFT TIMING OIL CONTROL VALVE ASSEMBLY
10.REMOVE CYLINDER HEAD COVER SUB-ASSEMBLY
11.REMOVE WATER INLET
12.REMOVE THERMOSTAT
13.REMOVE CRANKSHAFT PULLEY
14.REMOVE NO. 2 OIL PAN SUB-ASSEMBLY
15.REMOVE OIL STRAINER SUB-ASSEMBLY
16.REMOVE OIL PAN SUB-ASSEMBLY
17.REMOVE OIL PAN STUD BOLT
- NOTICE:
-
If a stud bolt is deformed or its threads are damaged, replace it.
18.REMOVE V-RIBBED BELT TENSIONER ASSEMBLY
19.REMOVE TIMING CHAIN COVER SUB-ASSEMBLY
20.REMOVE ENGINE WATER PUMP ASSEMBLY
21.REMOVE FRONT CRANKSHAFT OIL SEAL
22.REMOVE OIL PUMP RELIEF VALVE
23.SET NO. 1 CYLINDER TO TDC/COMPRESSION
24.REMOVE TIMING CHAIN GUIDE
25.REMOVE NO. 1 CHAIN TENSIONER ASSEMBLY
26.REMOVE CHAIN TENSIONER SLIPPER
27.REMOVE NO. 1 CHAIN VIBRATION DAMPER
28.REMOVE CHAIN SUB-ASSEMBLY
29.REMOVE CRANKSHAFT TIMING SPROCKET
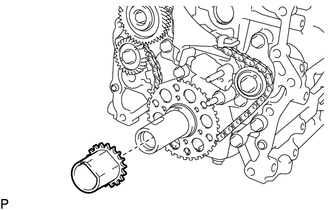
Remove the crankshaft timing sprocket from the crankshaft.
30.REMOVE CAMSHAFT BEARING CAP
31.REMOVE CAMSHAFT
32.REMOVE NO. 2 CAMSHAFT
33.REMOVE NO. 1 VALVE ROCKER ARM SUB-ASSEMBLY
34.REMOVE CAMSHAFT TIMING SPROCKET
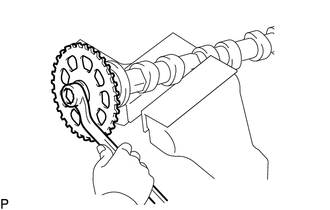
Mount the camshaft in a vise and remove the sprocket bolt and camshaft timing sprocket.
- NOTICE:
-
Do not damage the camshaft.
35.INSPECT CAMSHAFT TIMING GEAR ASSEMBLY
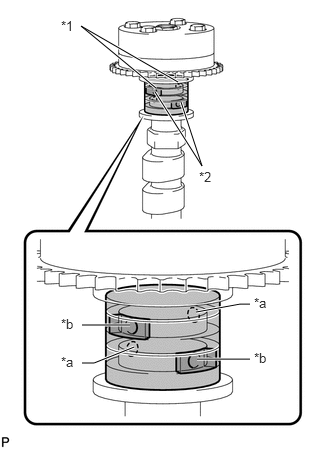
| *1 | Retard Side Path |
| *2 | Advance Side Path |
| *a | Open |
| *b | Close |

|
Rubber Piece |

|
Vinyl Tape |
Check the lock of the camshaft timing gear.
Mount the camshaft in a vise and confirm that the camshaft timing gear is locked.
- NOTICE:
-
Do not damage the camshaft.
Release the lock pin.
Cover the 4 oil paths of the cam journal with vinyl tape as shown in the illustration.
- HINT:
-
2 advance side paths are provided in the groove of the camshaft. Plug one of the paths with a rubber piece.
Break through the tape over the advance side path, and then break through the tape over the retard side path on the opposite side from the hole over the advance side path as shown in the illustration.
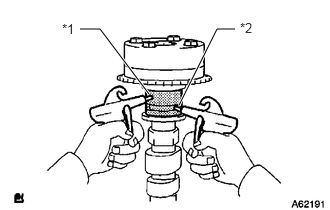
| *1 | Retard Side Path |
| *2 | Advance Side Path |
Apply compressed air at approximately 200 kPa (2.0 kgf/cm2, 28 psi) to the two paths accessible through the holes in the tape.
- CAUTION:
-
Some oil splashing will occur. Cover the paths with a piece of cloth.
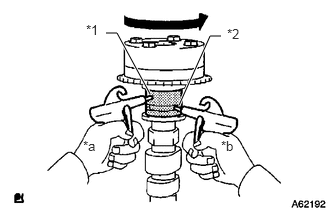
| *1 | Retard Side Path |
| *2 | Advance Side Path |
| *a | Decompress |
| *b | Hold Pressure |
Check that the camshaft timing gear revolves in the advance direction when reducing the air pressure applied to the retard side path.
- OK:
Gear rotates in the advance direction.
- HINT:
-
This operation releases the lock pin which holds the timing gear in the most retarded position.
When the camshaft timing gear reaches the most advanced position, release the air pressure from the retard side path and advance side path in that order.
- NOTICE:
-
Do not release the air pressure from the advance side path first. The gear may abruptly shift in the retard direction and break the lock pin.
Check for smooth rotation.
Rotate the camshaft timing gear within its movable range several times, but do not turn it to the most retarded position. Check that the gear rotates smoothly.
- CAUTION:
-
Do not use air pressure to perform the smooth operation check.
Check the lock in the most retarded position.
Confirm that the camshaft timing gear becomes locked at the most retarded position.
36.REMOVE CAMSHAFT TIMING GEAR ASSEMBLY
37.REMOVE CYLINDER HEAD SUB-ASSEMBLY
38.REMOVE CYLINDER HEAD GASKET
39.REMOVE NO. 2 CHAIN VIBRATION DAMPER
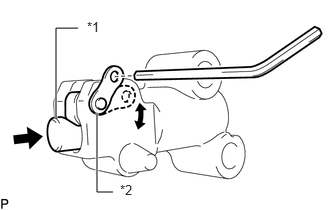
| *1 | Plunger |
| *2 | Stopper Plate |
Move the stopper plate downward to release the lock and push the plunger deep into the No. 2 chain tensioner.
Move the stopper plate upward to set the lock and insert a hexagon wrench into the stopper plate hole.
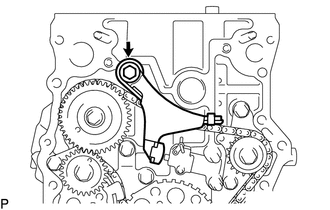
Remove the bolt and chain vibration damper.
40.REMOVE NO. 3 CHAIN VIBRATION DAMPER
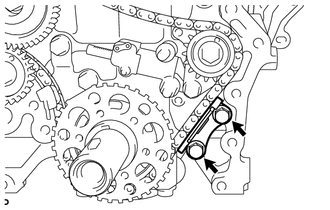
Remove the 2 bolts and chain vibration damper.
41.REMOVE NO. 2 CHAIN TENSIONER ASSEMBLY
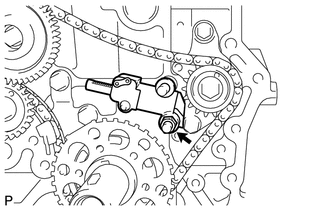
Remove the hexagon wrench from the tensioner assembly.
Remove the nut and chain tensioner assembly.
42.REMOVE NO. 2 CHAIN SUB-ASSEMBLY
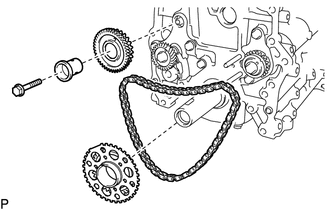
Remove the bolt, balance shaft drive gear shaft and balance shaft drive gear.
Remove the No. 2 crankshaft timing sprocket and chain.
43.REMOVE NO. 4 CHAIN VIBRATION DAMPER
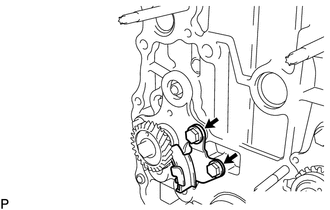
Remove the 2 bolts and vibration damper.
44.REMOVE CRANKSHAFT PULLEY SET KEY
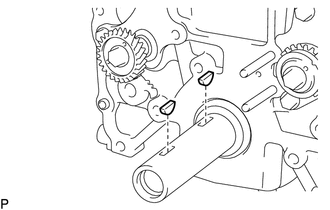
Remove the 2 pulley set keys from the crankshaft.
45.REMOVE OIL FILTER SUB-ASSEMBLY
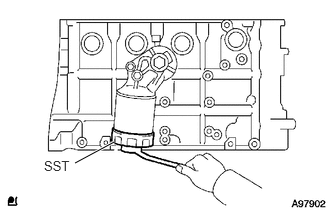
Using SST, remove the oil filter.
- SST
- 09228-07501
46.REMOVE OIL FILTER UNION
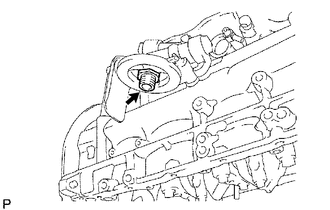
Using a 27 mm socket wrench, remove the oil filter union.
47.REMOVE OIL FILTER BRACKET SUB-ASSEMBLY
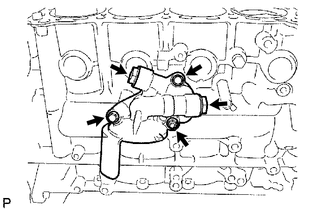
Remove the 2 bolts and nut from the oil filter bracket.
Remove the 2 screw plugs and 2 gaskets from the oil filter bracket.
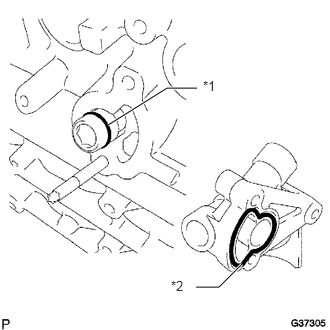
| *1 | O-Ring |
| *2 | Oil Filter Bracket Gasket |
Remove the oil filter bracket gasket and O-ring.
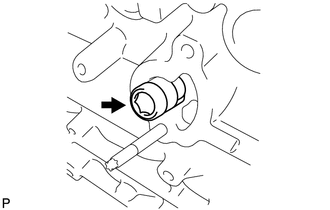
Using a hexagon wrench, remove the oil filter bracket union.
48.REMOVE NO. 1 TAPER SCREW PLUG
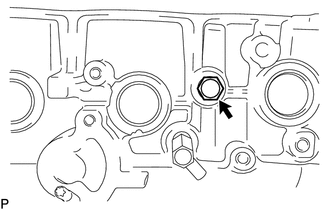
Remove the taper screw plug from the cylinder block.
49.REMOVE REAR ENGINE OIL SEAL RETAINER
Remove the 6 bolts.
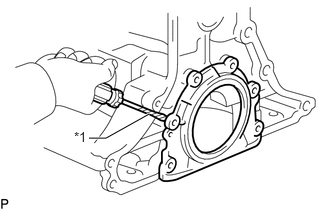
| *1 | Protective Tape |
Using a screwdriver, pry off the oil seal retainer.
- HINT:
-
Tape the screwdriver tip before use.
50.REMOVE REAR CRANKSHAFT OIL SEAL
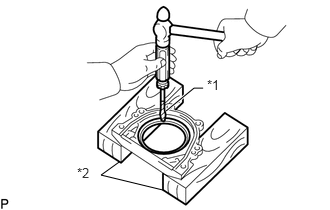
| *1 | Protective Tape |
| *2 | Wooden Blocks |
Place the oil seal retainer on wooden blocks.
Using a screwdriver and hammer, tap out the oil seal.
- HINT:
-
Tape the screwdriver tip before use.
51.REMOVE VALVE STEM CAP
52.REMOVE VALVE LASH ADJUSTER ASSEMBLY
53.REMOVE OIL CONTROL VALVE FILTER
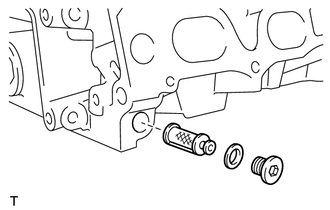
Using an 8 mm hexagon wrench, remove the screw plug.
Remove the oil control valve filter and gasket.