INSTALLATION
Removal / installation · Vehicles built from Aug 2014
Versions by build date: Aug 2013 – Jul 2014 from Aug 2014
| 1. INSTALL TRANSFER ASSEMBLY |

for 1KD-FTV:
Install the transfer assembly with the 8 bolts and 2 brackets.- Torque:
- 24 N*m{ 245 kgf*cm , 18 ft.*lbf }
- NOTICE:
- Take care not to damage the adaptor rear oil seal with the transfer input gear spline.
except 1KD-FTV:
Install the transfer assembly with the 8 bolts and bracket.- Torque:
- 24 N*m{ 245 kgf*cm , 18 ft.*lbf }
- NOTICE:
- Take care not to damage the adaptor rear oil seal with the transfer input gear spline.
| 2. INSTALL DIFFERENTIAL PRESSURE SENSOR ASSEMBLY (w/ DPF) |
Install the differential pressure sensor assembly to the sensor bracket with the nut.
- Torque:
- 5.0 N*m{ 51 kgf*cm , 44 in.*lbf }
| 3. INSTALL TRANSMISSION UPPER COVER SUB-ASSEMBLY |
Install the upper cover with the 2 bolts.
- Torque:
- 12 N*m{ 117 kgf*cm , 8 ft.*lbf }
| 4. INSTALL MANUAL TRANSMISSION WITH TRANSFER |
Install the manual transmission with transfer with the 8 bolts.
- Torque:
- 72 N*m{ 729 kgf*cm , 53 ft.*lbf }
| 5. CONNECT TRANSFER AND MANUAL TRANSMISSION BREATHER HOSE SUB-ASSEMBLY |
w/o DPF:
Connect the 3 breather hoses.
Attach the breather hose clamp.
w/ DPF:
Connect the 3 breather hoses.
Attach the 2 breather hose clamps.
| 6. CONNECT WIRE HARNESS |
w/o DPF:
Attach the 5 wire harness clamps.
Connect the 2 connector.
w/ DPF:
Attach the 8 wire harness clamps.
Connect the 3 connectors and 3 connector clamps.
| 7. INSTALL REAR NO. 1 ENGINE MOUNTING INSULATOR |
Install the engine No. 1 mounting insulator rear with the 4 bolts.
- Torque:
- 65 N*m{ 663 kgf*cm , 48 ft.*lbf }
| 8. INSTALL NO. 3 FRAME CROSSMEMBER SUB-ASSEMBLY |
Install the No. 3 frame crossmember sub-assembly with the 4 bolts and 4 nuts.
- Torque:
- 72 N*m{ 734 kgf*cm , 53 ft.*lbf }
Install the 4 bolts to the No. 3 frame crossmember sub-assembly.
- Torque:
- 30 N*m{ 306 kgf*cm , 22 ft.*lbf }
| 9. INSTALL FRONT SUSPENSION MEMBER BRACKET LH |
Install the front suspension member bracket LH with the 4 bolts.
- Torque:
- 33 N*m{ 337 kgf*cm , 24 ft.*lbf }
| 10. INSTALL FRONT SUSPENSION MEMBER BRACKET RH |
Install the front suspension member bracket RH with the 4 bolts.
- Torque:
- 33 N*m{ 337 kgf*cm , 24 ft.*lbf }
| 11. CONNECT CLUTCH RELEASE CYLINDER ASSEMBLY |
Connect the release cylinder with the 2 bolts.
- Torque:
- 12 N*m{ 120 kgf*cm , 9 ft.*lbf }
Install a new clip to the flexible hose.
| 12. INSTALL STARTER ASSEMBLY |
for 2.7 kW Type: (Click here)
| 13. INSTALL PROPELLER SHAFT ASSEMBLY |
| 14. INSTALL FRONT PROPELLER SHAFT ASSEMBLY |
| 15. INSTALL TRANSFER CASE LOWER PROTECTOR |
Install the transfer case lower protector with the 4 bolts.
- Torque:
- 18 N*m{ 184 kgf*cm , 13 ft.*lbf }
| 16. INSTALL FRONT EXHAUST PIPE ASSEMBLY |
w/ DPF: (Click here)
| 17. ADD MANUAL TRANSMISSION OIL |
| 18. INSPECT MANUAL TRANSMISSION OIL |
Park the vehicle on a level surface.
Check that the oil level is between 0 to 5 mm (0 to 0.196 in.) from the bottom lip of the filler plug opening.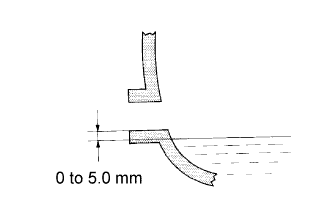

- If the result is not as specified, add transmission oil.
- NOTICE:
- Problems may occur when the oil level is too high or low.
- After replacing the oil, drive the vehicle and check the oil level again.
- Problems may occur when the oil level is too high or low.
- If the result is not as specified, add transmission oil.
Inspect for oil leaks when the oil level is low.
- If the result is not as specified, add transmission oil.
- If the result is not as specified, add transmission oil.
Install a new gasket and the filler plug.
- Torque:
- 37 N*m{ 377 kgf*cm , 27 ft.*lbf }
| 19. INSTALL FLOOR SHIFT SHIFT LEVER ASSEMBLY |
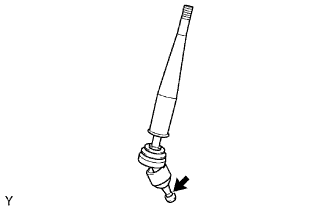 |
Apply MP grease to the tip of the shift lever.
Text in Illustration 
MP Grease
Cover the shift lever cap with a cloth.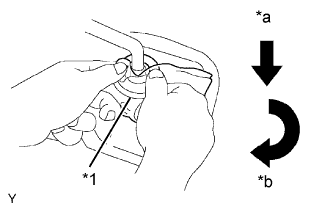
Text in Illustration *1
Cloth
*a
Down
*b
Clockwise
While pressing down on the shift lever cap, turn it clockwise to install the shift lever.
| 20. INSTALL NO. 1 SHIFT AND SELECT LEVER BOOT |
Install the shift lever boot with the 4 screws.
| 21. INSTALL CONSOLE PANEL SUB-ASSEMBLY |
Install the rear console box (Click here).
w/ Refrigerated Cool Box:
Install the rear console box (Click here).
| 22. INSTALL SHIFT LEVER KNOB SUB-ASSEMBLY |
| 23. CONNECT CABLE TO NEGATIVE BATTERY TERMINAL |
- NOTICE:
- When disconnecting the cable, some systems need to be initialized after the cable is reconnected (Click here).