2013-2015 Land Cruiser Prado · Service Manual Vehicle Interior

REMOVAL

Removal / installation · Vehicles built from Aug 2014

Versions by build date: Aug 2013 – Jul 2014 from Aug 2014

HINT:
  1. Use the same procedure for RHD and LHD vehicles.
  2. The procedure listed below is for LHD vehicles.


1. PRECAUTION

NOTICE:
After turning the ignition switch off, waiting time may be required before disconnecting the cable from the battery terminal. Therefore, make sure to read the disconnecting the cable from the battery terminal notice before proceeding with work (Click here).


2. DISCONNECT CABLE FROM NEGATIVE BATTERY TERMINAL

NOTICE:
When disconnecting the cable, some systems need to be initialized after the cable is reconnected (Click here).


3. REMOVE REAR NO. 1 SEAT ASSEMBLY (w/ Rear No. 1 Seat)
  1. for LH Side:
    Remove the rear No. 1 seat assembly (Click here).

  1. for RH Side:
    Remove the rear No. 1 seat assembly (Click here).


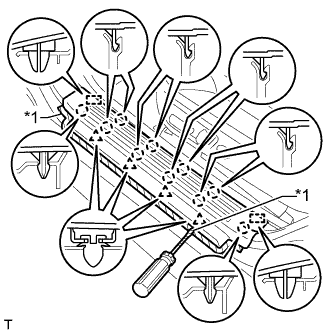
4. REMOVE DOOR SCUFF PLATE ASSEMBLY LH

B238732E01
  1. Put protective tape around the door scuff plate.

  1. Using a screwdriver, detach the 4 clips, 10 claws and 2 guides and remove the door scuff plate.

    HINT:
    Tape the screwdriver tip before use.

    Text in Illustration 
    *1
    Protective Tape


5. REMOVE DOOR SCUFF PLATE ASSEMBLY RH

HINT:
Use the same procedure described for the LH side.


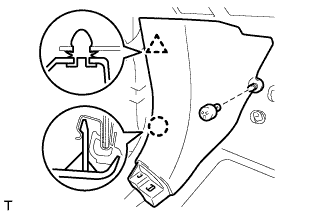
6. REMOVE COWL SIDE TRIM BOARD LH

B238734
  1. Remove the clip.

  1. Detach the clip and claw and remove the cowl side trim board.


7. REMOVE COWL SIDE TRIM BOARD RH

HINT:
Use the same procedure described for the LH side.


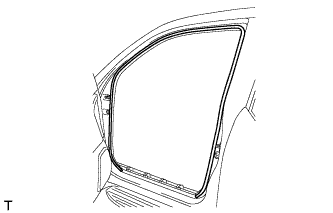
8. REMOVE FRONT DOOR OPENING TRIM WEATHERSTRIP LH

B238778
  1. Remove the front door opening trim weatherstrip.


9. REMOVE FRONT DOOR OPENING TRIM WEATHERSTRIP RH

HINT:
Use the same procedure described for the LH side.


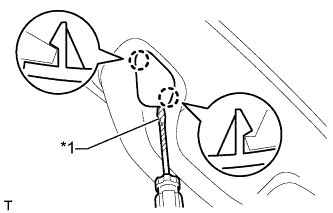
10. REMOVE FRONT NO. 1 ASSIST GRIP PLUG LH

B238741E01

HINT:
Use the same procedure for the other front No. 1 assist grip plug.

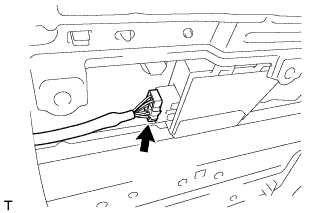
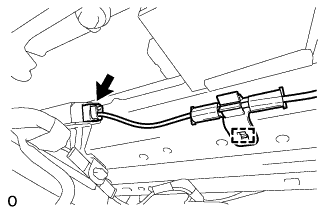
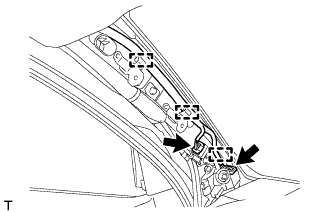
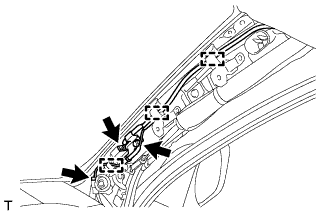
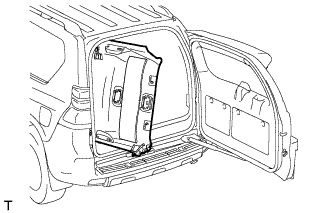
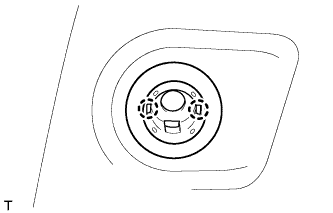
  1. Using a screwdriver, detach the 2 claws and remove the front No. 1 assist grip plug.

    HINT:
    Tape the screwdriver tip before use.

    Text in Illustration 
    *1
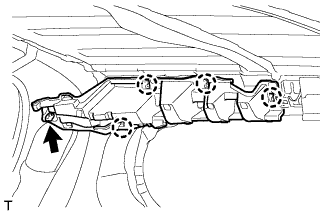
    Protective Tape


11. REMOVE FRONT NO. 1 ASSIST GRIP PLUG RH

HINT:
Use the same procedure described for the LH side.


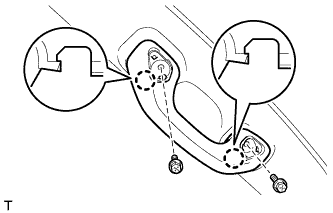
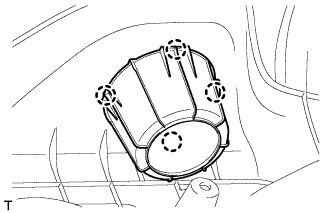
12. REMOVE NO. 1 ASSIST GRIP

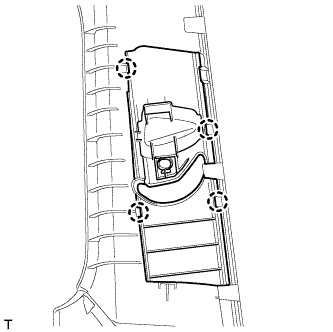
B238742

HINT:
Use the same procedure for the other No. 1 assist grip.

  1. Remove the 2 bolts.

  1. Detach the 2 claws and remove the No. 1 assist grip.


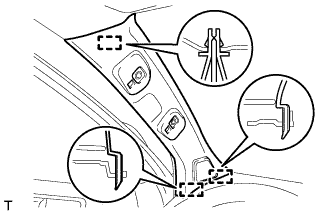
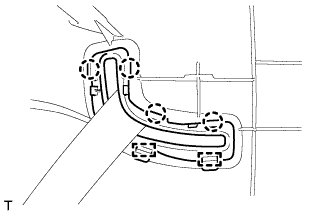
13. REMOVE FRONT PILLAR GARNISH LH

B238743
  1. Detach the 3 guides and remove the front pillar garnish.

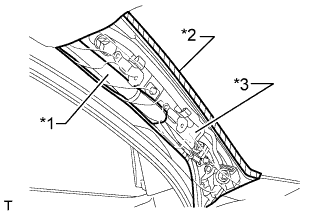
  1. B238744E01
    w/ Curtain Shield Airbag:
    Protect the curtain shield airbag assembly.

    1. Completely cover the airbag with a cloth or nylon sheet and secure the ends of the cover with adhesive tape as shown in the illustration.

      NOTICE:
      Cover the curtain shield airbag with a protective cover as soon as the front pillar garnish is removed.

      Text in Illustration 
      *1
      Curtain Shield Airbag Assembly
      *2
      Adhesive Tape
      *3
      Protective Cover


14. REMOVE FRONT PILLAR GARNISH RH

HINT:
Use the same procedure described for the LH side.


15. REMOVE TONNEAU COVER ASSEMBLY (w/ Tonneau Cover)
  1. Remove the tonneau cover.


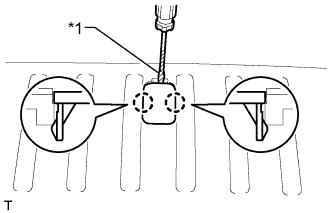
16. REMOVE MAT SET PLATE COVER

B240525E01

HINT:
Use the same procedure for all mat set plate covers.

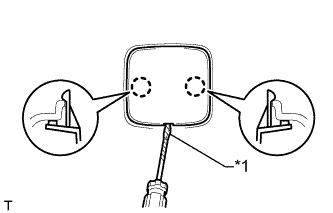
  1. Using a screwdriver, detach the 2 claws and remove the mat set plate cover.

    HINT:
    Tape the screwdriver tip before use.

    Text in Illustration 
    *1
    Protective tape


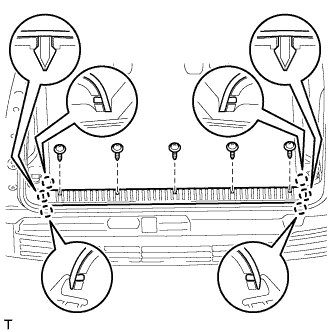
17. REMOVE REAR FLOOR MAT REAR SUPPORT PLATE

B240526
  1. Remove the 5 screws.

  1. Detach the 6 claws and remove the rear floor mat rear support plate.


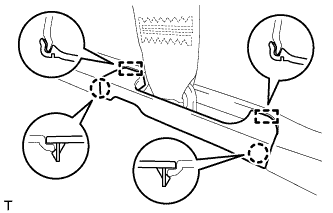
18. REMOVE QUARTER TRIM COVER HOLE LH

B240533
  1. Detach the 2 claws and 2 guides and remove the quarter trim cover hole.


19. REMOVE QUARTER TRIM COVER HOLE RH

HINT:
Use the same procedure described for the LH side.


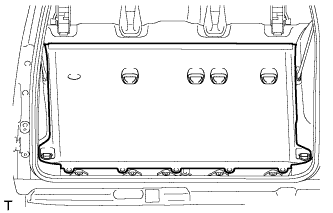
20. REMOVE REAR FLOOR CARPET ASSEMBLY

B240527
  1. Remove the rear floor carpet.


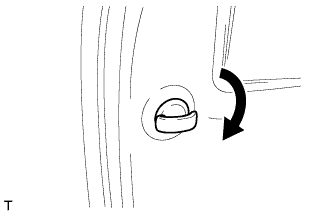
21. REMOVE NO. 1 LUGGAGE COMPARTMENT TRIM HOOK

B181695

HINT:
Use the same procedure for the other No. 1 luggage compartment trim hook.

  1. Remove the luggage compartment trim hook by turning it clockwise.


22. REMOVE NO. 1 TONNEAU COVER HOLDER CAP (w/o Tonneau Cover)

B240528E01

HINT:
Use the same procedure for the other tonneau cover holder cap.

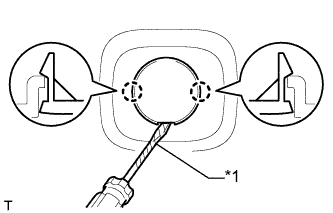
  1. Using a screwdriver, detach the 2 claws and remove the tonneau cover holder cap.

    HINT:
    Tape the screwdriver tip before use.

    Text in Illustration 
    *1
    Protective tape


23. REMOVE FRONT DECK SIDE TRIM COVER (w/ Tonneau Cover)

B240051E01

HINT:
Use the same procedure for the other front deck side trim cover.

  1. Using a screwdriver, detach the 2 claws and remove the front deck side trim cover.

    HINT:
    Tape the screwdriver tip before use.

    Text in Illustration 
    *1
    Protective tape


24. REMOVE QUARTER TRIM POCKET TRAY

B240553E01
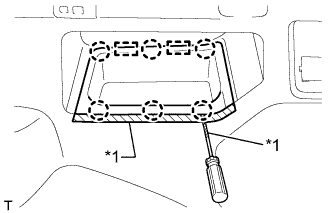
  1. Put protective tape around the quarter trim pocket tray.

  1. Using a screwdriver, detach the 6 claws and 2 guides, and remove the quarter trim pocket tray.

    HINT:
    Tape the screwdriver tip before use.

    Text in Illustration 
    *1
    Protective tape


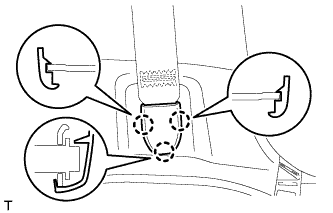
25. REMOVE OUTER LAP BELT ANCHOR COVER

B240529

HINT:
Use the same procedure for the other outer lap belt anchor cover.

  1. Detach the 3 claws and remove the outer lap belt anchor cover.


26. REMOVE DECK TRIM SIDE PANEL ASSEMBLY LH

B240531
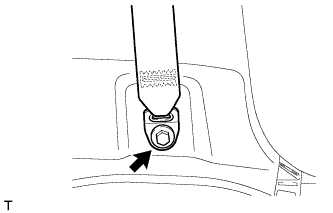
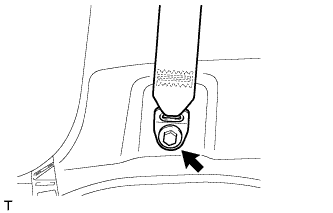
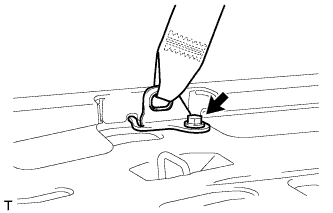
  1. Remove the bolt and disconnect the front seat outer belt floor anchor.

  1. B240534
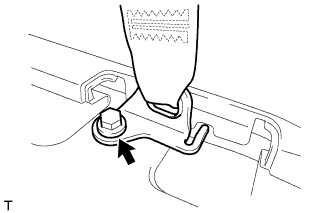
    Remove the bolt and disconnect the rear No. 1 seat outer belt floor anchor.

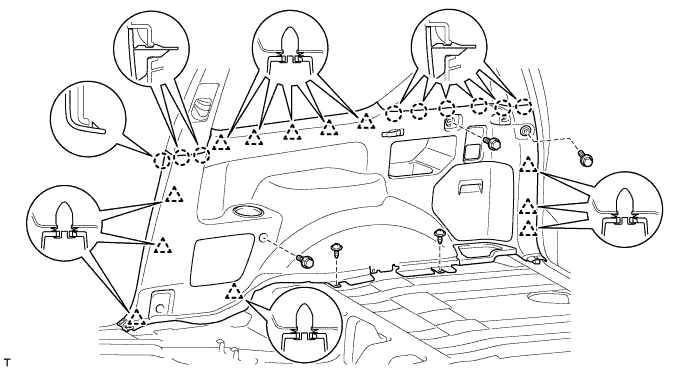
  1. Remove the 3 bolts and 2 screws.

  1. Detach the 9 claws and 12 clips and remove the deck trim side panel.

    B240536


27. REMOVE DECK TRIM SIDE PANEL ASSEMBLY RH

B240532
  1. Remove the bolt and disconnect the front seat outer belt floor anchor.

  1. B240535
    Remove the bolt and disconnect the rear No. 1 seat outer belt floor anchor.

  1. Remove the 3 bolts and 2 screws.

  1. Detach the 9 claws and 12 clips.

  1. Disconnect the connector and remove the deck trim side panel.

    B240537


28. REMOVE FRONT QUARTER TRIM PANEL ASSEMBLY LH

B240538
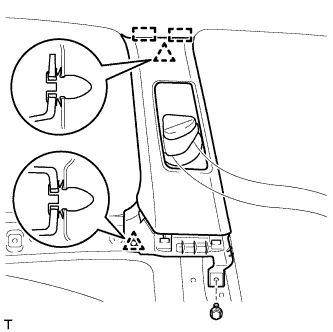
  1. Move the front shoulder belt anchor adjuster to the lowest position.

  1. Remove the bolt.

  1. Detach the 2 clips and 2 guides.

  1. Pass the front seat outer belt floor anchor through the front quarter trim panel and remove the front quarter trim panel.


29. REMOVE FRONT QUARTER TRIM PANEL ASSEMBLY RH

HINT:
Use the same procedure described for the LH side.


30. REMOVE REAR QUARTER TRIM PANEL ASSEMBLY LH

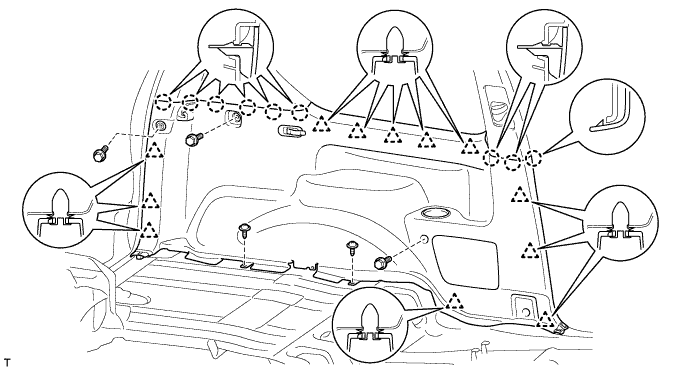
B240540
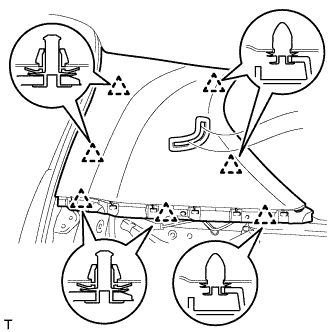
  1. Detach the 7 clips.

  1. B240541
    Detach the 4 claws and 2 guides, pass the rear No. 1 seat belt floor anchor through the rear quarter trim panel and remove the rear quarter trim panel.


31. REMOVE REAR QUARTER TRIM PANEL ASSEMBLY RH

HINT:
Use the same procedure described for the LH side.


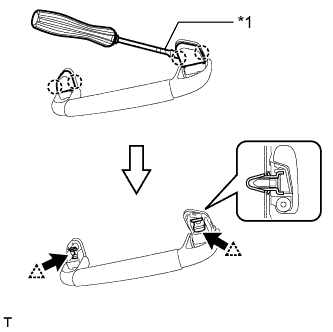
32. REMOVE ASSIST GRIP SUB-ASSEMBLY

B184001E03

HINT:
Use the same procedure for the other assist grip.

  1. Using a screwdriver, detach the 4 claws and remove the 2 assist grip covers.

    HINT:
    Tape the screwdriver tip before use.

    Text in Illustration 
    *1
    Protective Tape

  1. Detach the 2 clips and remove the assist grip.

  1. Remove the 2 clips from the vehicle body.


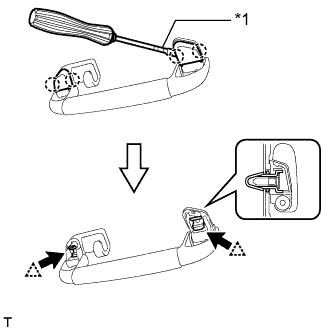
33. REMOVE REAR ASSIST GRIP ASSEMBLY LH

B184002E03
  1. Using a screwdriver, detach the 4 claws and remove the 2 assist grip covers.

    HINT:
    Tape the screwdriver tip before use.

    Text in Illustration 
    *1
    Protective Tape

  1. Detach the 2 clips and remove the assist grip.

  1. Remove the 2 clips from the vehicle body.


34. REMOVE REAR ASSIST GRIP ASSEMBLY RH

HINT:
Use the same procedure described for the LH side.


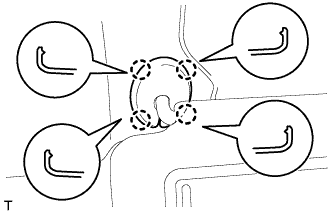
35. REMOVE VISOR BRACKET COVER LH

B181706

HINT:
Use the same procedure for the other visor bracket cover.

  1. Detach the 4 claws and remove the visor bracket cover.


36. REMOVE VISOR BRACKET COVER RH

HINT:
Use the same procedure described for the LH side.


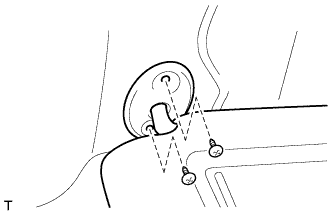
37. REMOVE VISOR ASSEMBLY LH

B181707
  1. Remove the 2 screws and visor.


38. REMOVE VISOR ASSEMBLY RH

HINT:
Use the same procedure described for the LH side.


39. REMOVE VISOR HOLDER

B151362E02

HINT:
Use the same procedure for the other visor holder.

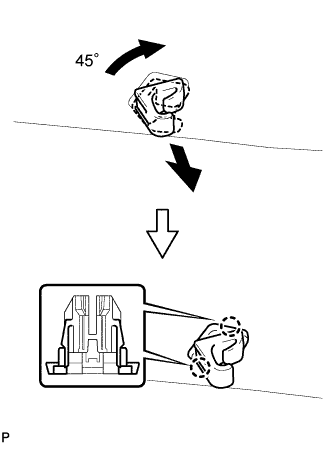
  1. Turn the visor holder approximately 45° and pull it out as shown in the illustration.

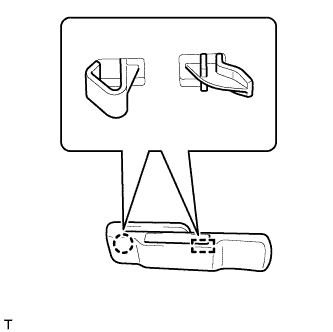
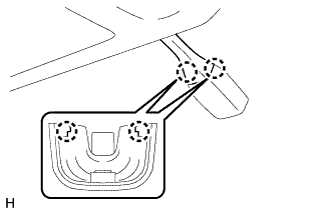
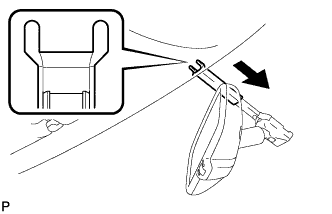
  1. Detach the 2 claws and remove the visor holder.


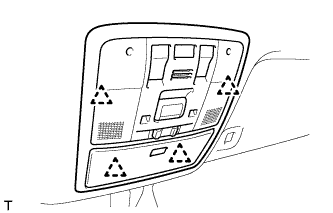
40. REMOVE MAP LIGHT ASSEMBLY

  1. E198057
    Detach the 4 clips.

  1. Disconnect the connector and remove the map light.


41. REMOVE RAIN SENSOR COVER (w/ Rain Sensor)

  1. E197772
    Detach the 2 claws and remove the rain sensor cover.


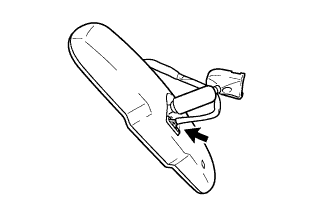
42. REMOVE INNER REAR VIEW MIRROR STAY HOLDER COVER (w/ EC Mirror)

  1. B175048
    Detach the 2 claws and slide the inner rear view mirror stay holder cover in the direction indicated by the arrow in the illustration.

  1. B175049
    Detach the 2 claws and remove the inner rear view mirror stay holder cover.

43. REMOVE NO. 1 ROOM LIGHT ASSEMBLY
  1. Remove the No. 1 room light assembly (Click here).


44. REMOVE NO. 2 ROOM LIGHT ASSEMBLY
  1. Remove the No. 2 room light assembly (Click here).


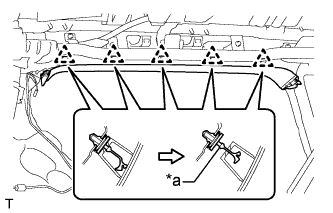
45. REMOVE NO. 1 ROOF SIDE RAIL GARNISH LH

B240548E01
  1. Detach the 5 clips.

  1. Cut off the 5 clips and remove the roof side rail garnish LH.

    Text in Illustration 
    *a
    Cut Off Position

  1. Remove the 5 clips from the vehicle body.


46. REMOVE NO. 1 ROOF SIDE RAIL GARNISH RH

HINT:
Use the same procedure described for the LH side.


47. REMOVE ROOF HEADLINING ASSEMBLY

B268455
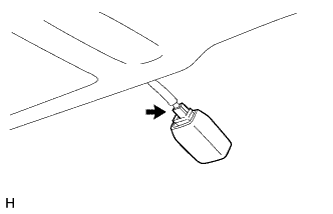
  1. w/ EC Mirror:
    Disconnect the inner mirror connector.

  1. E197773
    w/ Rain Sensor:
    Disconnect the rain sensor connector.

  1. B238774
    w/ Sliding Roof:
    Disconnect the drive gear connector.

  1. B358962
    w/ Digital Audio Broadcasting Antenna:
    Disconnect the connector and detach the wire harness clamp.

  1. B238771
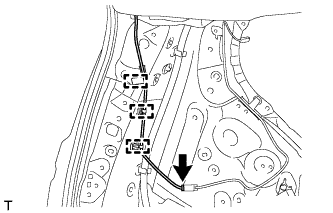
    Disconnect the 2 connectors and detach the 3 clamps from the front pillar LH.

  1. B238770
    Remove the bolt.

  1. Disconnect the 2 connectors and detach the 3 clamps from the front pillar RH.

  1. B240542
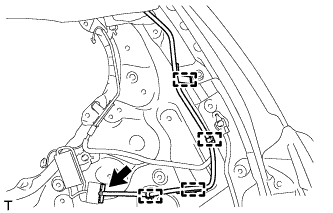
    Disconnect the connector and detach the 3 clamps from the rear pillar LH.

  1. B240543
    Disconnect the connector and detach the 4 clamps from the rear pillar RH.

  1. B240544
    w/o Sliding Roof:

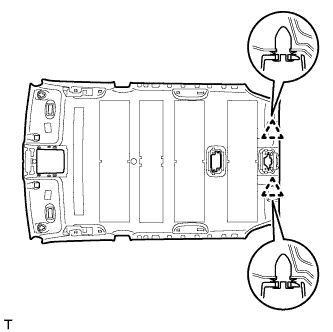
    1. Detach the 2 clips.

  1. B240545E01
    w/ Sliding Roof:

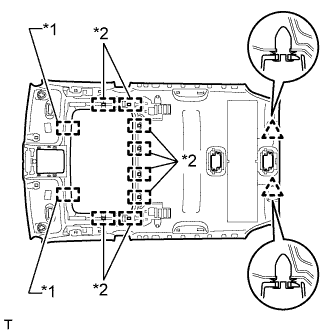
    1. Detach the 2 clips, 2 guides and 8 fasteners.

      Text in Illustration 
      *1
      Guide
      *2
      Fastener

  1. B240566
    Remove the roof headlining from the back door as shown in the illustration.

    NOTICE:
    Be careful not to damage the roof headlining when removing it.


48. REMOVE FRONT SHOULDER BELT ANCHOR PLATE SUB-ASSEMBLY LH

B240539
  1. Detach the 4 claws of the front shoulder belt anchor plate and slide the front shoulder belt anchor plate in the direction of the arrow to remove it.


49. REMOVE FRONT SHOULDER BELT ANCHOR PLATE SUB-ASSEMBLY RH

HINT:
Use the same procedure described for the LH side.


50. REMOVE REAR NO. 2 SIDE RAIL SPACER LH

B240546
  1. Remove the clip.

  1. Detach the 4 claws and remove the rear side rail spacer.


51. REMOVE REAR NO. 2 SIDE RAIL SPACER RH

HINT:
Use the same procedure described for the LH side.


52. REMOVE DECK SIDE TRIM CUP HOLDER LH

B240554
  1. Detach the 4 claws and remove the deck side trim cup holder.


53. REMOVE DECK SIDE TRIM CUP HOLDER RH

HINT:
Use the same procedure described for the LH side.


54. REMOVE REAR SEAT SHOULDER BELT HANGER LH

B238782
  1. Detach the claw and guide and remove the rear seat shoulder belt hanger.


55. REMOVE REAR SEAT SHOULDER BELT HANGER RH

HINT:
Use the same procedure described for the LH side.


56. REMOVE QUARTER TRIM COVER

B238798

HINT:
Use the same procedure for the other quarter trim cover.
  1. Detach the 2 claws and remove the quarter trim cover.

57. REMOVE QUARTER TRIM JACK COVER (w/ Spare Tire)

B240552
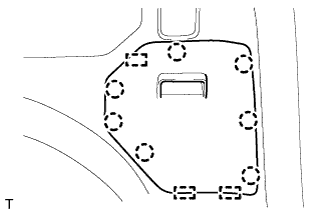
  1. Detach the 7 claws and 3 guides and remove the quarter trim jack cover.

58. REMOVE DECK SIDE TRIM COVER RH (w/o Spare Tire)

B240550
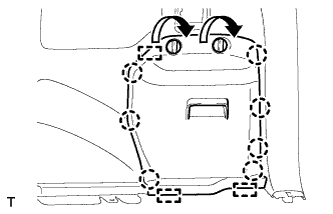
  1. Turn the 2 knobs and release the lock.

  1. Detach the 7 claws and 3 guides and remove the deck side trim cover.
← REMOVAL (Aug 2013 – Jul 2014)DISASSEMBLY (Aug 2013 – Jul 2014) →