1KD-FTV INTAKE / EXHAUST INTAKE MANIFOLD INSTALLATION
PROCEDURE

 17111
1.INSTALL INTAKE MANIFOLD
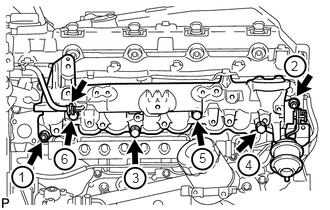
Temporarily install a new gasket and the intake manifold with the 2 nuts and 4 bolts.
Tighten the 2 nuts and 4 bolts in the order shown in the illustration.
- Torque:
- 29 N*m (296 kgf*cm, 21 ft.*lbf)
- NOTICE:
- ·
 1.521,0.552 1.615,0.552 1.615,0.552 1.781,0.927 false 1.313,0.469 1.615,0.688 0.302,0.219 10 true *1
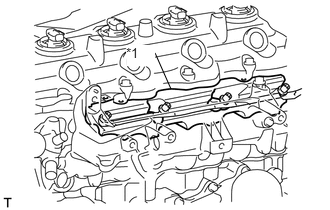
When installing the intake manifold, make sure that the No. 1 intake manifold insulator is not pinched.
·Make sure that the swirl control valve actuator is not damaged by the surrounding parts.
Text in Illustration *1 No. 1 Intake Manifold Insulator
Connect the vacuum hose to the intake manifold.
Attach the sensor wire connector clamp to the intake manifold.
17118B
2.INSTALL INTAKE MANIFOLD INSULATOR
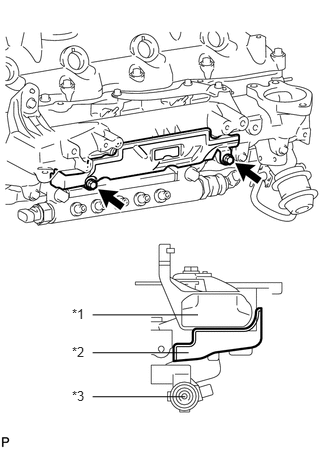
Install the intake manifold insulator with the 2 bolts.
- Torque:
- 8.0 N*m (82 kgf*cm, 71 in.*lbf)
| *1 | Intake Manifold |
| *2 | Intake Manifold Insulator |
| *3 | Common Rail |
23770
3.INSTALL NO. 2 NOZZLE LEAKAGE PIPE ASSEMBLY
23704
4.INSTALL NO. 4 INJECTION PIPE SUB-ASSEMBLY
25804
5.INSTALL VACUUM CONTROL VALVE SET
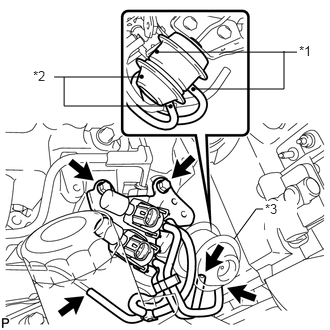
Install the vacuum control valve set with the 2 bolts.
- Torque:
- 20 N*m (204 kgf*cm, 15 ft.*lbf)
Connect the 3 vacuum hoses and 2 VSV connectors.
| *1 | Paint Mark (White) |
| *2 | Paint Mark (Green) |
| *3 | Swirl Control Valve Actuator |
- NOTICE:
-
When connecting the hoses, match the colors of the paint marks on the hoses to the colors of the paint marks on the swirl control valve as shown in the illustration.
17138
6.INSTALL INTAKE PIPE OR HOSE STAY
Install the intake pipe stay with the bolt.
- Torque:
- 23 N*m (235 kgf*cm, 17 ft.*lbf)
17118
7.INSTALL MANIFOLD STAY WITH VACUUM SWITCHING VALVE
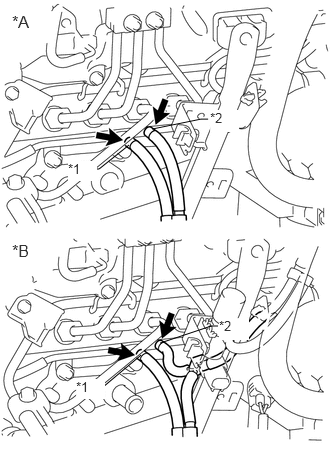
Install the manifold stay with vacuum switching valve with the 2 bolts and connect the No. 3 vacuum transmitting hose and No. 4 vacuum transmitting hose.
- Torque:
- 19 N*m (194 kgf*cm, 14 ft.*lbf)
| *A | w/o EGR System |
| *B | w/ EGR System |
| *1 | White Mark |
| *2 | Blue Mark |
- NOTICE:
-
Make sure the vacuum hose color matches the connection area color.
w/ EGR Cooler:
Connect the No. 3 vacuum transmitting hose.
w/ EGR System:
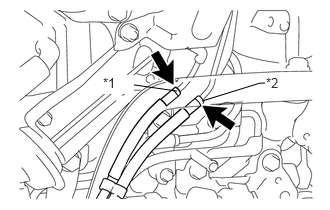
Connect the No. 2 vacuum transmitting hose and No. 3 vacuum transmitting hose.
| *1 | Yellow Mark |
| *2 | Pink Mark |
- NOTICE:
- ·
Make sure the vacuum hose color matches the connection area color.
·Push on the hose until it reaches the bent part of the pipe.
Connect the No. 1 vacuum transmitting hose.
Connect the vacuum switching valve connector.
w/o EGR System:
Connect the connector.
w/ EGR System without EGR Cooler:
Connect the 2 connectors.
w/ EGR System with EGR Cooler:
Connect the 3 connectors.
26100G
8.INSTALL INTAKE AIR CONNECTOR WITH DIESEL THROTTLE BODY ASSEMBLY (w/o EGR System)
9.CONNECT ENGINE WIRE (w/o EGR System)
17871A
10.INSTALL AIR CONNECTOR STAY (w/o EGR System)
23701
11.INSTALL NO. 1, NO. 2 AND NO. 3 INJECTION PIPE SUB-ASSEMBLY (w/o EGR System)
22267A
12.INSTALL THROTTLE BODY BRACKET (w/o EGR System)
17113E
13.INSTALL NO. 1 INTAKE PIPE (w/o EGR System)
25709E
14.CONNECT NO. 4 VACUUM TRANSMITTING PIPE SUB-ASSEMBLY (w/o EGR System)
87245A
15.CONNECT INLET HEATER WATER HOSE (w/o EGR System)
25800
16.INSTALL ELECTRIC EGR CONTROL VALVE ASSEMBLY (w/ EGR System)
Install the electric EGR control valve assembly (See page Engine / Hybrid System>1KD-FTV (EMISSION CONTROL)>EGR VALVE>INSTALLATION).
17.CONNECT CABLE TO NEGATIVE BATTERY TERMINAL
- NOTICE:
-
When disconnecting the cable, some systems need to be initialized after the cable is reconnected (See page General>INTRODUCTION>REPAIR INSTRUCTION>INITIALIZATION).
18.ADD ENGINE COOLANT (w/ EGR System with EGR Cooler)
19.BLEED AIR FROM FUEL SYSTEM
20.INSPECT FOR COOLANT LEAK (w/ EGR System with EGR Cooler)
21.INSPECT FOR FUEL LEAK