SLIDING ROOF / CONVERTIBLE SLIDING ROOF HOUSING INSTALLATION
PROCEDURE

 63203F
1.INSTALL SLIDING ROOF HOUSING SUB-ASSEMBLY
Temporarily install the sliding roof housing sub-assembly with the 4 bolts (vehicle body side) and 8 nuts.
Tighten the 8 nuts.
- Torque:
- 5.5 N*m (56 kgf*cm, 49 in.*lbf)
Tighten the 4 bolts.
- Torque:
- 8.0 N*m (82 kgf*cm, 71 in.*lbf)
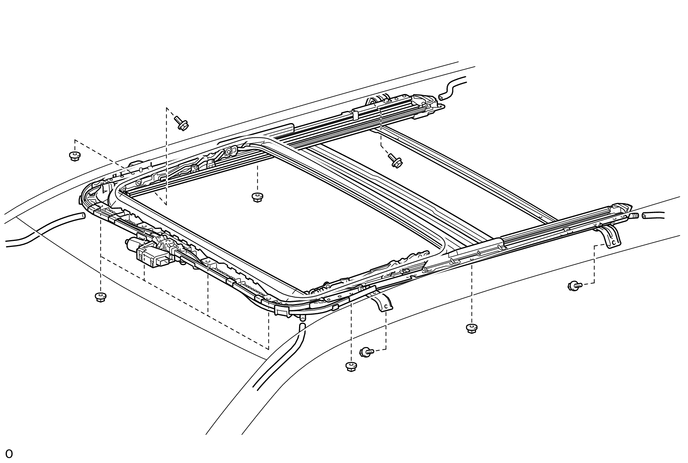
Connect the 4 drain hoses.
63201G
2.INSTALL SLIDING ROOF GLASS SUB-ASSEMBLY
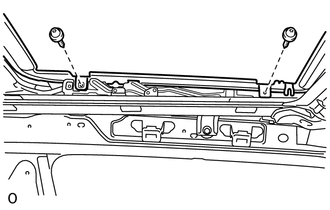
Using a T25 "TORX" driver, temporarily install the sliding roof glass sub-assembly with the 4 screws.
Perform a level check.
Check the difference in the level between the roof panel and upper surface of the weatherstrip labeled "a" when the sliding roof glass is fully closed.
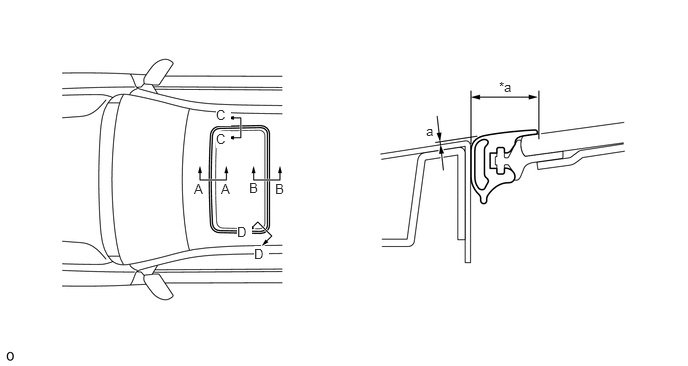
| *a | Even | - | - |
- Standard:
Area Specified Condition A - A -2.0 to 1.0 mm (-0.0787 to 0.0394 in.) B - B -1.0 to 2.0 mm (-0.0394 to 0.0787 in.) C - C -1.5 to 1.5 mm (-0.0591 to 0.0591 in.) D - D -1.0 to 1.5 mm (-0.0394 to 0.0591 in.)
- HINT:
-
"+" represents the condition that the glass is above the panel level. "-" represents the condition that the glass is below the panel level.
Perform a gap check.
Check the gap between the roof panel and roof glass.
- NOTICE:
-
The gap must be even all around.
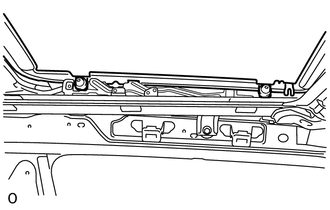
Using a T25 "TORX" driver, tighten the 4 screws.
- Torque:
- 5.5 N*m (56 kgf*cm, 49 in.*lbf)
3.CHECK FOR WATER LEAK
After adjusting the sliding roof glass sub-assembly, check for water leakage into the vehicle interior.
If there are any leaks, readjust the sliding roof glass sub-assembly.
63218M
4.INSTALL SLIDING ROOF SIDE GARNISH LH
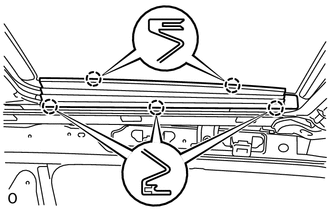
Attach the 5 claws to install the sliding roof side garnish LH.
63217K
5.INSTALL SLIDING ROOF SIDE GARNISH RH
- HINT:
-
Use the same procedure described for the LH side.
86117A
6.INSTALL TELEVISION DISPLAY BRACKET A (w/ Rear Seat Entertainment System)
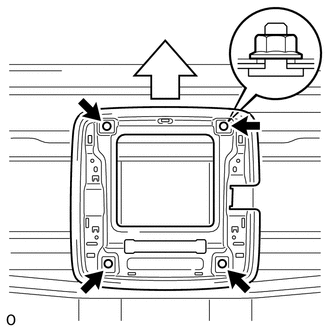
Install the television display bracket A with the 4 nuts.
- Torque:
- 9.0 N*m (92 kgf*cm, 80 in.*lbf)

|
Front Side |
86680A
7.INSTALL TELEVISION DISPLAY ASSEMBLY (w/ Rear Seat Entertainment System)
88566T
8.INSTALL REAR NO. 3 ROOF AIR DUCT (for Dual Air Conditioning System)
88566V
9.INSTALL REAR NO. 5 ROOF AIR DUCT (for Dual Air Conditioning System)
62180A
10.INSTALL CURTAIN SHIELD AIRBAG ASSEMBLY LH
62170A
11.INSTALL CURTAIN SHIELD AIRBAG ASSEMBLY RH
- HINT:
-
Use the same procedure described for the LH side.
63310
12.INSTALL ROOF HEADLINING ASSEMBLY (for 3 Door)
63310
13.INSTALL ROOF HEADLINING ASSEMBLY (for 5 Door)
14.CONNECT CABLE TO NEGATIVE BATTERY TERMINAL
- NOTICE:
-
When disconnecting the cable, some systems need to be initialized after the cable is reconnected (See page General>INTRODUCTION>REPAIR INSTRUCTION>INITIALIZATION).
15.CHECK SRS WARNING LIGHT