METER / GAUGE / DISPLAY METER / GAUGE SYSTEM B1507 Open in Turn Signal Circuit B1508 Short in Turn Signal / Hazard Flasher Circuit
DESCRIPTION
| DTC Code | DTC Detection Condition | Trouble Area |
|---|---|---|
| B1507 | Open in turn signal light circuit. | for Halogen Headlight (w/ Reverse Shift-linked Mirror): -
Harness or connector -
Front turn signal light bulb socket -
Headlight cord -
Side turn signal light assembly -
Outer mirror retractor -
Outer mirror control ECU assembly -
Rear combination light socket and wire sub-assembly -
Combination meter asssembly for Halogen Headlight (w/o Reverse Shift-linked Mirror): -
Harness or connector -
Front turn signal light bulb socket -
Headlight cord -
Side turn signal light assembly -
Outer mirror retractor -
Rear combination light socket and wire sub-assembly -
Combination meter asssembly for LED Headlight (w/ Reverse Shift-linked Mirror): -
Harness or connector -
Front turn signal light bulb socket -
Headlight unit assembly -
No. 1 headlight ECU sub-assembly -
Side turn signal light assembly -
Outer mirror retractor -
Outer mirror control ECU assembly -
Rear combination light socket and wire sub-assembly -
Combination meter asssembly for LED Headlight (w/o Reverse Shift-linked Mirror): -
Harness or connector -
Front turn signal light bulb socket -
Headlight unit assembly -
No. 1 headlight ECU sub-assembly -
Side turn signal light assembly -
Outer mirror retractor -
Rear combination light socket and wire sub-assembly -
Combination meter asssembly |
| B1508 | Short in turn signal light circuit or hazard warning light circuit. | for Halogen Headlight (w/ Reverse Shift-linked Mirror): -
Harness or connector -
Front turn signal light bulb socket -
Headlight cord -
Side turn signal light assembly -
Outer mirror retractor -
Outer mirror control ECU assembly -
Rear combination light socket and wire sub-assembly -
Combination meter asssembly for Halogen Headlight (w/o Reverse Shift-linked Mirror): -
Harness or connector -
Front turn signal light bulb socket -
Headlight cord -
Side turn signal light assembly -
Outer mirror retractor -
Rear combination light socket and wire sub-assembly -
Combination meter asssembly for LED Headlight (w/ Reverse Shift-linked Mirror): -
Harness or connector -
Front turn signal light bulb socket -
Headlight unit assembly -
No. 1 headlight ECU sub-assembly -
Side turn signal light assembly -
Outer mirror retractor -
Outer mirror control ECU assembly -
Rear combination light socket and wire sub-assembly -
Combination meter asssembly for LED Headlight (w/o Reverse Shift-linked Mirror): -
Harness or connector -
Front turn signal light bulb socket -
Headlight unit assembly -
No. 1 headlight ECU sub-assembly -
Side turn signal light assembly -
Outer mirror retractor -
Rear combination light socket and wire sub-assembly -
Combination meter asssembly |
WIRING DIAGRAM
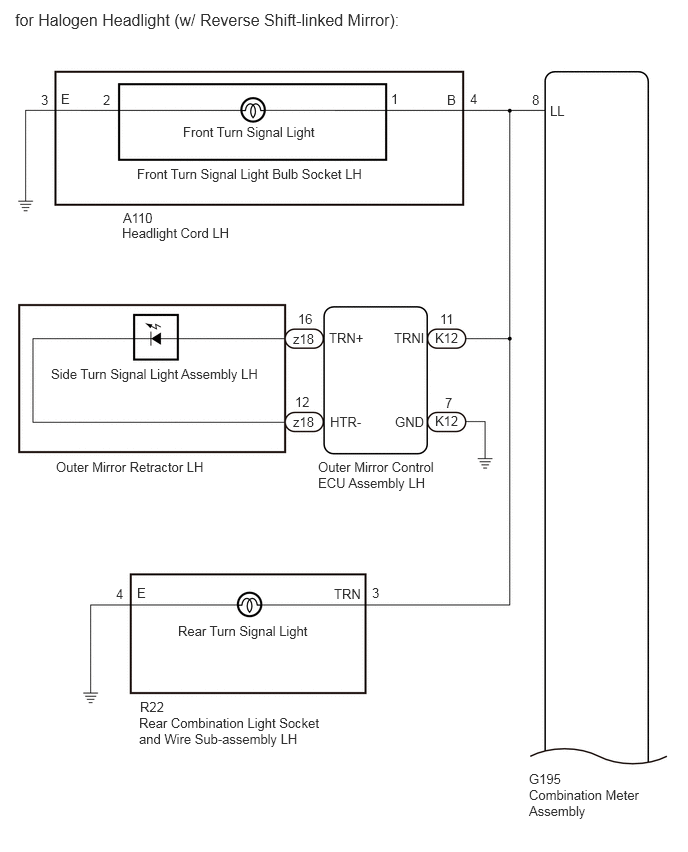
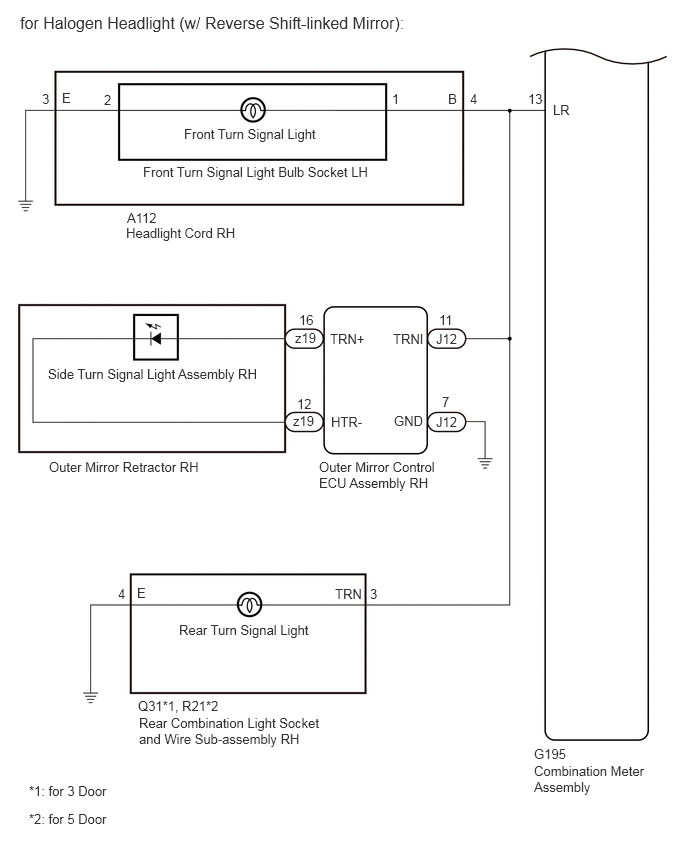
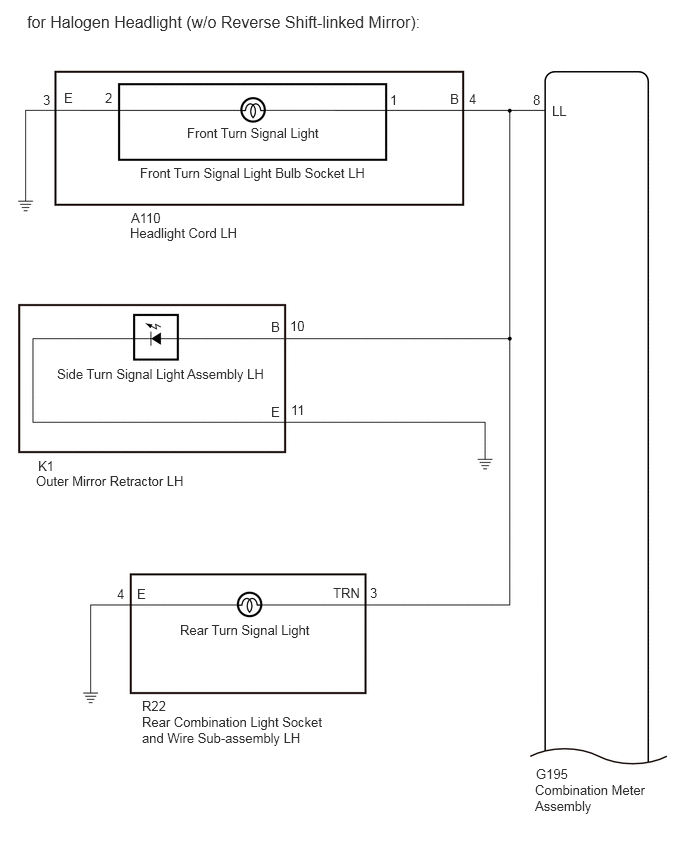
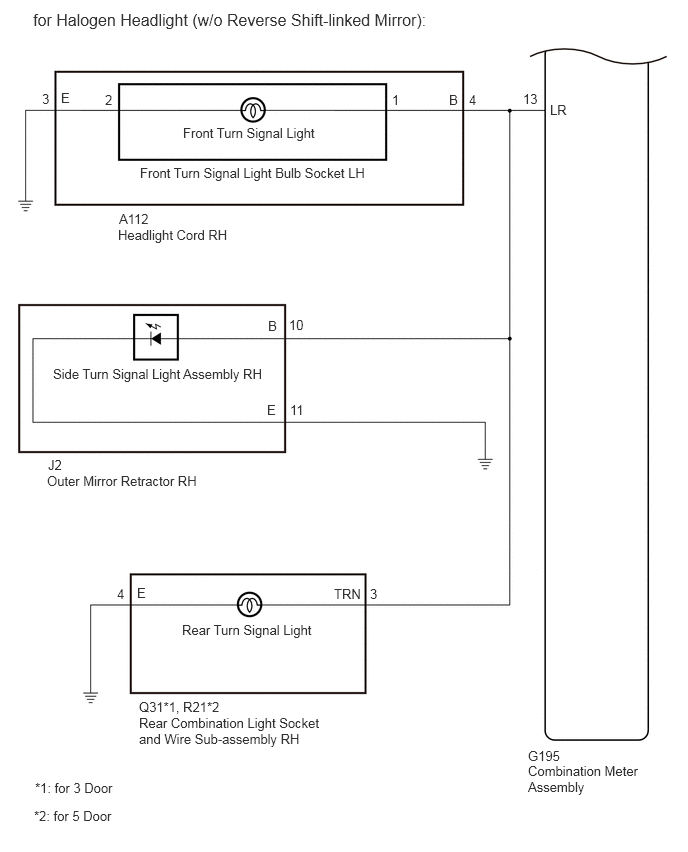
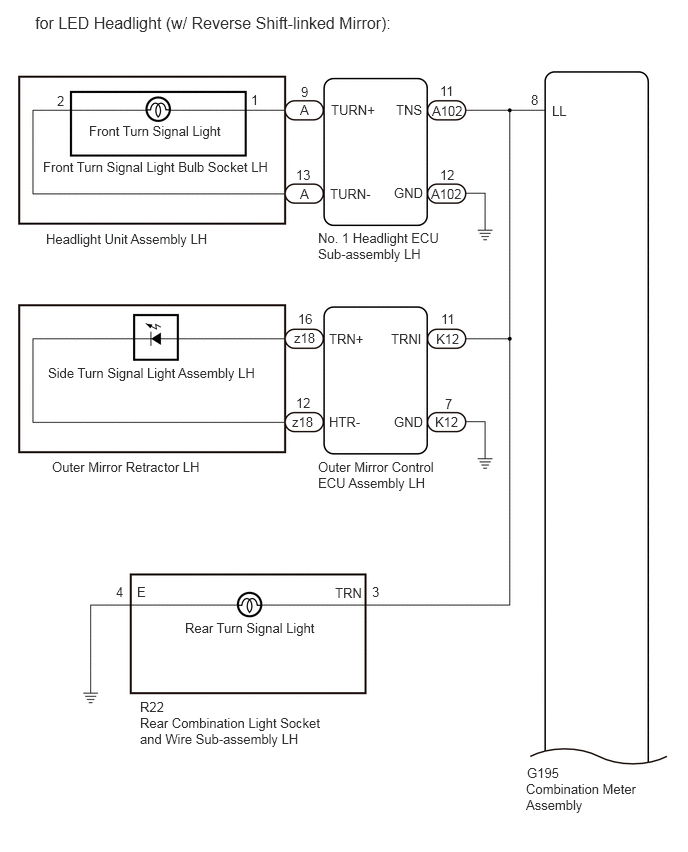
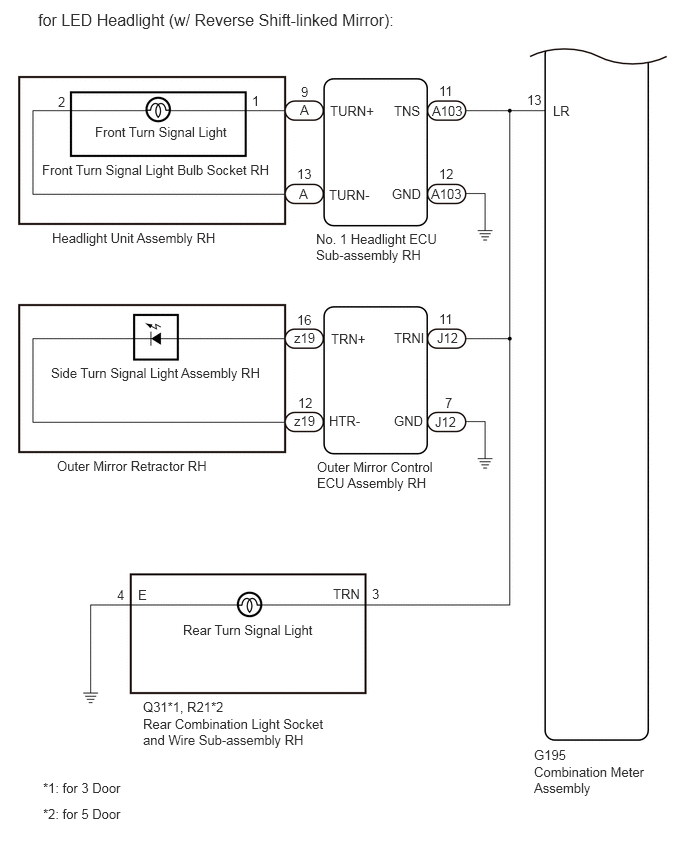
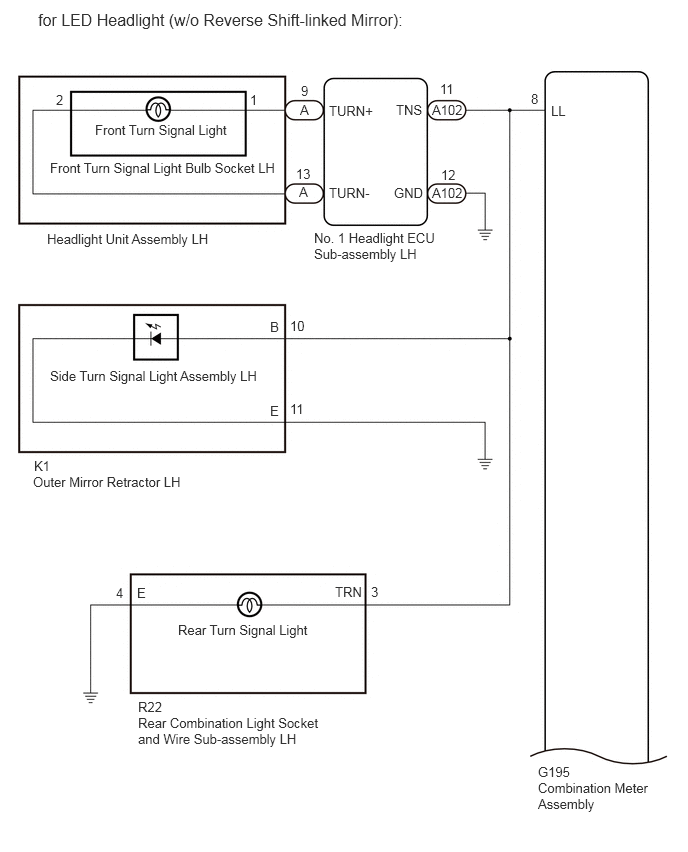
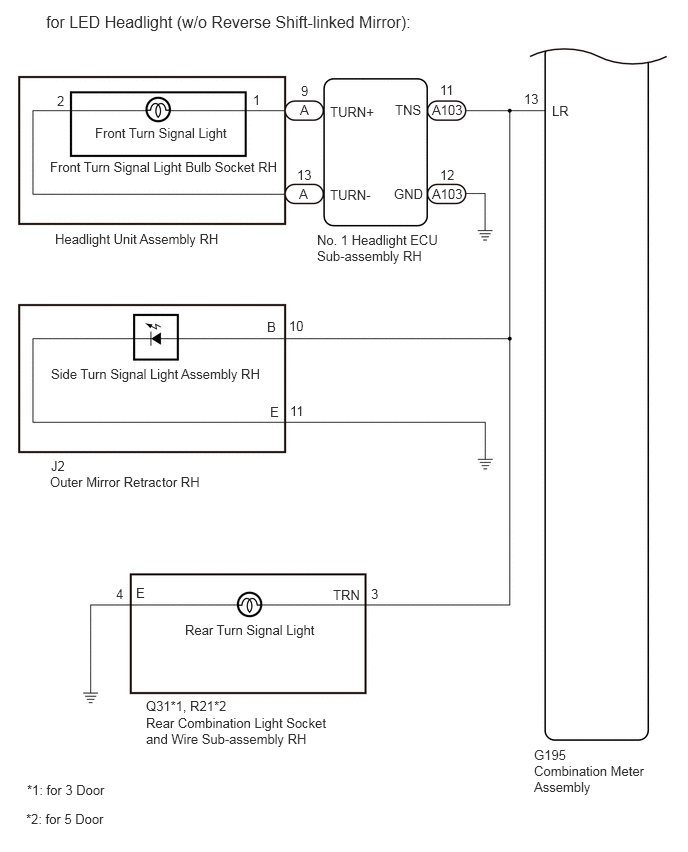
CAUTION / NOTICE / HINT
- NOTICE:
-
Inspect the bulbs for circuits related to this system before performing the following inspection procedure.
PROCEDURE
Clear the DTCs.
Click hereVehicle Interior>METER / GAUGE / DISPLAY>METER / GAUGE SYSTEM>DTC CHECK / CLEAR
Recheck for DTCs and check that no DTCs are output.
Click hereVehicle Interior>METER / GAUGE / DISPLAY>METER / GAUGE SYSTEM>DTC CHECK / CLEAR
- OK:
B1507 and B1508 are not output.
- Result:
Proceed to OK NG
OK
Click hereGeneral>INTRODUCTION>HOW TO TROUBLESHOOT ECU CONTROLLED SYSTEMS>HOW TO PROCEED WITH TROUBLESHOOTING
NG
Check the vehicle type.
- Result:
Result Proceed to for Halogen Headlight (w/ Reverse Shift-linked Mirror) A for Halogen Headlight (w/o Reverse Shift-linked Mirror) B for LED Headlight (w/ Reverse Shift-linked Mirror) C for LED Headlight (w/o Reverse Shift-linked Mirror) D
A
B
C
D
Inspect the illumination of each turn signal light.
- Result:
Result Proceed to LH side turn signal light does not illuminate. A RH side turn signal light does not illuminate. B
A
B
Turn the ignition switch to ON.
Set the headlight dimmer switch assembly to the left turn switch position.
Check the operation of the turn signal lights (LH side).
- Result:
Result Proceed to Front turn signal light (LH side) does not blink. A Side turn signal light (LH side) does not blink. B Rear turn signal light (LH side) does not blink. C
A
B
C
Disconnect the G195 combination meter assembly connector.
Disconnect the A110 headlight cord LH connector.
Disconnect the K12 outer mirror control ECU assembly LH connector.
Disconnect the R22 rear combination light socket and wire sub-assembly LH connector.
Measure the resistance according to the value(s) in the table below.
- Standard Resistance (Check for Open):
Tester Connection Condition Specified Condition A110-4 (B) - J195-8 (LL) Always Below 1 Ω A110-3 (E) - Body ground Always Below 1 Ω
- Standard Resistance (Check for Short):
Tester Connection Condition Specified Condition A110-4 (B) - Body ground Always 10 kΩ or higher
- Result:
Proceed to OK NG
OK
NG
Remove the headlight cord LH.
Click hereVehicle Exterior>LIGHTING (EXT)>HEADLIGHT ASSEMBLY(for Halogen Headlight)>DISASSEMBLY
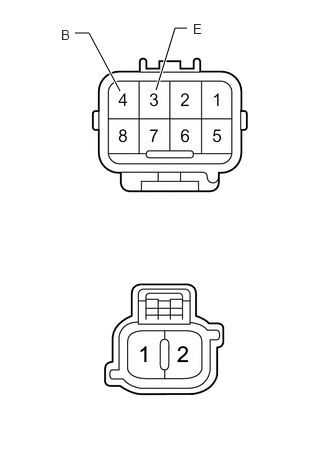
Measure the resistance according to the value(s) in the table below.
- Standard Resistance (Check for Open):
Tester Connection Condition Specified Condition 4 (B) - 1 Always Below 1 Ω 3 (E) - 2 Always Below 1 Ω
- Standard Resistance (Check for Short):
Tester Connection Condition Specified Condition 4 (B) - 3 (E) Always 10 kΩ or higher
- Result:
Proceed to OK NG
OK
NG
Remove the front turn signal light bulb socket LH.
Click hereVehicle Exterior>LIGHTING (EXT)>HEADLIGHT ASSEMBLY(for Halogen Headlight)>DISASSEMBLY
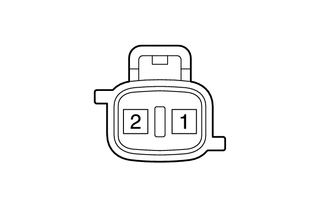
Apply battery voltage and check the operation of the front turn signal light.
- OK:
Battery Connection Specified Condition Positive (+) → 1
Negative (-) → 2Front turn signal light illuminates
- Result:
Proceed to OK NG
OK
NG
Disconnect the G195 combination meter assembly connector.
Disconnect the A110 headlight cord LH connector.
Disconnect the K12 outer mirror control ECU assembly LH connector.
Disconnect the R22 rear combination light socket and wire sub-assembly LH connector.
Measure the resistance according to the value(s) in the table below.
- Standard Resistance (Check for Open):
Tester Connection Condition Specified Condition K12-11 (TRNI) - G195-8 (LL) Always Below 1 Ω K12-7 (GND) - Body ground Always Below 1 Ω
- Standard Resistance (Check for Short):
Tester Connection Condition Specified Condition K12-11 (TRNI) - Body ground Always 10 kΩ or higher
- Result:
Proceed to OK NG
OK
NG
Remove the side turn signal light assembly LH.
Click hereVehicle Exterior>LIGHTING (EXT)>SIDE TURN SIGNAL LIGHT ASSEMBLY>REMOVAL
Inspect the side turn signal light assembly LH.
Click hereVehicle Exterior>LIGHTING (EXT)>SIDE TURN SIGNAL LIGHT ASSEMBLY>INSPECTION
- Result:
Proceed to OK NG
OK
NG
Disconnect the z18 outer mirror retractor LH connector.
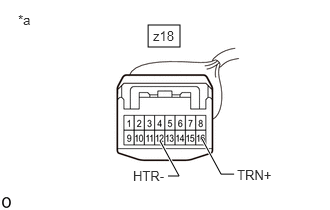
| *a | Front view of wire harness connector
(to Outer Mirror Control ECU Assembly LH) |
Apply battery voltage and check the operation of the side turn signal light.
- OK:
Battery Connection Specified Condition Positive (+) → z18-16 (TRN+)
Negative (-) → z18-12 (HTR-)Side turn signal light illuminates
- Result:
Proceed to OK NG
OK
NG
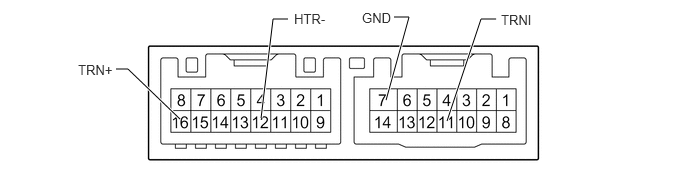
Remove the outer mirror control ECU assembly LH.
Click hereVehicle Exterior>MIRROR (EXT)>OUTER MIRROR CONTROL ECU>REMOVAL
Measure the resistance according to the value(s) in the table below.
- Standard Resistance (Check for Open):
Tester Connection Condition Specified Condition 16 (TRN+) - 11 (TRNI) Always Below 1 Ω 12 (HTR-) - 7 (GND) Always Below 1 Ω
- Standard Resistance (Check for Short):
Tester Connection Condition Specified Condition 16 (TRN+) - 12 (HTR-) Always 10 kΩ or higher
- Result:
Proceed to OK NG
OK
NG
Disconnect the G195 combination meter assembly connector.
Disconnect the A110 headlight cord LH connector.
Disconnect the K12 outer mirror control ECU assembly LH connector.
Disconnect the R22 rear combination light socket and wire sub-assembly LH connector.
Measure the resistance according to the value(s) in the table below.
- Standard Resistance (Check for Open):
Tester Connection Condition Specified Condition R22-3 (TRN) - G195-8 (LL) Always Below 1 Ω R22-4 (E) - Body ground Always Below 1 Ω
- Standard Resistance (Check for Short):
Tester Connection Condition Specified Condition R22-3 (TRN) - Body ground Always 10 kΩ or higher
- Result:
Proceed to OK NG
OK
NG
Remove the rear combination light socket and wire sub-assembly LH.
Click hereVehicle Exterior>LIGHTING (EXT)>REAR COMBINATION LIGHT ASSEMBLY>DISASSEMBLY
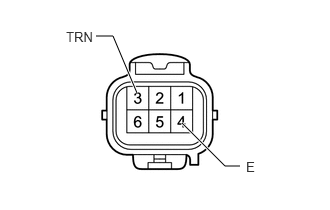
Apply battery voltage and check the operation of the rear turn signal light.
- OK:
Battery Connection Specified Condition Positive (+) → 3 (TRN)
Negative (-) → 4 (E)Rear turn signal light illuminates
- Result:
Proceed to OK NG
OK
NG
Turn the ignition switch to ON.
Set the headlight dimmer switch assembly to the right turn switch position.
Check the operation of the turn signal lights (RH side).
- Result:
Result Proceed to Front turn signal light (RH side) does not blink. A Side turn signal light (RH side) does not blink. B Rear turn signal light (RH side) does not blink. C
A
B
C
Disconnect the G195 combination meter assembly connector.
Disconnect the A112 headlight cord RH connector.
Disconnect the J12 outer mirror control ECU assembly RH connector.
Disconnect the Q31*1 or R21*2 rear combination light socket and wire sub-assembly RH connector.
*1: for 3 Door
*2: for 5 Door
Measure the resistance according to the value(s) in the table below.
- Standard Resistance (Check for Open):
Tester Connection Condition Specified Condition A112-4 (B) - J195-13 (LR) Always Below 1 Ω A112-3 (E) - Body ground Always Below 1 Ω
- Standard Resistance (Check for Short):
Tester Connection Condition Specified Condition A112-4 (B) - Body ground Always 10 kΩ or higher
- Result:
Proceed to OK NG
OK
NG
Remove the headlight cord RH.
Click hereVehicle Exterior>LIGHTING (EXT)>HEADLIGHT ASSEMBLY(for Halogen Headlight)>DISASSEMBLY
Measure the resistance according to the value(s) in the table below.
- Standard Resistance (Check for Open):
Tester Connection Condition Specified Condition 4 (B) - 1 Always Below 1 Ω 3 (E) - 2 Always Below 1 Ω
- Standard Resistance (Check for Short):
Tester Connection Condition Specified Condition 4 (B) - 3 (E) Always 10 kΩ or higher
- Result:
Proceed to OK NG
OK
NG
Remove the front turn signal light bulb socket RH.
Click hereVehicle Exterior>LIGHTING (EXT)>HEADLIGHT ASSEMBLY(for Halogen Headlight)>DISASSEMBLY
Apply battery voltage and check the operation of the front turn signal light.
- OK:
Battery Connection Specified Condition Positive (+) → 1
Negative (-) → 2Front turn signal light illuminates
- Result:
Proceed to OK NG
OK
NG
Disconnect the G195 combination meter assembly connector.
Disconnect the A112 headlight cord RH connector.
Disconnect the J12 outer mirror control ECU assembly RH connector.
Disconnect the Q31*1 or R21*2 rear combination light socket and wire sub-assembly RH connector.
*1: for 3 Door
*2: for 5 Door
Measure the resistance according to the value(s) in the table below.
- Standard Resistance (Check for Open):
Tester Connection Condition Specified Condition J12-11 (TRNI) - G195-13 (LR) Always Below 1 Ω J12-7 (GND) - Body ground Always Below 1 Ω
- Standard Resistance (Check for Short):
Tester Connection Condition Specified Condition J12-11 (TRNI) - Body ground Always 10 kΩ or higher
- Result:
Proceed to OK NG
OK
NG
Remove the side turn signal light assembly RH.
Click hereVehicle Exterior>LIGHTING (EXT)>SIDE TURN SIGNAL LIGHT ASSEMBLY>REMOVAL
Inspect the side turn signal light assembly RH.
Click hereVehicle Exterior>LIGHTING (EXT)>SIDE TURN SIGNAL LIGHT ASSEMBLY>INSPECTION
- Result:
Proceed to OK NG
OK
NG
Disconnect the z19 outer mirror retractor RH connector.
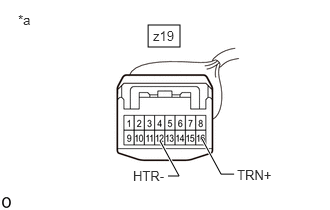
| *a | Front view of wire harness connector
(to Outer Mirror Control ECU Assembly RH) |
Apply battery voltage and check the operation of the side turn signal light.
- OK:
Battery Connection Specified Condition Positive (+) → z19-16 (TRN+)
Negative (-) → z19-12 (HTR-)Side turn signal light illuminates
- Result:
Proceed to OK NG
OK
NG
Remove the outer mirror control ECU assembly RH.
Click hereVehicle Exterior>MIRROR (EXT)>OUTER MIRROR CONTROL ECU>REMOVAL
Measure the resistance according to the value(s) in the table below.
- Standard Resistance (Check for Open):
Tester Connection Condition Specified Condition 16 (TRN+) - 11 (TRNI) Always Below 1 Ω 12 (HTR-) - 7 (GND) Always Below 1 Ω
- Standard Resistance (Check for Short):
Tester Connection Condition Specified Condition 16 (TRN+) - 12 (HTR-) Always 10 kΩ or higher
- Result:
Proceed to OK NG
OK
NG
Disconnect the G195 combination meter assembly connector.
Disconnect the A112 headlight cord RH connector.
Disconnect the J12 outer mirror control ECU assembly RH connector.
Disconnect the Q31*1 or R21*2 rear combination light socket and wire sub-assembly RH connector.
*1: for 3 Door
*2: for 5 Door
Measure the resistance according to the value(s) in the table below.
- Standard Resistance (Check for Open):
Tester Connection Condition Specified Condition *1: for 3 Door
*2: for 5 Door
Q31-3 (TRN) - G195-13 (LR)*1 Always Below 1 Ω R21-3 (TRN) - G195-13 (LR)*2 Always Below 1 Ω Q31-4 (E) - Body ground*1 Always Below 1 Ω R21-4 (E) - Body ground*2 Always Below 1 Ω
- Standard Resistance (Check for Short):
Tester Connection Condition Specified Condition *1: for 3 Door
*2: for 5 Door
Q31-3 (TRN) - Body ground*1 Always 10 kΩ or higher R21-3 (TRN) - Body ground*2 Always 10 kΩ or higher
- Result:
Proceed to OK NG
OK
NG
Remove the rear combination light socket and wire sub-assembly RH.
Click hereVehicle Exterior>LIGHTING (EXT)>REAR COMBINATION LIGHT ASSEMBLY>DISASSEMBLY
Apply battery voltage and check the operation of the rear turn signal light.
- OK:
Battery Connection Specified Condition Positive (+) → 3 (TRN)
Negative (-) → 4 (E)Rear turn signal light illuminates
- Result:
Proceed to OK NG
OK
NG
Inspect the illumination of each turn signal light.
- Result:
Result Proceed to LH side turn signal light does not illuminate. A RH side turn signal light does not illuminate. B
A
B
Turn the ignition switch to ON.
Set the headlight dimmer switch assembly to the left turn switch position.
Check the operation of the turn signal lights (LH side).
- Result:
Result Proceed to Front turn signal light (LH side) does not blink. A Side turn signal light (LH side) does not blink. B Rear turn signal light (LH side) does not blink. C
A
B
C
Disconnect the G195 combination meter assembly connector.
Disconnect the A110 headlight cord LH connector.
Disconnect the K1 outer mirror retractor LH connector.
Disconnect the R22 rear combination light socket and wire sub-assembly LH connector.
Measure the resistance according to the value(s) in the table below.
- Standard Resistance (Check for Open):
Tester Connection Condition Specified Condition A110-4 (B) - J195-8 (LL) Always Below 1 Ω A110-3 (E) - Body ground Always Below 1 Ω
- Standard Resistance (Check for Short):
Tester Connection Condition Specified Condition A110-4 (B) - Body ground Always 10 kΩ or higher
- Result:
Proceed to OK NG
OK
NG
Disconnect the G195 combination meter assembly connector.
Disconnect the A110 headlight cord LH connector.
Disconnect the K1 outer mirror retractor LH connector.
Disconnect the R22 rear combination light socket and wire sub-assembly LH connector.
Measure the resistance according to the value(s) in the table below.
- Standard Resistance (Check for Open):
Tester Connection Condition Specified Condition K1-10 (B) - G195-8 (LL) Always Below 1 Ω K1-11 (E) - Body ground Always Below 1 Ω
- Standard Resistance (Check for Short):
Tester Connection Condition Specified Condition K1-10 (B) - Body ground Always 10 kΩ or higher
- Result:
Proceed to OK NG
OK
NG
Remove the side turn signal light assembly LH.
Click hereVehicle Exterior>LIGHTING (EXT)>SIDE TURN SIGNAL LIGHT ASSEMBLY>REMOVAL
Inspect the side turn signal light assembly LH.
Click hereVehicle Exterior>LIGHTING (EXT)>SIDE TURN SIGNAL LIGHT ASSEMBLY>INSPECTION
- Result:
Proceed to OK NG
OK
NG
Remove the outer mirror retractor LH connector.
Click hereVehicle Exterior>MIRROR (EXT)>OUTER REAR VIEW MIRROR>REMOVAL
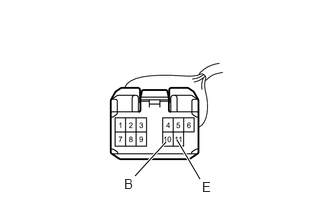
Apply battery voltage and check the operation of the side turn signal light.
- OK:
Battery Connection Specified Condition Positive (+) → 10 (B)
Negative (-) → 11 (E)Side turn signal light illuminates
- Result:
Proceed to OK NG
OK
NG
Disconnect the G195 combination meter assembly connector.
Disconnect the A110 headlight cord LH connector.
Disconnect the K1 outer mirror retractor LH connector.
Disconnect the R22 rear combination light socket and wire sub-assembly LH connector.
Measure the resistance according to the value(s) in the table below.
- Standard Resistance (Check for Open):
Tester Connection Condition Specified Condition R22-3 (TRN) - G195-8 (LL) Always Below 1 Ω R22-4 (E) - Body ground Always Below 1 Ω
- Standard Resistance (Check for Short):
Tester Connection Condition Specified Condition R22-3 (TRN) - Body ground Always 10 kΩ or higher
- Result:
Proceed to OK NG
OK
NG
Turn the ignition switch to ON.
Set the headlight dimmer switch assembly to the right turn switch position.
Check the operation of the turn signal lights (RH side).
- Result:
Result Proceed to Front turn signal light (RH side) does not blink. A Side turn signal light (RH side) does not blink. B Rear turn signal light (RH side) does not blink. C
A
B
C
Disconnect the G195 combination meter assembly connector.
Disconnect the A112 headlight cord RH connector.
Disconnect the J2 outer mirror retractor RH connector.
Disconnect the Q31*1 or R21*2 rear combination light socket and wire sub-assembly RH connector.
*1: for 3 Door
*2: for 5 Door
Measure the resistance according to the value(s) in the table below.
- Standard Resistance (Check for Open):
Tester Connection Condition Specified Condition A112-4 (B) - J195-13 (LR) Always Below 1 Ω A112-3 (E) - Body ground Always Below 1 Ω
- Standard Resistance (Check for Short):
Tester Connection Condition Specified Condition A112-4 (B) - Body ground Always 10 kΩ or higher
- Result:
Proceed to OK NG
OK
NG
Disconnect the G195 combination meter assembly connector.
Disconnect the A112 headlight cord RH connector.
Disconnect the J2 outer mirror retractor RH connector.
Disconnect the Q31*1 or R21*2 rear combination light socket and wire sub-assembly RH connector.
*1: for 3 Door
*2: for 5 Door
Measure the resistance according to the value(s) in the table below.
- Standard Resistance (Check for Open):
Tester Connection Condition Specified Condition J2-10 (B) - G195-13 (LR) Always Below 1 Ω J2-11 (E) - Body ground Always Below 1 Ω
- Standard Resistance (Check for Short):
Tester Connection Condition Specified Condition J2-10 (B) - Body ground Always 10 kΩ or higher
- Result:
Proceed to OK NG
OK
NG
Remove the side turn signal light assembly RH.
Click hereVehicle Exterior>LIGHTING (EXT)>SIDE TURN SIGNAL LIGHT ASSEMBLY>REMOVAL
Inspect the side turn signal light assembly RH.
Click hereVehicle Exterior>LIGHTING (EXT)>SIDE TURN SIGNAL LIGHT ASSEMBLY>INSPECTION
- Result:
Proceed to OK NG
OK
NG
Remove the outer mirror retractor RH connector.
Click hereVehicle Exterior>MIRROR (EXT)>OUTER REAR VIEW MIRROR>REMOVAL
Apply battery voltage and check the operation of the side turn signal light.
- OK:
Battery Connection Specified Condition Positive (+) → 10 (B)
Negative (-) → 11 (E)Side turn signal light illuminates
- Result:
Proceed to OK NG
OK
NG
Disconnect the G195 combination meter assembly connector.
Disconnect the A112 headlight cord RH connector.
Disconnect the J2 outer mirror retractor RH connector.
Disconnect the Q31*1 or R21*2 rear combination light socket and wire sub-assembly RH connector.
*1: for 3 Door
*2: for 5 Door
Measure the resistance according to the value(s) in the table below.
- Standard Resistance (Check for Open):
Tester Connection Condition Specified Condition *1: for 3 Door
*2: for 5 Door
Q31-3 (TRN) - G195-13 (LR)*1 Always Below 1 Ω R21-3 (TRN) - G195-13 (LR)*2 Always Below 1 Ω Q31-4 (E) - Body ground*1 Always Below 1 Ω R21-4 (E) - Body ground*2 Always Below 1 Ω
- Standard Resistance (Check for Short):
Tester Connection Condition Specified Condition *1: for 3 Door
*2: for 5 Door
Q31-3 (TRN) - Body ground*1 Always 10 kΩ or higher R21-3 (TRN) - Body ground*2 Always 10 kΩ or higher
- Result:
Proceed to OK NG
OK
NG
Inspect the illumination of each turn signal light.
- Result:
Result Proceed to LH side turn signal light does not illuminate. A RH side turn signal light does not illuminate. B
A
B
Turn the ignition switch to ON.
Set the headlight dimmer switch assembly to the left turn switch position.
Check the operation of the turn signal lights (LH side).
- Result:
Result Proceed to Front turn signal light (LH side) does not blink. A Side turn signal light (LH side) does not blink. B Rear turn signal light (LH side) does not blink. C
A
B
C
Disconnect the G195 combination meter assembly connector.
Disconnect the A102 No. 1 headlight ECU sub-assembly LH connector.
Disconnect the K12 outer mirror control ECU assembly LH connector.
Disconnect the R22 rear combination light socket and wire sub-assembly LH connector.
Measure the resistance according to the value(s) in the table below.
- Standard Resistance (Check for Open):
Tester Connection Condition Specified Condition A102-11 (TNS) - J195-8 (LL) Always Below 1 Ω A102-12 (GND) - Body ground Always Below 1 Ω
- Standard Resistance (Check for Short):
Tester Connection Condition Specified Condition A102-11 (TNS) - Body ground Always 10 kΩ or higher
- Result:
Proceed to OK NG
OK
NG
Remove the front turn signal light bulb socket LH.
Click hereVehicle Exterior>LIGHTING (EXT)>HEADLIGHT ASSEMBLY(for LED Headlight)>DISASSEMBLY
Apply battery voltage and check the operation of the front turn signal light.
- OK:
Battery Connection Specified Condition Positive (+) → 1
Negative (-) → 2Front turn signal light illuminates
- Result:
Proceed to OK NG
OK
NG
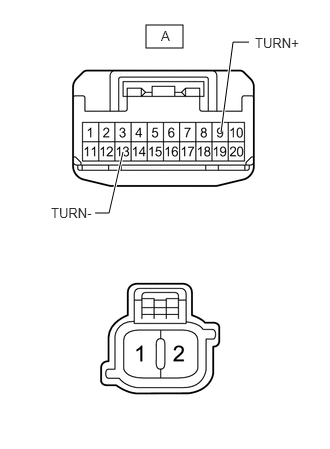
Remove the headlight unit assembly LH.
Click hereVehicle Exterior>LIGHTING (EXT)>HEADLIGHT ASSEMBLY(for LED Headlight)>REMOVAL
Measure the resistance according to the value(s) in the table below.
- Standard Resistance (Check for Open):
Tester Connection Condition Specified Condition A-9 (TURN+) - 1 Always Below 1 Ω A-13 (TURN-) - 2 Always Below 1 Ω
- Standard Resistance (Check for Short):
Tester Connection Condition Specified Condition A-9 (TURN+) - A-13 (TURN-) Always 10 kΩ or higher
- Result:
Proceed to OK NG
OK
NG
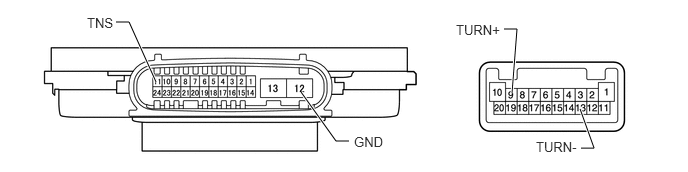
Remove the No. 1 headlight ECU sub-assembly LH.
Click hereVehicle Exterior>LIGHTING (EXT)>HEADLIGHT ASSEMBLY(for LED Headlight)>DISASSEMBLY
Measure the resistance according to the value(s) in the table below.
- Standard Resistance (Check for Open):
Tester Connection Condition Specified Condition 11 (TNS) - 9 (TURN+) Always Below 1 Ω 12 (GND) - 13 (TURN-) Always Below 1 Ω
- Standard Resistance (Check for Short):
Tester Connection Condition Specified Condition 11 (TNS) - 12 (GND) Always 10 kΩ or higher
- Result:
Proceed to OK NG
OK
NG
Disconnect the G195 combination meter assembly connector.
Disconnect the A102 No. 1 headlight ECU sub-assembly LH connector.
Disconnect the K12 outer mirror control ECU assembly LH connector.
Disconnect the R22 rear combination light socket and wire sub-assembly LH connector.
Measure the resistance according to the value(s) in the table below.
- Standard Resistance (Check for Open):
Tester Connection Condition Specified Condition K12-11 (TRNI) - G195-8 (LL) Always Below 1 Ω K12-7 (GND) - Body ground Always Below 1 Ω
- Standard Resistance (Check for Short):
Tester Connection Condition Specified Condition K12-11 (TRNI) - Body ground Always 10 kΩ or higher
- Result:
Proceed to OK NG
OK
NG
Disconnect the G195 combination meter assembly connector.
Disconnect the A102 No. 1 headlight ECU sub-assembly LH connector.
Disconnect the K12 outer mirror control ECU assembly LH connector.
Disconnect the R22 rear combination light socket and wire sub-assembly LH connector.
Measure the resistance according to the value(s) in the table below.
- Standard Resistance (Check for Open):
Tester Connection Condition Specified Condition R22-3 (TRN) - G195-8 (LL) Always Below 1 Ω R22-4 (E) - Body ground Always Below 1 Ω
- Standard Resistance (Check for Short):
Tester Connection Condition Specified Condition R22-3 (TRN) - Body ground Always 10 kΩ or higher
- Result:
Proceed to OK NG
OK
NG
Turn the ignition switch to ON.
Set the headlight dimmer switch assembly to the right turn switch position.
Check the operation of the turn signal lights (RH side).
- Result:
Result Proceed to Front turn signal light (RH side) does not blink. A Side turn signal light (RH side) does not blink. B Rear turn signal light (RH side) does not blink. C
A
B
C
Disconnect the G195 combination meter assembly connector.
Disconnect the A103 No. 1 headlight ECU sub-assembly RH connector.
Disconnect the J12 outer mirror control ECU assembly RH connector.
Disconnect the Q31*1 or R21*2 rear combination light socket and wire sub-assembly RH connector.
*1: for 3 Door
*2: for 5 Door
Measure the resistance according to the value(s) in the table below.
- Standard Resistance (Check for Open):
Tester Connection Condition Specified Condition A103-11 (TNS) - J195-13 (LR) Always Below 1 Ω A103-12 (GND) - Body ground Always Below 1 Ω
- Standard Resistance (Check for Short):
Tester Connection Condition Specified Condition A103-11 (TNS) - Body ground Always 10 kΩ or higher
- Result:
Proceed to OK NG
OK
NG
Remove the front turn signal light bulb socket RH.
Click hereVehicle Exterior>LIGHTING (EXT)>HEADLIGHT ASSEMBLY(for LED Headlight)>DISASSEMBLY
Apply battery voltage and check the operation of the front turn signal light.
- OK:
Battery Connection Specified Condition Positive (+) → 1
Negative (-) → 2Front turn signal light illuminates
- Result:
Proceed to OK NG
OK
NG
Remove the headlight unit assembly RH.
Click hereVehicle Exterior>LIGHTING (EXT)>HEADLIGHT ASSEMBLY(for LED Headlight)>REMOVAL
Measure the resistance according to the value(s) in the table below.
- Standard Resistance (Check for Open):
Tester Connection Condition Specified Condition A-9 (TURN+) - 1 Always Below 1 Ω A-13 (TURN-) - 2 Always Below 1 Ω
- Standard Resistance (Check for Short):
Tester Connection Condition Specified Condition A-9 (TURN+) - A-13 (TURN-) Always 10 kΩ or higher
- Result:
Proceed to OK NG
OK
NG
Remove the No. 1 headlight ECU sub-assembly RH.
Click hereVehicle Exterior>LIGHTING (EXT)>HEADLIGHT ASSEMBLY(for LED Headlight)>DISASSEMBLY
Measure the resistance according to the value(s) in the table below.
- Standard Resistance (Check for Open):
Tester Connection Condition Specified Condition 11 (TNS) - 9 (TURN+) Always Below 1 Ω 12 (GND) - 13 (TURN-) Always Below 1 Ω
- Standard Resistance (Check for Short):
Tester Connection Condition Specified Condition 11 (TNS) - 12 (GND) Always 10 kΩ or higher
- Result:
Proceed to OK NG
OK
NG
Disconnect the G195 combination meter assembly connector.
Disconnect the A103 No. 1 headlight ECU sub-assembly RH connector.
Disconnect the J12 outer mirror control ECU assembly RH connector.
Disconnect the Q31*1 or R21*2 rear combination light socket and wire sub-assembly RH connector.
*1: for 3 Door
*2: for 5 Door
Measure the resistance according to the value(s) in the table below.
- Standard Resistance (Check for Open):
Tester Connection Condition Specified Condition J12-11 (TRNI) - G195-13 (LR) Always Below 1 Ω J12-7 (GND) - Body ground Always Below 1 Ω
- Standard Resistance (Check for Short):
Tester Connection Condition Specified Condition J12-11 (TRNI) - Body ground Always 10 kΩ or higher
- Result:
Proceed to OK NG
OK
NG
Disconnect the G195 combination meter assembly connector.
Disconnect the A103 No. 1 headlight ECU sub-assembly RH connector.
Disconnect the J12 outer mirror control ECU assembly RH connector.
Disconnect the Q31*1 or R21*2 rear combination light socket and wire sub-assembly RH connector.
*1: for 3 Door
*2: for 5 Door
Measure the resistance according to the value(s) in the table below.
- Standard Resistance (Check for Open):
Tester Connection Condition Specified Condition *1: for 3 Door
*2: for 5 Door
Q31-3 (TRN) - G195-13 (LR)*1 Always Below 1 Ω R21-3 (TRN) - G195-13 (LR)*2 Always Below 1 Ω Q31-4 (E) - Body ground*1 Always Below 1 Ω R21-4 (E) - Body ground*2 Always Below 1 Ω
- Standard Resistance (Check for Short):
Tester Connection Condition Specified Condition *1: for 3 Door
*2: for 5 Door
Q31-3 (TRN) - Body ground*1 Always 10 kΩ or higher R21-3 (TRN) - Body ground*2 Always 10 kΩ or higher
- Result:
Proceed to OK NG
OK
NG
Inspect the illumination of each turn signal light.
- Result:
Result Proceed to LH side turn signal light does not illuminate. A RH side turn signal light does not illuminate. B
A
B
Turn the ignition switch to ON.
Set the headlight dimmer switch assembly to the left turn switch position.
Check the operation of the turn signal lights (LH side).
- Result:
Result Proceed to Front turn signal light (LH side) does not blink. A Side turn signal light (LH side) does not blink. B Rear turn signal light (LH side) does not blink. C
A
B
C
Disconnect the G195 combination meter assembly connector.
Disconnect the A102 No. 1 headlight ECU sub-assembly LH connector.
Disconnect the K1 outer mirror retractor LH connector.
Disconnect the R22 rear combination light socket and wire sub-assembly LH connector.
Measure the resistance according to the value(s) in the table below.
- Standard Resistance (Check for Open):
Tester Connection Condition Specified Condition A102-11 (TNS) - J195-8 (LL) Always Below 1 Ω A102-12 (GND) - Body ground Always Below 1 Ω
- Standard Resistance (Check for Short):
Tester Connection Condition Specified Condition A102-11 (TNS) - Body ground Always 10 kΩ or higher
- Result:
Proceed to OK NG
OK
NG
Disconnect the G195 combination meter assembly connector.
Disconnect the A102 No. 1 headlight ECU sub-assembly LH connector.
Disconnect the K1 outer mirror retractor LH connector.
Disconnect the R22 rear combination light socket and wire sub-assembly LH connector.
Measure the resistance according to the value(s) in the table below.
- Standard Resistance (Check for Open):
Tester Connection Condition Specified Condition K1-10 (B) - G195-8 (LL) Always Below 1 Ω K1-11 (E) - Body ground Always Below 1 Ω
- Standard Resistance (Check for Short):
Tester Connection Condition Specified Condition K1-10 (B) - Body ground Always 10 kΩ or higher
- Result:
Proceed to OK NG
OK
NG
Disconnect the G195 combination meter assembly connector.
Disconnect the A102 No. 1 headlight ECU sub-assembly LH connector.
Disconnect the K1 outer mirror retractor LH connector.
Disconnect the R22 rear combination light socket and wire sub-assembly LH connector.
Measure the resistance according to the value(s) in the table below.
- Standard Resistance (Check for Open):
Tester Connection Condition Specified Condition R22-3 (TRN) - G195-8 (LL) Always Below 1 Ω R22-4 (E) - Body ground Always Below 1 Ω
- Standard Resistance (Check for Short):
Tester Connection Condition Specified Condition R22-3 (TRN) - Body ground Always 10 kΩ or higher
- Result:
Proceed to OK NG
OK
NG
Turn the ignition switch to ON.
Set the headlight dimmer switch assembly to the right turn switch position.
Check the operation of the turn signal lights (RH side).
- Result:
Result Proceed to Front turn signal light (RH side) does not blink. A Side turn signal light (RH side) does not blink. B Rear turn signal light (RH side) does not blink. C
A
B
C
Disconnect the G195 combination meter assembly connector.
Disconnect the A103 No. 1 headlight ECU sub-assembly RH connector.
Disconnect the J2 outer mirror retractor RH connector.
Disconnect the Q31*1 or R21*2 rear combination light socket and wire sub-assembly RH connector.
*1: for 3 Door
*2: for 5 Door
Measure the resistance according to the value(s) in the table below.
- Standard Resistance (Check for Open):
Tester Connection Condition Specified Condition A103-11 (TNS) - J195-13 (LR) Always Below 1 Ω A103-12 (GND) - Body ground Always Below 1 Ω
- Standard Resistance (Check for Short):
Tester Connection Condition Specified Condition A103-11 (TNS) - Body ground Always 10 kΩ or higher
- Result:
Proceed to OK NG
OK
NG
Disconnect the G195 combination meter assembly connector.
Disconnect the A103 No. 1 headlight ECU sub-assembly RH connector.
Disconnect the J2 outer mirror retractor RH connector.
Disconnect the Q31*1 or R21*2 rear combination light socket and wire sub-assembly RH connector.
*1: for 3 Door
*2: for 5 Door
Measure the resistance according to the value(s) in the table below.
- Standard Resistance (Check for Open):
Tester Connection Condition Specified Condition J2-10 (B) - G195-13 (LR) Always Below 1 Ω J2-11 (E) - Body ground Always Below 1 Ω
- Standard Resistance (Check for Short):
Tester Connection Condition Specified Condition J2-10 (B) - Body ground Always 10 kΩ or higher
- Result:
Proceed to OK NG
OK
NG
Disconnect the G195 combination meter assembly connector.
Disconnect the A103 No. 1 headlight ECU sub-assembly RH connector.
Disconnect the J2 outer mirror retractor RH connector.
Disconnect the Q31*1 or R21*2 rear combination light socket and wire sub-assembly RH connector.
*1: for 3 Door
*2: for 5 Door
Measure the resistance according to the value(s) in the table below.
- Standard Resistance (Check for Open):
Tester Connection Condition Specified Condition *1: for 3 Door
*2: for 5 Door
Q31-3 (TRN) - G195-13 (LR)*1 Always Below 1 Ω R21-3 (TRN) - G195-13 (LR)*2 Always Below 1 Ω Q31-4 (E) - Body ground*1 Always Below 1 Ω R21-4 (E) - Body ground*2 Always Below 1 Ω
- Standard Resistance (Check for Short):
Tester Connection Condition Specified Condition *1: for 3 Door
*2: for 5 Door
Q31-3 (TRN) - Body ground*1 Always 10 kΩ or higher R21-3 (TRN) - Body ground*2 Always 10 kΩ or higher
- Result:
Proceed to OK NG
OK
NG