1GD-FTV FUEL FUEL INJECTOR REMOVAL
CAUTION / NOTICE / HINT
The necessary procedures (adjustment, calibration, initialization, or registration) that must be performed after parts are removed, installed, or replaced during the injector assembly removal/installation are shown below.
| Replaced Part or Performed Procedure | Necessary Procedure | Effect/Inoperative Function when Necessary Procedure not Performed | Link |
|---|---|---|---|
| Battery terminal is disconnected/reconnected | Correction of steering angle neutral point | Multi-terrain monitor system | ( ) |
- HINT:
-
When the cable is disconnected/reconnected to the battery terminal, systems temporarily stop operating. However, each system has a function that completes learning the first time the system is used.
- ·
Learning completes when vehicle is driven
Effect/Inoperative Function When Necessary Procedures are not Performed Necessary Procedures Link Lane departure alert system Drive the vehicle straight ahead at 40 km/h (25 mph) or more for 10 seconds or more. ( )
Pre-collision system Lighting system (EXT) (for LED Headlight) Stop and start system Drive the vehicle until stop and start control is permitted (approximately 5 to 60 minutes) ( )
Vehicle stability control system (for Hydraulic brake booster) Drive the vehicle straight ahead at 40 km/h (25 mph) or more for at least 10 seconds. ( )
- NOTICE:
- ·
When replacing the parts in the following chart (A), replace the No. 1 injection pipe subassembly, No. 2 injection pipe sub-assembly and/or fuel inlet pipe sub-assembly with new ones.
Replaced Parts (A) Pipes Requiring New Replacement Injector assembly (including shuffling the injector assemblies between the cylinders) ·No. 1 injection pipe sub-assembly
·No. 2 injection pipe sub-assembly
Supply pump assembly Fuel inlet pipe sub-assembly ·Common rail assembly
·Cylinder block sub-assembly
·Cylinder head sub-assembly
·Cylinder head gasket
·Timing chain case assembly
·No. 1 injection pipe sub-assembly
·No. 2 injection pipe sub-assembly
·Fuel inlet pipe sub-assembly
·After removing the No. 1 injection pipe sub-assembly, No. 2 injection pipe sub-assembly and/or fuel inlet pipe sub-assembly, clean them with a brush and compressed air.
·The injector assembly is a precision instrument. Do not use the injector assembly if it is struck or dropped.
·Make sure foreign matter does not enter the fuel path.
PROCEDURE

 1. PRECAUTION
- NOTICE:
-
After turning the ignition switch off, waiting time may be required before disconnecting the cable from the battery terminal.
-
Click hereGeneral>INTRODUCTION>REPAIR INSTRUCTION>PRECAUTION
2.DISCONNECT CABLE FROM NEGATIVE BATTERY TERMINAL
25800
3.REMOVE EGR COOLER ASSEMBLY (w/ EGR System with EGR Cooler)
25800
4.REMOVE ELECTRIC EGR CONTROL VALVE ASSEMBLY (w/ EGR System without EGR Cooler)
5.DRAIN ENGINE COOLANT (w/o EGR System)
55781E
6.REMOVE COWL TOP VENTILATOR LOUVER SUB-ASSEMBLY (w/o EGR System)
26100G
7.REMOVE DIESEL THROTTLE BODY ASSEMBLY (w/o EGR System)
87209
8.REMOVE WATER HOSE SUB-ASSEMBLY (w/o EGR System)
16278
9.REMOVE NO. 2 WATER BY-PASS PIPE (w/o EGR System)
12633
10.REMOVE NO. 3 ENGINE COVER BRACKET (w/o EGR System)
12632
11.REMOVE NO. 2 ENGINE COVER BRACKET (w/o EGR System)
44306
12.DISCONNECT VANE PUMP OIL RESERVOIR SUB-ASSEMBLY (w/o EGR System)
82121
13.DISCONNECT ENGINE WIRE (w/o EGR System)
25624
14.REMOVE EGR VALVE ADAPTER (w/o EGR System)
89463C
15.DISCONNECT NO. 1 NITROGEN OXIDES SENSOR (w/ Urea SCR System)
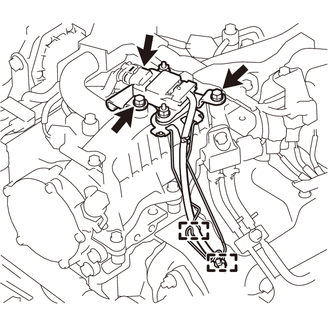
Remove the 2 bolts, detach the connector, and then disconnect the No. 1 nitrogen oxides sensor from the cylinder head cover sub-assembly.
23811H
16.REMOVE NO. 1 FUEL PIPE (w/ DPF)
17.REMOVE WIRING HARNESS CLAMP BRACKET
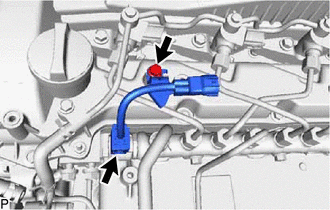
Disconnect the pressure discharge valve connector from the common rail assembly.
Remove the bolt and wiring harness clamp bracket from the cylinder head cover sub-assembly.
18.REMOVE HARNESS BRACKET
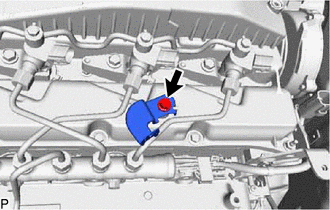
Remove the bolt and harness bracket.
23760
19.REMOVE NOZZLE LEAKAGE PIPE ASSEMBLY
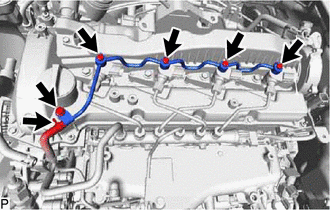
Slide the clamp and disconnect the No. 5 fuel hose from the nozzle leakage pipe assembly.
Remove the 4 union bolts and 4 gaskets.
Remove the bolt and nozzle leakage pipe assembly.
20.REMOVE NO. 1 AND NO. 2 INJECTION PIPE SUB-ASSEMBLY
- NOTICE:
-
After removing the No. 1 and No. 2 injection pipe sub-assemblies, cover the common rail assembly with electrical tape to prevent dirt or foreign objects from entering the pipe inlet. Also, protect the injector inlets with electrical tape or plastic bags.
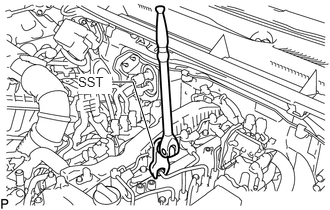
Using SST, loosen the No. 1 and No. 2 injection pipe sub-assemblies and 8 union nuts of the fuel injector assembly side and common rail assembly side.
- SST
- 09245-11010
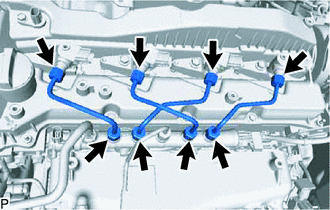
Remove the 2 No. 1 injection pipe sub-assemblies and 2 No. 2 injection pipe sub-assemblies.
- NOTICE:
-
When removing the No. 1 injection pipe subassembly and No. 2 injection pipe sub-assembly, store the injector assemblies in the correct order so that they can be returned to their original locations when reassembling.
23670
21.REMOVE INJECTOR ASSEMBLY
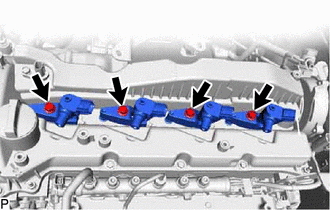
Remove the 4 nozzle holder clamp bolts, 4 washers and 4 nozzle holder clamps.
Remove the 4 fuel injector assemblies and 4 injection nozzle seats from the cylinder head sub-assembly.
- NOTICE:
-
When removing the injector assembly, store the injector assemblies in the correct order so that they can be returned to their original locations when reassembling.
Remove the O-ring from each injector assembly.
23682
22.REMOVE NOZZLE HOLDER GASKET
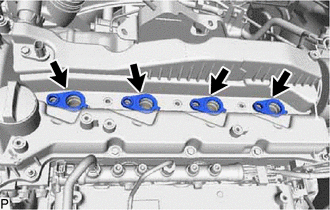
Remove the 4 nozzle holder gaskets from the cylinder head cover sub-assembly.