1GD-FTV FUEL FUEL SUPPLY PUMP REMOVAL
CAUTION / NOTICE / HINT
The necessary procedures (adjustment, calibration, initialization, or registration) that must be performed after parts are removed, installed, or replaced during the supply pump assembly removal/installation are shown below.
| Replaced Part or Performed Procedure | Necessary Procedure | Effect/Inoperative Function when Necessary Procedure not Performed | Link |
|---|---|---|---|
| Battery terminal is disconnected/reconnected | Correction of steering angle neutral point | Multi-terrain monitor system | ( ) |
- HINT:
-
When the cable is disconnected/reconnected to the battery terminal, systems temporarily stop operating. However, each system has a function that completes learning the first time the system is used.
- ·
Learning completes when vehicle is driven
Effect/Inoperative Function When Necessary Procedures are not Performed Necessary Procedures Link Lane departure alert system Drive the vehicle straight ahead at 40 km/h (25 mph) or more for 10 seconds or more. ( )
Pre-collision system Lighting system (EXT) (for LED Headlight) Stop and start system Drive the vehicle until stop and start control is permitted (approximately 5 to 60 minutes) ( )
Vehicle stability control system (for Hydraulic brake booster) Drive the vehicle straight ahead at 40 km/h (25 mph) or more for at least 10 seconds. ( )
- NOTICE:
- ·
When replacing the parts in the following chart (A), replace the No. 1 injection pipe subassembly, No. 2 injection pipe sub-assembly and/or fuel inlet pipe sub-assembly with new ones.
Replaced Parts (A) Pipes Requiring New Replacement Injector assembly (including shuffling the injector assemblies between the cylinders) ·No. 1 injection pipe sub-assembly
·No. 2 injection pipe sub-assembly
Supply pump assembly Fuel inlet pipe sub-assembly ·Common rail assembly
·Cylinder block sub-assembly
·Cylinder head sub-assembly
·Cylinder head gasket
·Timing chain case assembly
·No. 1 injection pipe sub-assembly
·No. 2 injection pipe sub-assembly
·Fuel inlet pipe sub-assembly
·After removing the No. 1 injection pipe sub-assembly, No. 2 injection pipe sub-assembly and/or fuel inlet pipe sub-assembly, clean them with a brush and compressed air.
·The supply pump assembly is a precision instrument. Do not use the supply pump assembly if it is struck or dropped.
·Hold the supply pump assembly itself during removal and installation. Do not hold the pre-stroke control valve or fuel pipe, etc.
·Make sure foreign matter does not enter the fuel path.
PROCEDURE

 1. PRECAUTION
- NOTICE:
-
After turning the ignition switch off, waiting time may be required before disconnecting the cable from the battery terminal.
-
Click hereGeneral>INTRODUCTION>REPAIR INSTRUCTION>PRECAUTION
2.DISCONNECT CABLE FROM NEGATIVE BATTERY TERMINAL
51405A
3.REMOVE NO. 1 ENGINE UNDER COVER SUB-ASSEMBLY
17111
4.REMOVE INTAKE MANIFOLD
17341K
5.REMOVE INTERCOOLER AIR HOSE (w/o Urea SCR System)
17342F
6.REMOVE NO. 2 INTERCOOLER AIR HOSE (w/o Urea SCR System)
16571C
7.REMOVE NO. 1 RADIATOR HOSE
16552B
8.REMOVE NO. 2 SUB-RADIATOR HOSE (w/ Urea SCR System)
16551B
9.REMOVE NO. 1 SUB-RADIATOR HOSE (w/ Urea SCR System)
161B0
10.REMOVE ELECTRIC WATER PUMP ASSEMBLY (w/ Urea SCR System)
16553B
11.REMOVE NO. 3 SUB-RADIATOR HOSE (w/ Urea SCR System)
16554B
12.REMOVE NO. 4 SUB-RADIATOR HOSE (w/ Urea SCR System)
16640
13.REMOVE INTERCOOLER RESERVOIR ASSEMBLY (w/ Urea SCR System)
14.DISCONNECT OIL COOLER HOSE (for Automatic Transmission)
88359
15.REMOVE VISCOUS HEATER V BELT (w/ Viscous Heater)
16470
16.REMOVE RADIATOR RESERVOIR ASSEMBLY
82123
17.DISCONNECT NO. 3 ENGINE WIRE (for Cold Area Specification Vehicles)
16711
18.REMOVE FAN SHROUD
16620
19.REMOVE V-RIBBED BELT TENSIONER ASSEMBLY
23273C
20.REMOVE NO. 2 FUEL HOSE
Slide the 2 clips and remove the No. 2 fuel hose from the supply pump assembly and No. 3 nozzle leakage pipe assembly.
23271H
21.REMOVE NO. 1 FUEL HOSE
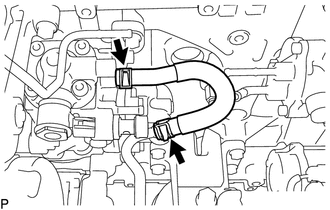
Slide the 2 clips and remove the No. 1 fuel hose from the supply pump assembly and No. 2 fuel pipe.
22.REMOVE NO. 4 FUEL PIPE (w/o DPF)
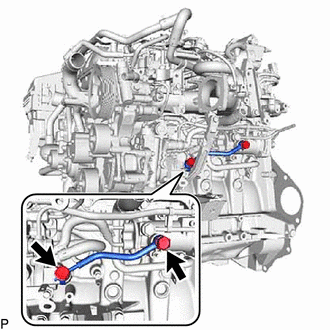
Remove the No. 4 fuel pipe 2 union bolts and 2 gaskets from the supply pump assembly and fuel filter.
22803
23.REMOVE FUEL INJECTION PUMP COVER SUB-ASSEMBLY
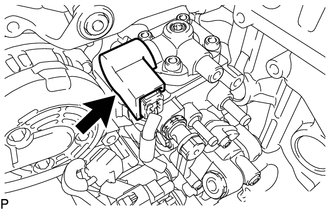
Remove the fuel injection pump cover subassembly from the supply pump assembly.
24.REMOVE FUEL PUMP MOTOR WIRE
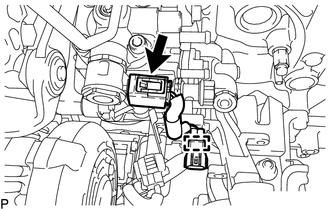
Disconnect the fuel pump motor wire connector.
Detach the clamp and remove the fuel pump motor wire.
11324
25.REMOVE TIMING CHAIN COVER PLATE
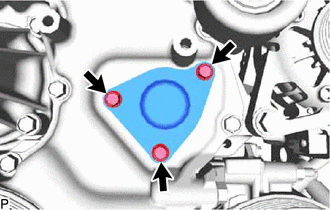
Remove the 3 bolts and timing chain cover plate.
Remove the gasket.
22100
26.REMOVE SUPPLY PUMP ASSEMBLY
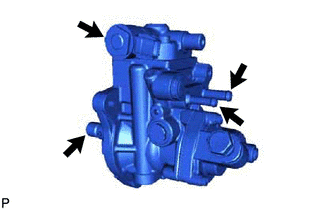
- NOTICE:
- ·
Do not hold the supply pump assembly by the parts indicated by the arrows in the illustration.
·With SST set, do not turn the crankshaft more than a half rotation.
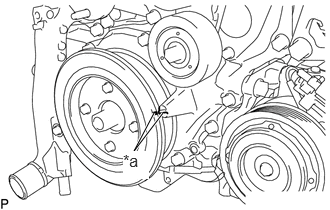
| *a | Timing Mark |
Align the timing mark of the crankshaft pulley subassembly and timing chain cover by rotating the crankshaft clockwise.
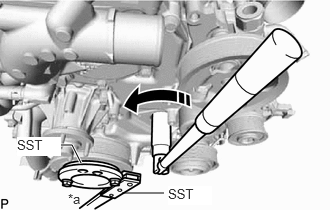
| *a | Hold |

|
Turn |
Using SST, hold the crankshaft pulley assembly and loosen the fuel supply pump shaft nut.
- SST
- 09213-58014 (91551-80840)
09330-00021
- NOTICE:
-
Do not excessively loosen the supply pump shaft nut, otherwise SST cannot be installed.
- HINT:
-
Rotate the supply pump shaft nut once to loosen it.
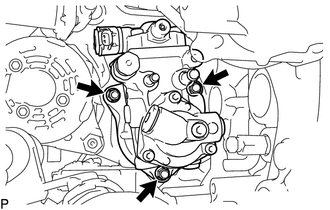
Loosen the 3 nuts from the supply pump assembly.
- NOTICE:
-
Do not completely remove the nuts. Otherwise, the supply pump assembly may fall off.
Install SST with 3 bolts.
- SST
- 09241-11010
- Torque:
- 10 N*m (102 kgf*cm, 7 ft.*lbf)
- NOTICE:
-
Install SST with the bolts included with SST.
- HINT:
- ·
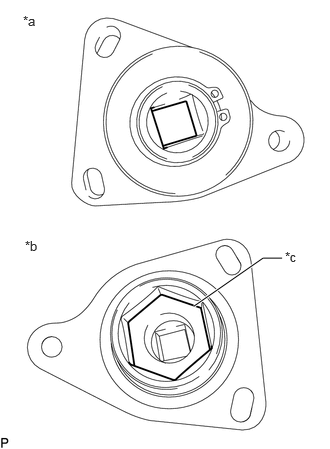 2.021,3.188 2.74,2.688 2.74,2.688 2.938,2.688 true 0.24,0.135 0.552,0.292 0.313,0.156 10 false *a 0.26,2.479 0.573,2.635 0.313,0.156 10 false *b 2.969,2.594 3.281,2.75 0.313,0.156 10 false *c
*a Engine Front Side *b Engine Rear Side *c SST Hexagonal Portion
·Make sure that the installation direction of SST is as shown in the illustration.
·Align the hexagonal portion of SST with the supply pump shaft nut to install SST.
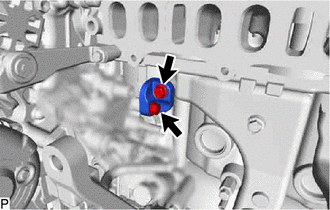
Remove the 2 bolts and No. 1 fuel pump bracket from the supply pump assembly and cylinder block sub-assembly.
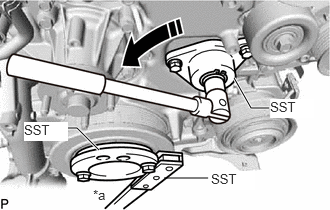
| *a | Hold |
|
|
Turn |
Install the handle to SST. While holding the crankshaft pulley assembly in place with the crankshaft holding tool, turn the handle in the counterclockwise direction to disconnect the supply pump assembly.
- SST
- 09213-58014 (91551-80840)
09330-00021
- SST
- 09241-11010
Remove the 3 nuts and supply pump assembly from the timing chain case assembly.
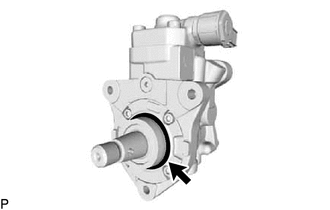
Remove the O-ring from the supply pump assembly.