1GD-FTV ENGINE CONTROL ECD SYSTEM(w/ DPF) White Smoke Emitted
DESCRIPTION
Faults and Symptoms of Common Rail Diesel Components
Engine Control
| Main fault | Turbocharger sub-assembly (compressor side seal ring, turbine side seal ring, shaft, oil drain) |
| Symptoms | White smoke
Excessive oil consumption |
| Main fault | Glow system malfunction |
| Symptoms | Difficult to start, rough idle, knocking, white smoke (when cold) |
| Diagnostic Point | ·
Measure the resistance of the glow plug assembly ·
Check the glow plug indicator light |
| Main fault | Loss of compression |
| Symptoms | Rough idle (constant lack of power) |
| Data List | Engine Speed Cylinder #1 to #4
·
When cranking during the "Check the Cylinder Compression" Active Test, if there is a high speed cylinder (approx. 100 rpm more than the other cylinders), that cylinder may lose compression. Injection Feedback Value #1 to #4 ·
If Injection Feedback Value #1 to #4 is more than 5 mm3/st, the cylinder may have a fault. |
Diesel Injection
| Main fault | Blockage |
| Symptoms | Rough idle, lack of power, black smoke, white smoke, knocking |
| Data List | Injection Feedback Value #1 to #4
·
When an Injector Feedback Value is more than 5 mm3/st, there may be a malfunction in the corresponding cylinder. Injection Feedback Value #1 to #4 can be read after idling for 1 minute with the engine warmed up (engine coolant temperature is higher than 75°C (167°F)). |
- HINT:
-
When the sliding resistance of the internal parts of the injector assemblies (nozzle needle, control valve) has increased due to internal contamination, injection quantity will increase at high common rail pressure due to a delay in injector assembly closure.
| Main fault | - |
| Symptoms | Difficult to start, rough idle (especially when cold) |
Diesel EGR
| Main fault | ·
Does not move smoothly ·
Does not close fully |
| Symptoms | ·
Rough idle ·
EGR valve stuck closed: A loud turbocharger sound. ·
EGR valve stuck open: Difficult to start (does not stall), black smoke, white smoke (when engine is cold), lack of power, jerking (If there is an excess in the quantity of EGR and there is a heavy load, when the vehicle starts moving, a lack of power will be felt. Also, when racing the engine, there will be some black smoke). |
| Data List | Actual EGR Valve Position No.1, Target EGR Valve Position No.1
·
Generally, Actual EGR Valve Position No.1 = Target EGR Valve Position No.1 +/-5% (fully closed: 0%, fully open: 100%). ·
Using the EGR valve Active Test, check whether Actual EGR Valve Position No.1 follows Target EGR Valve Position No.1 (the engine coolant temperature and intake air temperature should be considered when a malfunction occurs). ·
EGR valve is fully closed when the engine switch is on (IG) (engine stopped). ·
EGR valve opens to the halfway point at idling after the engine is warmed up. ·
When the EGR valve does not close, Mass Air Flow Sensor (Mass Air Flow Sub-assembly) decreases when the vehicle is accelerated at full throttle. Intake Manifold Absolute Pressure also decreases in comparison to Target Boost Pressure, however there is not a large difference. EGR Close Learning Value Bank 1 ·
When leaving the vehicle idling, the normal range of EGR Close Learning Value Bank 1 is 0 to 1 V. ·
In cases when EGR Close Learning Value Bank 1 is out of the normal range (0 to 1 V), it is possible that the EGR valve cannot completely close. |
CAUTION / NOTICE / HINT
Explanation of Symptom
| White Smoke | When the engine is misfiring, any fuel that has been injected but remains unburned is emitted as white smoke. |
Turbocharger internal oil leak (Click here ( )) If oil leak occurs from turbine side seal, large amount of white smoke will be emitted from exhaust pipe. Internal oil leak is not visible from outside of turbocharger sub-assembly. |
PROCEDURE
Ask the customer about the conditions when the white smoke was emitted.
- What were the driving conditions when the white smoke was generated.
- Is the white smoke constantly emitted, or only occasionally?
- Does the white smoke occur only when the vehicle is cold, or when the vehicle is both cold and hot?
- Is the white smoke emitted just after starting the vehicle only, or does it continue while the vehicle is idling?
Determine the symptoms of the problem to narrow down the possible causes.
- Result:
Proceed to NEXT
NEXT
Connect the GTS to the DLC3.
Turn the engine switch on (IG) and turn the GTS on.
Enter the following menus: Powertrain / Engine / Trouble Codes.
Read pending DTCs.
- Result:
Result Proceed to No DTCs are output A Engine related DTCs are output B
A
B
Click hereEngine / Hybrid System>1GD-FTV (ENGINE CONTROL)>ECD SYSTEM (w/ DPF)>DIAGNOSTIC TROUBLE CODE CHART
Start the engine.
Fully depress the accelerator pedal, and then release it.
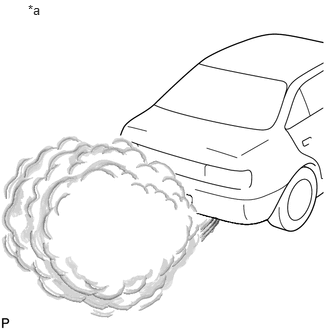
| *a | Example |
Check whether white smoke is emitted or not when racing the engine.
- NOTICE:
-
Be sure not to check for white smoke indoors.
- HINT:
- ·
If the white smoke is emitted only just after engine start and disappears later, the smoke is not from the turbocharger.
·If the turbocharger is the cause of the problem, regardless of whether the engine is cold or warmed up, there will be a large amount of white smoke to the extent that visibility is obstructed for a few meters in the area of the smoke (as shown in the illustration).
·Depending on whether there is oil mixed with the fuel, or whether there is unburned fuel present, the smell of the exhaust gas differs. When oil is mixed in, the exhaust gas smells such as burning oil.
·When continuously traveling with the engine close to idle for 1 hour or more, such as when in heavy traffic, unburned fuel accumulates in the catalytic converter, and can produce white smoke when accelerating.
- Result:
Result Proceed to White smoke is emitted just after engine start only A White smoke is always and continuously emitted B There is oil on the exhaust pipe, etc.
- HINT:
-
The oil on the exhaust pipe may be from the transmission, etc.
C
- HINT:
- ·
White smoke may be emitted at a specific exhaust gas temperature. Listed are possible symptoms and causes for this case. Please use this information as reference when carrying out malfunction diagnosis.
·The exhaust gas temperature may be checked using "Exhaust Temperature B1S2, Exhaust Temperature B1S3" in the Data List.
| Symptoms | Causes |
|---|---|
| White smoke is emitted when the exhaust temperature is below 200°C (452°F) and the vehicle is traveling at low speed or when accelerating after decelerating.
·
Related Data List -
Exhaust Temperature B1S2 -
Exhaust Temperature B1S3 |
When continuously traveling with the engine close to idle for 1 hour or more, such as when in heavy traffic, unburned fuel accumulates in the catalytic converter, and can produce white smoke when accelerating*.
*: In this case the white smoke is not caused by a defect, so explain to the customer that the white smoke is caused by an accumulation of unburned fuel due to low-speed driving etc., and monitor the situation. (If the customer reports that the problem only occurs after continuous driving in heavy traffic/low speed driving, the problem may resolve itself when the catalytic converter temperature is raised through high-speed driving. However, if the catalytic converter activity is reduced, this will not resolve the problem, so the catalytic converter must be replaced. Deterioration of the catalytic converter can cause EGR valve malfunction and injector malfunction, so if there has not been any repair in the past, check and repair these components as well.) |
| White smoke is emitted when accelerating while the exhaust gas temperature is around 200 to 300°C (452 to 572°F) (in the process of rising to 500°C (932°F) for PM forced regeneration).
·
Related Data List -
Exhaust Temperature B1S2 -
Exhaust Temperature B1S3 |
·
Deterioration of the exhaust gas temperature sensor may be causing the sensor to read lower than the actual temperature, so the amount of fuel added is increased and white smoke is produced. In this case the sensor will need to be replaced. ·
If catalytic converter activity has decreased, more fuel will be added without an increase in exhaust gas temperature, possibly resulting in white smoke. In this case the catalytic converter needs to be replaced. Deterioration of the catalytic converter can cause EGR valve and injector malfunction, so if there has not been any repair in the past, check these components as well and repair if necessary. |
A
B
C
Check whether the white smoke is emitted only when the engine coolant temperature is below 0°C (32°F).
- HINT:
- ·
If so, the smoke is not from the turbocharger and may be the smoke of unburned fuel.
·If misfiring occurs, unburned fuel is emitted.
- Result:
Result Proceed to White smoke is emitted when the temperature is below 0°C (32°F) A White smoke is emitted regardless of temperature B
A
B
Inspect the glow plug assembly.
Click hereEngine / Hybrid System>1GD-FTV (STARTING)>GLOW PLUG>ON-VEHICLE INSPECTION
- Result:
Proceed to OK NG
OK
NG
Connect the GTS to the DLC3.
Turn the engine switch on (IG) and turn the GTS on.
Start the engine.
Enter the following menus: Powertrain / Engine / Data List / Target Fuel Pressure (High) and Fuel Pressure (High).
Take a snapshot with the GTS.
Measure the difference between the target fuel pressure (Target Fuel Pressure (High)) and the actual fuel pressure (Fuel Pressure (High)) when racing the engine with the accelerator pedal fully depressed.
- Result:
Result Proceed to Fuel Pressure (High) is within 5000 kPag of Target Fuel Pressure (High) A Except above B
- HINT:
- ·
"Target Fuel Pressure (High)" is the target fuel pressure controlled by the ECM.
·"Fuel Pressure (High)" is the actual fuel pressure.
A
B
Check Injection Feedback Value #1 to #4 and Target Injection Volume in the snapshot taken after the engine is warmed up and idled for 1 minute with the A/C off.
- HINT:
-
Engine coolant temperature is 75°C (167°F) or higher.
- Result:
Result Proceed to Injection Feedback Value #1 to #4 are 5 mm3/st or less and Target Injection Volume is 3.0 to 15 mm3/st A Other than above B
A
B
Connect the GTS to the DLC3.
Turn the engine switch on (IG) and turn the GTS on.
Enter the following menus: Powertrain / Engine / Data List / Injector Leaking Count #1 to #4 and i-ART Learning Status History #1 to #4.
Record the value displayed for Injector Leaking Count #1 to #4 and i-ART Learning Status History #1 to #4.
- Result:
Result Proceed to The value for Injector Leaking Count #1 to #4 does not change from 0
The value for i-ART Learning Status History #1 to #4 does not change from 0 TripA The value for Injector Leaking Count #1 to #4 displays 1 or more
The value for i-ART Learning Status History #1 to #4 displays 1 Trip or moreB
A
B
Connect the GTS to the DLC3.
Start the engine and warm it up, and make sure the A/C switch and all accessory switches are off.
Turn the engine switch off. Wait for 30 seconds, and then restart the engine.
Turn the GTS on.
Enter the following menus: Powertrain / Engine / Data List / Mass Air Flow Sensor.
Read the Mass Air Flow Sensor value displayed on the GTS while the engine is idling.
Enter the following menus: Powertrain / Engine / Active Test / Activate the EGR Valve Close Bank 1 / Data List / Mass Air Flow Sensor.
Read the Mass Air Flow Sensor value when the EGR valve is closed using the Active Test function.
- HINT:
- ·
If idling continues for 20 minutes or more, the EGR valve target opening angle becomes 0% (EGR valve fully closed). As this makes diagnosis impossible, it becomes necessary to drive the vehicle or restart the engine.
·Before performing the diagnosis, confirm that the EGR valve target opening angle is not 0%.
- Result:
Active Test Result Proceed to Activate the EGR Valve Close Bank 1:
OFF to ClosedMass Air Flow Sensor value does not change A Mass Air Flow Sensor value changes B
- NOTICE:
-
As the measured values may differ from those shown below due to factors such as differences in measuring environments and changes in vehicle condition due to aging, do not use these values to determine whether the vehicle is malfunctioning or not.
- HINT:
-
The problem may be a temporary one, due to the entry of deposits or foreign matter. Check that there are no deposits or foreign matter in the electric EGR control valve assembly or mass air flow meter sub-assembly.
- Reference:
EGR Valve Condition (Opening) Measuring Condition Mass Air Flow Sensor (Reference) Open (41%) ·Atmospheric pressure: 101 kPa
·Engine coolant temperature: 75°C (167°F)
2.5 to 14.5 gm/sec Closed (0%) 11 to 18 gm/sec
A
B
Inspect the engine to see whether white smoke is being emitted due to defects in the engine itself.
Check for oil leaking into the combustion chamber due to a faulty valve stem oil seal.
Check for oil leaking into the combustion chamber due to a faulty injector assembly nozzle sheet.
Check for low compression.
- HINT:
-
If the engine runs too rough, Injection Feedback Value #1 to #4 cannot be corrected and the readout will (incorrectly) show that Injection Feedback Value #1 to #4 are within the normal range.
- HINT:
-
If defects are found, perform repairs, and then check that the symptoms are no longer present.
- Result:
Proceed to NEXT
NEXT
- NOTICE:
-
Only replace the injector assembly for the cylinder which displays an Injector Leaking Count #1 to #4 value of 1 or more, or i-ART Learning Status History #1 to #4 value of 1 Trip or more.
Replace the injector assembly of the malfunctioning cylinder.
Click hereEngine / Hybrid System>1GD-FTV (FUEL)>FUEL INJECTOR>REMOVAL
- NOTICE:
- ·
When replacing the injector assembly for a cylinder, always be sure to use a new No. 1 injection pipe sub-assembly and a new No. 2 injection pipe sub-assembly.
·Follow the procedure in the repair manual and temporarily install the No. 1 injection pipe sub-assembly, No. 2 injection pipe sub-assembly and No. 1 nozzle leakage pipe assembly, and then correctly position the injector assemblies. After that, tighten parts according to the torque specifications.
·If the installation procedure is not performed correctly, injector assemblies may become out of position, which may cause the injector assemblies to deteriorate, resulting in malfunctions.
·If an injector assembly deteriorates and malfunctions, other problems such as knocking, rough idle, etc. may occur.
·If an injector assembly becomes out of position, it is possible that the seal between the injector assembly and injection pipe sub-assembly may become incomplete, resulting in a fuel leak.
- Result:
Proceed to NEXT
NEXT
Clean the fuel filter case and replace the fuel filter element assembly.
Click hereEngine / Hybrid System>1GD-FTV (FUEL)>FUEL FILTER>REPLACEMENT
- HINT:
-
Be sure to clean the inside of the fuel filter case as the injector assemblies may not operate properly if the fuel filter element assembly is installed with foreign matter remaining inside the fuel filter case.
- Result:
Proceed to NEXT
NEXT
- HINT:
-
Use this Active Test to determine the malfunctioning cylinder.
Connect the GTS to the DLC3.
Start the engine and turn the GTS on.
Enter the following menus: Powertrain / Engine / Active Test / Control the Select Cylinder Fuel Cut.
- HINT:
-
If the engine idle speed does not change when an injector assembly is disabled, the cylinder being tested is malfunctioning. Record any malfunctioning cylinders.
- Result:
Proceed to NEXT
NEXT
- HINT:
-
Use this Active Test to help determine whether a cylinder has compression loss or not.
Connect the GTS to the DLC3.
Turn the engine switch on (IG) and turn the GTS on.
Enter the following menus: Powertrain / Engine / Active Test / Check the Cylinder Compression / Data List / Compression / Engine Speed Cylinder #1 to #4.
Crank the engine.
Check the engine speed during the Active Test.
- Result:
Result Proceed to The values of Engine Speed Cylinder #1 to #4 are within 10 rpm of each other A Other than above B
- HINT:
-
When cranking, if the speed of a cylinder is approximately 100 rpm more than the other cylinders, there is probably a complete loss of compression in that cylinder.
A
B
Disconnect the inlet hose from the fuel supply pump assembly.
Operate the priming pump and check that fuel is being supplied to the fuel supply pump assembly.
- OK:
Fuel is properly supplied to the fuel supply pump assembly when the priming pump is operated.
- HINT:
- ·
A lack of fuel causes the fuel pressure to drop.
·Check that the fuel filter element assembly is not clogged.
Reconnect the inlet hose.
- Result:
Proceed to NEXT
NEXT
Clean the fuel filter case and replace the fuel filter element assembly.
Click hereEngine / Hybrid System>1GD-FTV (FUEL)>FUEL FILTER>REPLACEMENT
- HINT:
-
Be sure to clean the inside of the fuel filter case as the injector assemblies may not operate properly if the fuel filter element assembly is installed with foreign matter remaining inside the fuel filter case.
- Result:
Proceed to NEXT
NEXT
Check and replace the clogged fuel pipe.
- Result:
Proceed to NEXT
NEXT
- HINT:
-
If the fuel filter element assembly or fuel pipe has been replaced, be sure to remove any air in the system.
Bleed the air from the fuel system.
Click hereEngine / Hybrid System>1GD-FTV (FUEL)>FUEL SYSTEM>ON-VEHICLE INSPECTION
- Result:
Proceed to NEXT
NEXT
Check whether the white smoke problem has been successfully repaired by starting the engine.
- Result:
Proceed to NEXT
NEXT
- HINT:
-
Measure the compression of the cylinder that had a high speed during the Active Test "Check the Cylinder Compression".
Check cylinder compression pressure.
Click hereEngine / Hybrid System>1GD-FTV (ENGINE MECHANICAL)>ENGINE>ON-VEHICLE INSPECTION
- Result:
Proceed to OK NG
OK
NG
Connect the GTS to the DLC3.
Turn the engine switch on (IG) and turn the GTS on.
Start the engine.
Enter the following menus: Powertrain / Engine / Data List / Injector Leaking Count #1 to #4 and i-ART Learning Status History #1 to #4.
Record the value displayed for Injector Leaking Count #1 to #4 and i-ART Learning Status History #1 to #4.
- Result:
Proceed to NEXT
NEXT
- NOTICE:
- ·
Replace the injector assembly of the cylinder which displays a value of 5.0 mm3/st or higher for Injection Feedback Value #1 to #4 in step 7.
·Only replace the injector assembly for the cylinder which displays an Injector Leaking Count #1 to #4 value of 1 or more, or i-ART Learning Status History #1 to #4 value of 1 Trip or more.
·If Injector Leaking Count #1 to #4 and i-ART Learning Status History #1 to #4 both display 0, only replace the injector assembly for the cylinder which was determined to be malfunctioning using Injection Feedback Value #1 to #4.
Replace the injector assembly of the malfunctioning cylinder.
Click hereEngine / Hybrid System>1GD-FTV (FUEL)>FUEL INJECTOR>REMOVAL
- NOTICE:
- ·
When replacing the injector assembly for a cylinder, always be sure to use a new No. 1 injection pipe sub-assembly and a new No. 2 injection pipe sub-assembly.
·Follow the procedure in the repair manual and temporarily install the No. 1 injection pipe sub-assembly, No. 2 injection pipe sub-assembly and No. 1 nozzle leakage pipe assembly, and then correctly position the injector assemblies. After that, tighten parts according to the torque specifications.
·If the installation procedure is not performed correctly, injector assemblies may become out of position, which may cause the injector assemblies to deteriorate, resulting in malfunctions.
·If an injector assembly deteriorates and malfunctions, other problems such as knocking, rough idle, etc. may occur.
·If an injector assembly becomes out of position, it is possible that the seal between the injector assembly and injection pipe sub-assembly may become incomplete, resulting in a fuel leak.
- Result:
Proceed to NEXT
NEXT
Clean the fuel filter case and replace the fuel filter element assembly.
- HINT:
-
Be sure to clean the inside of the fuel filter case as the injector assemblies may not operate properly if the fuel filter element assembly is installed with foreign matter remaining inside the fuel filter case.
- Result:
Proceed to NEXT
NEXT
Bleed the air from the fuel system.
Click hereEngine / Hybrid System>1GD-FTV (FUEL)>FUEL SYSTEM>ON-VEHICLE INSPECTION
- Result:
Proceed to NEXT
NEXT
Check whether the white smoke problem has been successfully repaired by starting the engine.
- Result:
Proceed to OK NG
OK
NG
Check that only diesel fuel is being used.
Check that the fuel does not contain any impurities.
- Result:
Proceed to NEXT
NEXT
Start the engine.
Check the idling condition.
- Result:
Result Proceed to Engine run smoothly at idle, however white smoke is emitted. A There are problems such as rough idling or engine stall, and white smoke is emitted.
- HINT:
-
If the pressure in the crank case has risen, white smoke will be produced just after the engine is started. In this case, if blow-by gas is ejected when the oil level gauge is slightly removed*, it is possible that the piston is damaged.
- NOTICE:
-
*Do not completely remove the oil level gauge as oil may spray from the opening.
B
- HINT:
-
It is possible to determine the faulty cylinder by carrying out the "Check the Cylinder Compression" Active Test.
A
B
Remove any oil in the front exhaust pipe assembly.
- HINT:
-
Oil in the exhaust pipe is producing white smoke.
If there is an oil leak, repair the leak.
- Result:
Proceed to NEXT
NEXT