Driver Side Power Window does not Operate with Power Window Master Switch
Circuit diagnosis · Vehicles built from Jan 2012
Versions by build date: Sep 2011 – Dec 2011 from Jan 2012
DESCRIPTION
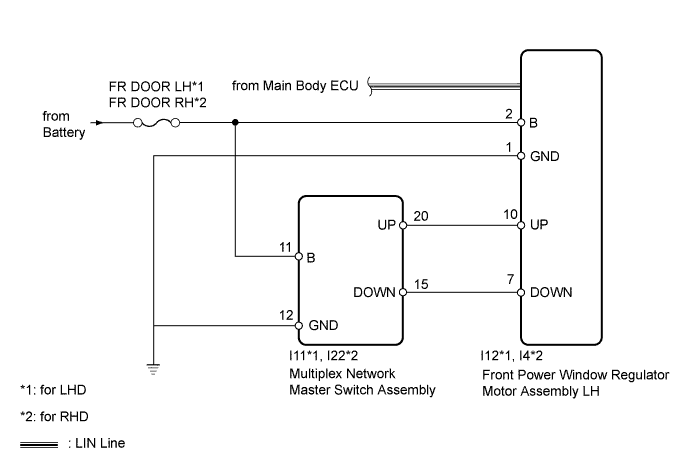
- If the manual up/down function does not operate, there may be a malfunction in the multiplex network master switch, power window regulator motor, harness or connector.
WIRING DIAGRAM

INSPECTION PROCEDURE
| 1. CHECK LIN COMMUNICATION SYSTEM |

Check for LIN communication system DTCs related to the power window control system (Click here).
- OK:
- LIN communication system DTCs are not output.
|
|
||||

| OK | |
 |
| 2. CHECK FOR DTC (B2312) |
Check if DTC B2312 is output (Click here).
- OK:
- DTC B2312 is not output.
|
|
||||
| OK | |
|
| 3. READ VALUE USING INTELLIGENT TESTER (POWER WINDOW REGULATOR MOTOR) |
Use the Data List to check if the power window regulator motor is functioning properly (Click here).
D-Door Motor Tester Display
Measurement Item/Range
Normal Condition
Diagnostic Note
D Door P/W Up SW
Driver side power window manual up signal / ON or OFF
ON: Driver side power window manual up switch operated
OFF: Driver side power window switch not operated
-
D Door P/W Down SW
Driver side power window manual down signal / ON or OFF
ON: Driver side power window manual down switch operated
OFF: Driver side power window switch not operated
-
- OK:
- The display changes according to operation of the multiplex network master switch.
Result Result
Proceed to
NG
A
OK (for LHD)
B
OK (for RHD)
C
|
|
||||
|
|
||||
| A | |
|
| 4. CHECK HARNESS AND CONNECTOR (MULTIPLEX NETWORK MASTER SWITCH - BATTERY AND BODY GROUND) |
Disconnect the I11*1 or I22*2 switch connector.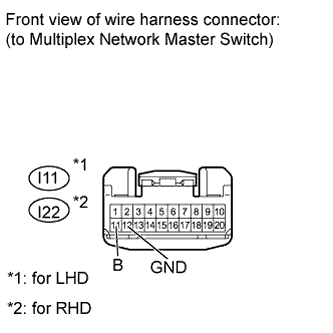
- HINT:
- *1: for LHD
- *2: for RHD
- *1: for LHD
Measure the voltage and resistance according to the value(s) in the table below.
- Standard Voltage:
for LHD Tester Connection
Condition
Specified Condition
I11-11 (B) - Body ground
Always
11 to 14 V
for RHD Tester Connection
Condition
Specified Condition
I22-11 (B) - Body ground
Always
11 to 14 V
- Standard Resistance:
for LHD Tester Connection
Condition
Specified Condition
I11-12 (GND) - Body ground
Always
Below 1 Ω
for RHD Tester Connection
Condition
Specified Condition
I22-12 (GND) - Body ground
Always
Below 1 Ω
|
|
||||
| OK | |
|
| 5. CHECK HARNESS AND CONNECTOR (FRONT POWER WINDOW REGULATOR MOTOR - BATTERY AND BODY GROUND) |
Disconnect the I12*1 or I4*2 motor connector.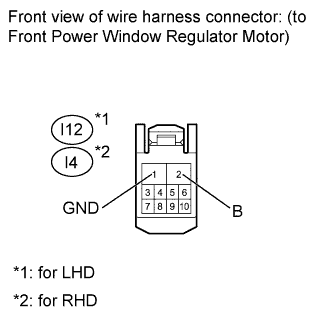
- HINT:
- *1: for LHD
- *2: for RHD
- *1: for LHD
Measure the voltage and resistance according to the value(s) in the table below.
- Standard Voltage:
for LHD Tester Connection
Condition
Specified Condition
I12-2 (B) - Body ground
Always
11 to 14 V
for RHD Tester Connection
Condition
Specified Condition
I4-2 (B) - Body ground
Always
11 to 14 V
- Standard Resistance:
for LHD Tester Connection
Condition
Specified Condition
I12-1 (GND) - Body ground
Always
Below 1 Ω
for RHD Tester Connection
Condition
Specified Condition
I4-1 (GND) - Body ground
Always
Below 1 Ω
|
|
||||
| OK | |
|
| 6. CHECK HARNESS AND CONNECTOR (MULTIPLEX NETWORK MASTER SWITCH - FRONT POWER WINDOW REGULATOR MOTOR) |
Disconnect the I11*1 or I22*2 switch connector.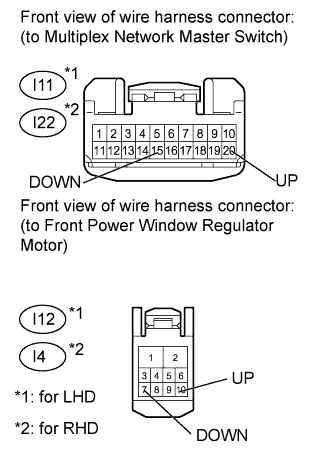
- HINT:
- *1: for LHD
- *2: for RHD
- *1: for LHD
Disconnect the I12*1 or I4*2 motor connector.
- HINT:
- *1: for LHD
- *2: for RHD
- *1: for LHD
Measure the resistance according to the value(s) in the table below.
- Standard Resistance:
for LHD Tester Connection
Condition
Specified Condition
I11-20 (UP) - I12-10 (UP)
Always
Below 1 Ω
I11-15 (DOWN) - I12-7 (DOWN)
Always
Below 1 Ω
I11-20 (UP) or I12-10 (UP) - Body ground
Always
10 kΩ or higher
I11-15 (DOWN) or I12-7 (DOWN) - Body ground
Always
10 kΩ or higher
for RHD Tester Connection
Condition
Specified Condition
I22-20 (UP) - I4-10 (UP)
Always
Below 1 Ω
I22-15 (DOWN) - I4-7 (DOWN)
Always
Below 1 Ω
I22-20 (UP) or I4-10 (UP) - Body ground
Always
10 kΩ or higher
I22-15 (DOWN) or I4-7 (DOWN) - Body ground
Always
10 kΩ or higher
Result Result
Proceed to
NG
A
OK (for LHD)
B
OK (for RHD)
C
|
|
||||
|
|
||||

| A | ||
 |
||
| ||
| 7. INSPECT FRONT POWER WINDOW REGULATOR MOTOR ASSEMBLY LH |
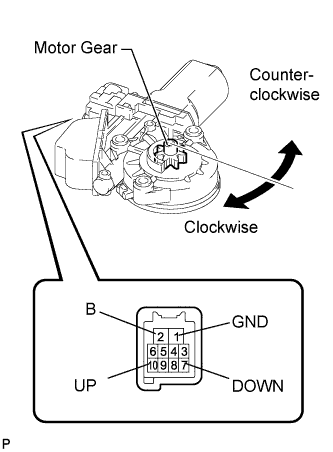 |
Remove the motor (Click here).
Apply positive (+) battery voltage to connector terminal 2 (B).
- NOTICE:
- Do not apply positive (+) battery voltage to any terminals, except terminal 2 (B), to avoid damaging the pulse sensor inside the motor.
- Do not apply positive (+) battery voltage to any terminals, except terminal 2 (B), to avoid damaging the pulse sensor inside the motor.
- Reset the power window regulator motor (initialize the pulse sensor) after installing the power window regulator motor and regulator assembly onto the door.
- Reset the power window regulator motor (initialize the pulse sensor) after installing the power window regulator motor and regulator assembly onto the door.
Apply negative (-) battery voltage to connector terminals 1 (GND), and 7 (DOWN) or 10 (UP).
Check that the motor gear rotates smoothly as follows.
- OK:
Measurement Condition
Specified Condition
- Connect the positive (+) battery cable to terminal 2(B), and connect the negative (-) battery cable to terminal 1(GND), and keep them connected for 3 seconds or more.
- With terminals 2(B) and 1(GND) connected, connect the negative (-) battery cable to terminal 10(UP).
- Disconnect and reconnect the negative (-) battery cable to terminal 10(UP) within 1 second.
Motor gear rotates clockwise (Up)
- Connect the positive (+) battery cable to terminal 2(B), and connect the negative (-) battery cable to terminal 1(GND), and keep them connected for 3 seconds or more.
- With terminals 2(B) and 1(GND) connected, connect the negative (-) battery cable to terminal 7(DOWN).
- Disconnect and reconnect the negative (-) battery cable to terminal 7(DOWN) within 1 second.
Motor gear rotates counterclockwise (Down)
- Connect the positive (+) battery cable to terminal 2(B), and connect the negative (-) battery cable to terminal 1(GND), and keep them connected for 3 seconds or more.
|
|
||||
| OK | ||
|
||
| ||
| 8. INSPECT FRONT POWER WINDOW REGULATOR MOTOR ASSEMBLY RH |
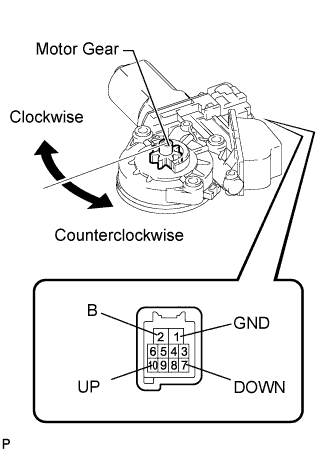 |
Remove the motor (Click here).
Apply positive (+) battery voltage to connector terminal 2 (B).
- NOTICE:
- Do not apply positive (+) battery voltage to any terminals, except terminal 2 (B), to avoid damaging the pulse sensor inside the motor.
- Do not apply positive (+) battery voltage to any terminals, except terminal 2 (B), to avoid damaging the pulse sensor inside the motor.
- Reset the power window regulator motor (initialize the pulse sensor) after installing the power window regulator motor and regulator assembly onto the door.
- Reset the power window regulator motor (initialize the pulse sensor) after installing the power window regulator motor and regulator assembly onto the door.
Apply negative (-) battery voltage to the connector terminals 1 (GND), and 7 (DOWN) or 10 (UP).
Check that the motor gear rotates smoothly as follows.
- OK:
Measurement Condition
Specified Condition
- Connect the positive (+) battery cable to terminal 2(B), and connect the negative (-) battery cable to terminal 1(GND), and keep them connected for 3 seconds or more.
- With terminals 2(B) and 1(GND) connected, connect the negative (-) battery cable to terminal 10(UP).
- Disconnect and reconnect the negative (-) battery cable to terminal 10(UP) within 1 second.
Motor gear rotates counterclockwise (Up)
- Connect the positive (+) battery cable to terminal 2(B), and connect the negative (-) battery cable to terminal 1(GND), and keep them connected for 3 seconds or more.
- With terminals 2(B) and 1(GND) connected, connect the negative (-) battery cable to terminal 7(DOWN).
- Disconnect and reconnect the negative (-) battery cable to terminal 7(DOWN) within 1 second.
Motor gear rotates clockwise (Down)
- Connect the positive (+) battery cable to terminal 2(B), and connect the negative (-) battery cable to terminal 1(GND), and keep them connected for 3 seconds or more.
|
|
||||
| OK | ||
|
||
| ||