P1440 Secondary Air Injection Vacuum Switching Valve Circuit Malfunction Bank 1
Diagnostic trouble codes · Vehicles built Sep 2011 – Dec 2011
Also covers:
- P1443 Secondary Air Injection Vacuum Switching Valve Circuit Malfunction Bank 2
DESCRIPTION
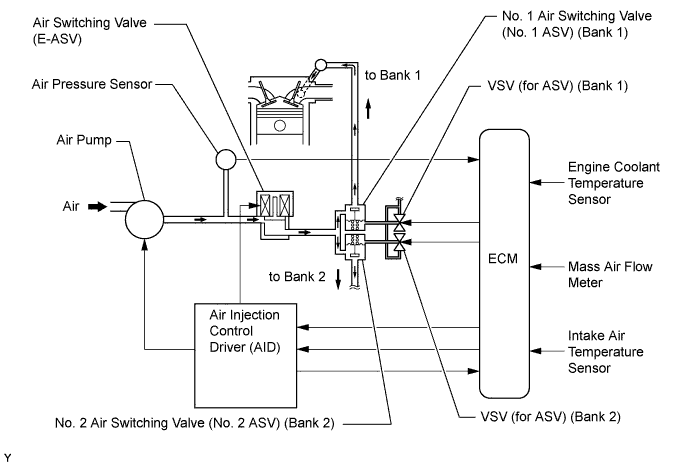
The diagnostic trouble code (DTC) indicates an open in the vacuum switching valve (VSV) circuit of the secondary air injection (AIR) system. The engine control module (ECM) monitors the VSV voltage to detect the malfunction. If the VSV voltage is below half of the battery voltage, the ECM illuminates the malfunction indicator lamp (MIL), and stores a DTC.The secondary air injection (AIR) system introduces fresh air into the exhaust manifold in order to reduce carbon monoxide (CO) and hydrocarbon (HC) in the exhaust emission. This system is activated just after the engine start, and is stopped when the catalyst converter is warmed-up. This system consists of the following components: 1) the air pump which sends fresh air to the exhaust manifold, 2) the electric air switching valve (E-ASV) which switches the fresh air flow, 3) the air switching valve (ASV) which switches the air passage to the exhaust manifold of each bank, 4) the vacuum switching valve (VSV) which switches the vacuum (intake manifold pressure) to operate the ASV, 5) the pressure sensor which detects the fresh air pressure and exhaust pulse, 6) the air injection control driver which controls the power sources of the air pump and E-ASV, 7) the engine control module (ECM) which controls and monitors this system.

| DTC Code |
DTC Detection Condition |
Trouble Area |
| P1440 |
The VSV bank 1 voltage is below half of the battery voltage (1 trip detection logic). |
|
| P1443 |
The VSV bank 2 voltage is below half of the battery voltage (1 trip detection logic). |
|
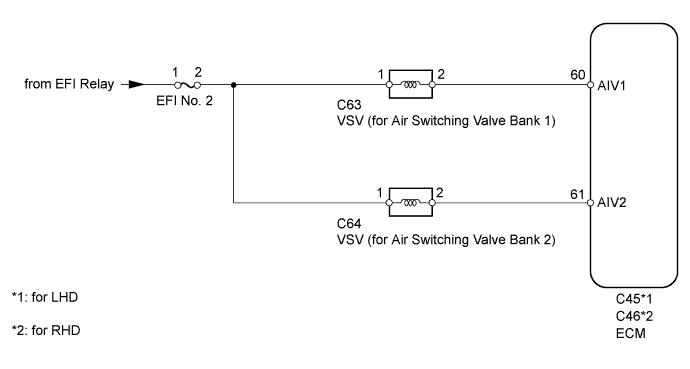
WIRING DIAGRAM
INSPECTION PROCEDURE
- HINT:
- Read freeze frame data using the intelligent tester. Freeze frame data records the engine conditions when malfunctions are detected. When troubleshooting, freeze frame data can help determine if the vehicle was running or stopped, if the engine was warmed up or not, if the air-fuel ratio was lean or rich, and other data from the time the malfunction occurred.
| 1. CHECK HARNESS AND CONNECTOR (AIR INJECTION SYSTEM POWER SOURCE) |

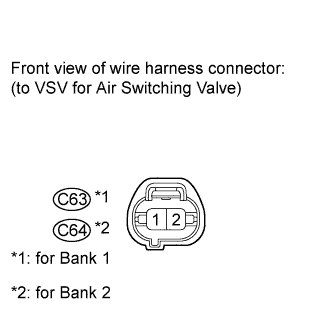 |
Disconnect the VSV for air switching valve connector.
Turn the engine switch on (IG).
Measure the voltage according to the value(s) in the table below.
- Standard Voltage:
Tester Connection
Switch Condition
Specified Condition
C63-1 - Body ground
Engine switch on (IG)
11 to 14 V
C64-1 - Body ground
Engine switch on (IG)
11 to 14 V
|
|
||||

| OK | |
 |
| 2. CHECK HARNESS AND CONNECTOR (ECM - VSV) |
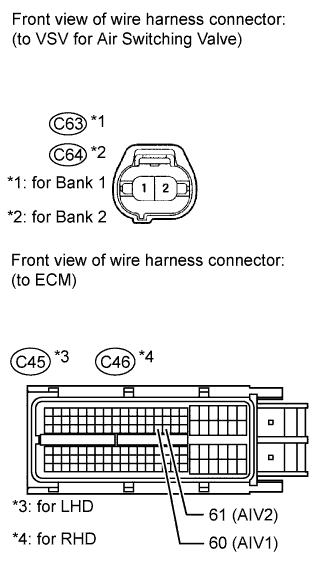 |
Disconnect the ECM connector.
Disconnect the VSV for air switching valve connector.
Measure the resistance according to the value(s) in the table below.
- Standard Resistance (for LHD):
Tester Connection
Condition
Specified Condition
C63-2 - C45-60 (AIV1)
Always
Below 1 Ω
C64-2 - C45-61 (AIV2)
Always
Below 1 Ω
C63-2 or C45-60 (AIV1) - Body ground
Always
10 kΩ or higher
C64-2 or C45-61 (AIV2) - Body ground
Always
10 kΩ or higher
- Standard Resistance (for RHD):
Tester Connection
Condition
Specified Condition
C63-2 - C46-60 (AIV1)
Always
Below 1 Ω
C64-2 - C46-61 (AIV2)
Always
Below 1 Ω
C63-2 or C46-60 (AIV1) - Body ground
Always
10 kΩ or higher
C64-2 or C46-61 (AIV2) - Body ground
Always
10 kΩ or higher
|
|
||||

| OK | |
|
| 3. CHECK VSV (RESISTANCE) |
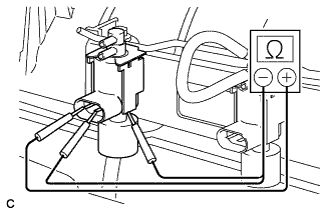 |
Disconnect the VSV for air switching valve connector.
Disconnect the 2 vacuum hoses from the VSV.
Measure the resistance according to the value(s) in the table below.
- Standard Resistance:
Tester Connection
Condition
Specified Condition
1 - 2
Always
33 to 39 Ω at 20°C (68°F)
1 - Body ground
Always
10 kΩ or higher
2 - Body ground
Always
10 kΩ or higher
|
|
||||
| OK | ||
 |
||
| ||
| 4. CHECK HARNESS AND CONNECTOR (VSV - EFI NO. 2 FUSE) |
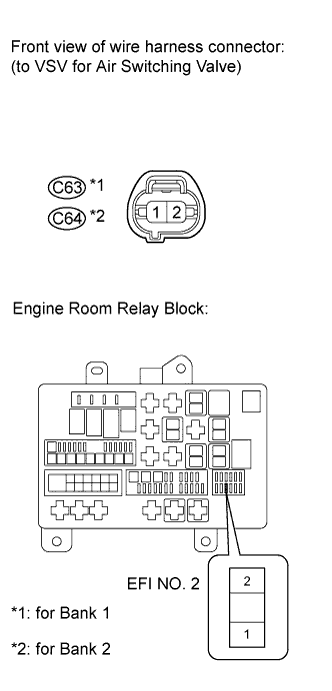 |
Disconnect the VSV connector.
Remove the EFI No. 2 fuse from the engine room relay block.
Measure the resistance according to the value(s) in the table below.
- Standard Resistance:
Tester Connection
Condition
Specified Condition
C63-1 - EFI No. 2 fuse terminal 2
Always
Below 1 Ω
C64-1 - EFI No. 2 fuse terminal 2
Always
Below 1 Ω
C63-1 or EFI No. 2 fuse terminal 2 - Body ground
Always
10 kΩ or higher
C64-1 or EFI No. 2 fuse terminal 2 - Body ground
Always
10 kΩ or higher
|
|
||||
| OK | ||
|
||
| ||