Microphone Circuit between Microphone and Navigation ECU
Circuit diagnosis · Vehicles built Sep 2011 – Dec 2011
DESCRIPTION
This circuit sends a microphone signal from the map light assembly (telephone microphone assembly) to the display and navigation module display.It also supplies power from the display and navigation module display to the map light assembly (telephone microphone assembly).
WIRING DIAGRAM
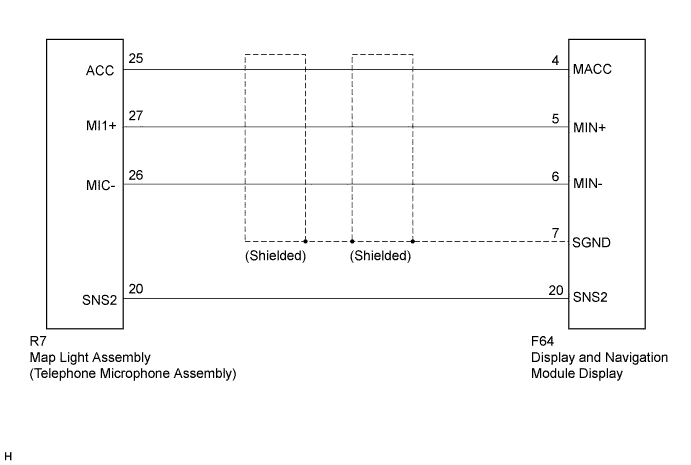

INSPECTION PROCEDURE
| 1. CHECK HARNESS AND CONNECTOR (DISPLAY AND NAVIGATION MODULE DISPLAY - MAP LIGHT ASSEMBLY) |

Disconnect the F64 display and navigation module display connector.
Disconnect the R7 map light assembly connector.
Measure the resistance according to the value(s) in the table below.
- Standard Resistance:
Tester Connection
Condition
Specified Condition
F64-20 (SNS2) - R7-20 (SNS2)
Always
Below 1 Ω
F64-4 (MACC) - R7-25 (ACC)
Always
Below 1 Ω
F64-5 (MIN+) - R7-27 (MI1+)
Always
Below 1 Ω
F64-6 (MIN-) - R7-26 (MIC-)
Always
Below 1 Ω
F64-20 (SNS2) - Body ground
Always
10 kΩ or higher
F64-4 (MACC) - Body ground
Always
10 kΩ or higher
F64-5 (MIN+) - Body ground
Always
10 kΩ or higher
F64-6 (MIN-) - Body ground
Always
10 kΩ or higher
F64-7 (SGND) - Body ground
Always
10 kΩ or higher
|
|
||||

| OK | |
 |
| 2. INSPECT DISPLAY AND NAVIGATION MODULE DISPLAY |
Reconnect the F64 display and navigation module display connector.
Measure the voltage according to the value(s) in the table below.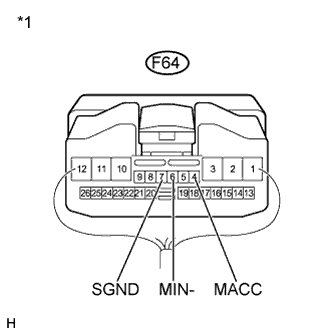
- Standard Voltage:
Tester Connection
Switch Condition
Specified Condition
F64-4 (MACC) - Body ground
Engine switch on (ACC)
4 to 6 V
Measure the resistance according to the value(s) in the table below.
- Standard Resistance:
Tester Connection
Condition
Specified Condition
F64-7 (SGND) - Body ground
Always
Below 1 Ω
F64-6 (MIN-) - Body ground
Always
Below 1 Ω
Text in Illustration *1
Component with harness connected
(Display and Navigation Module Display)
|
|
||||
| OK | |
|
| 3. INSPECT MAP LIGHT ASSEMBLY |
Measure the resistance according to the value(s) in the table below.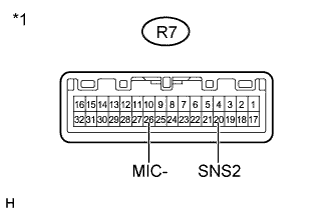
- Standard Resistance:
Tester Connection
Condition
Specified Condition
R7-20 (SNS2) - R7-26 (MIC-)
Always
Below 1 Ω
Text in Illustration *1
Component without harness connected
(Map Light Assembly)
|
|
||||

| OK | |
|
| 4. INSPECT MAP LIGHT ASSEMBLY |
Reconnect the F64 display and navigation module display connector.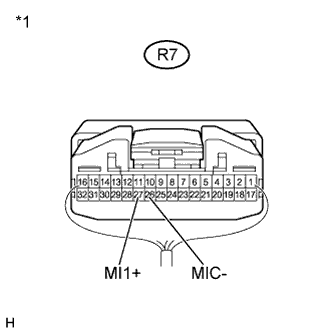
Reconnect the R7 map light assembly connector.
Turn the engine switch on (ACC).
Connect an oscilloscope to terminals 27 (MI1+) and 26 (MIC-) of the R7 telephone microphone assembly connector.
Check the waveform of the telephone microphone assembly using the oscilloscope.
Result Result
Proceed to
Waveform synchronized with the voice input to the map light assembly is output
A
Waveform synchronized with the voice input to the map light assembly is not output
B
Text in Illustration *1
Component with harness connected
(Map Light Assembly)
|
|
||||
| A | ||
 |
||
| ||
| 5. REPLACE TELEPHONE MICROPHONE ASSEMBLY |
Replace the telephone microphone assembly (Click here).
Check if the same malfunction recurs.
Result Result
Proceed to
Malfunction does not recur (returns to normal)
A
Malfunction recurs
B
|
|
||||
| A | ||
|
||
| ||