1UR-FE FUEL FUEL INJECTOR REMOVAL
PROCEDURE

 1.DISCHARGE FUEL SYSTEM PRESSURE
- CAUTION:
- ·
Do not disconnect any part of the fuel system until you have discharged the fuel system pressure.
·After discharging the fuel pressure, place a cloth or equivalent over fittings as you separate them to reduce the risk of fuel spray on yourself or in the engine compartment.
Disconnect the fuel pump ECU connector (See page Engine / Hybrid System>1UR-FE (FUEL)>FUEL PUMP ECU(w/o Active Height Control)>REMOVAL).
Start the engine. After the engine stops, turn the engine switch off.
- HINT:
-
DTC P0171/0174 (system too lean) may be stored.
Crank the engine again, and then check that the engine does not start.
Loosen the fuel tank cap, and then discharge the pressure in the fuel tank completely.
Disconnect the cable from the negative (-) battery terminal.
- NOTICE:
- ·
After turning the engine switch off, waiting time may be required before disconnecting the cable from the battery terminal. Therefore, make sure to read the disconnecting the cable from the battery terminal notice before proceeding with work (See page General>INTRODUCTION>REPAIR INSTRUCTION>PRECAUTION).
·When disconnecting the cable, some systems need to be initialized after the cable is reconnected (See page General>INTRODUCTION>REPAIR INSTRUCTION>INITIALIZATION).
Connect the fuel pump ECU connector (See page Engine / Hybrid System>1UR-FE (FUEL)>FUEL PUMP ECU(w/o Active Height Control)>INSTALLATION).
2. PRECAUTION
- NOTICE:
-
After turning the engine switch off, waiting time may be required before disconnecting the cable from the battery terminal. Therefore, make sure to read the disconnecting the cable from the battery terminal notice before proceeding with work (See page General>INTRODUCTION>REPAIR INSTRUCTION>PRECAUTION).
3.DISCONNECT CABLE FROM NEGATIVE BATTERY TERMINAL
- NOTICE:
-
When disconnecting the cable, some systems need to be initialized after the cable is reconnected (See page General>INTRODUCTION>REPAIR INSTRUCTION>INITIALIZATION).
53806
4.REMOVE FRONT FENDER SPLASH SHIELD SUB-ASSEMBLY LH
53805
5.REMOVE FRONT FENDER SPLASH SHIELD SUB-ASSEMBLY RH
51405A
6.REMOVE NO. 1 ENGINE UNDER COVER SUB-ASSEMBLY
11209
7.REMOVE V-BANK COVER SUB-ASSEMBLY
17705
8.REMOVE AIR CLEANER CAP AND HOSE
9.DRAIN ENGINE COOLANT
25710
10.REMOVE AIR SWITCHING VALVE ASSEMBLY (w/ Secondary Air Injection System)
for Bank 1 (See page Engine / Hybrid System>1UR-FE (EMISSION CONTROL)>AIR SWITCHING VALVE(for Bank 1)>REMOVAL)
11.REMOVE NO. 5 WATER BY-PASS PIPE
25625C
12.REMOVE EGR VALVE BRACKET
23902
13.DISCONNECT NO. 2 FUEL TUBE SUB-ASSEMBLY
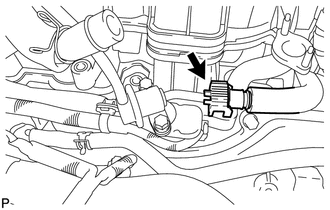
Disconnect the No. 2 fuel tube from the fuel pressure regulator (See page Engine / Hybrid System>1UR-FE (FUEL)>FUEL SYSTEM>PRECAUTION).
23901
14.DISCONNECT FUEL TUBE SUB-ASSEMBLY
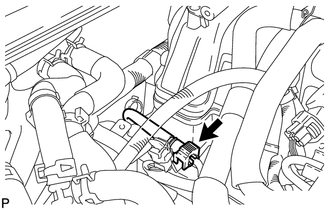
Disconnect the fuel tube from the fuel delivery pipe (See page Engine / Hybrid System>1UR-FE (FUEL)>FUEL SYSTEM>PRECAUTION).
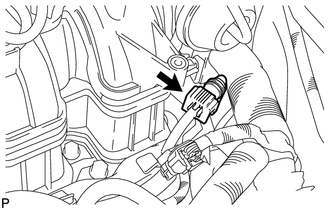
Disconnect the fuel tube from the No. 2 fuel delivery pipe (See page Engine / Hybrid System>1UR-FE (FUEL)>FUEL SYSTEM>PRECAUTION).
15.DISCONNECT WIRE HARNESS AND HOSE
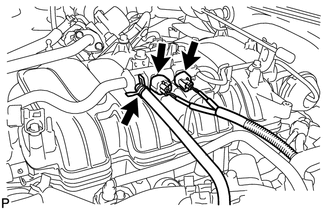
Disconnect the purge VSV connector.
Disconnect the purge line hose from the purge VSV.
Disconnect the vacuum switching valve connector (for ACIS).
23271F
16.DISCONNECT FUEL HOSE
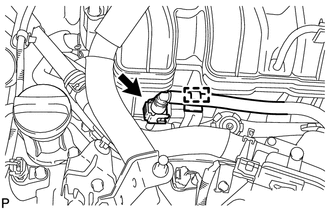
Detach the clamp.
Disconnect the fuel hose from the No. 2 fuel delivery pipe (See page Engine / Hybrid System>1UR-FE (FUEL)>FUEL SYSTEM>PRECAUTION).
23807
17.REMOVE FUEL DELIVERY PIPE SUB-ASSEMBLY
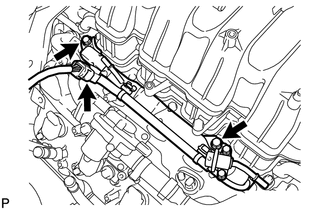
Disconnect the No. 6 wire harness connector.
Remove the 2 bolts and fuel delivery pipe.
- NOTICE:
-
When removing the delivery pipe, hold the pipe by both ends and pull it straight upward.
Remove the 2 delivery pipe spacers and 4 insulators from the intake manifold.
23808
18.REMOVE NO. 2 FUEL DELIVERY PIPE SUB-ASSEMBLY
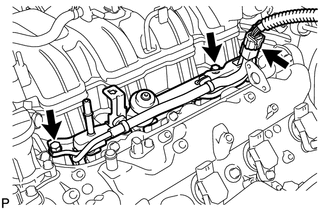
Disconnect the No. 7 wire harness connector.
Remove the 2 bolts and No. 2 fuel delivery pipe.
- NOTICE:
-
When removing the delivery pipe, hold the pipe by both ends and pull it straight upward.
Remove the 2 delivery pipe spacers and 4 insulators from the intake manifold.
23250
19.REMOVE FUEL INJECTOR ASSEMBLY
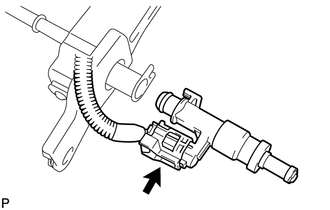
Remove the fuel injector from the fuel delivery pipe, and then disconnect the injector connector.
- NOTICE:
-
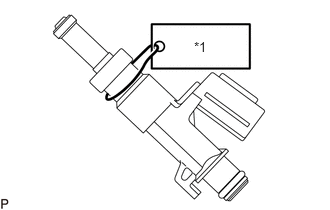 2.021,0.406 2.333,0.604 0.313,0.198 10 false *1
-
For reinstallation, attach a tag or label to the injector shaft.
| *1 | No. 1 |
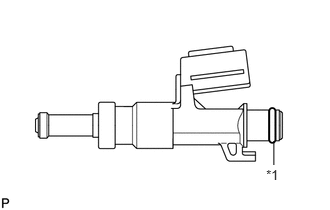
Remove the O-ring from the fuel injector.
| *1 | O-ring |
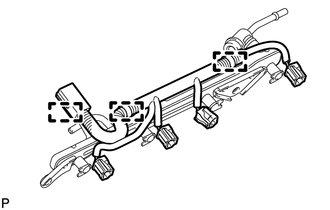
Detach the 3 clamps and then remove the No. 6 wire harness from the fuel delivery pipe.
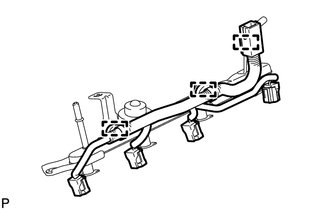
Detach the 3 clamps and then remove the No. 7 wire harness from the No. 2 fuel delivery pipe.