1VD-FTV INTAKE / EXHAUST EXHAUST PIPE(w/ DPF) INSTALLATION
CAUTION / NOTICE / HINT
- CAUTION:
- ·
Wear protective gloves and protective glasses when installing the exhaust pipe.
·The exhaust pipe is extremely hot immediately after the engine has stopped.
·Confirm that the exhaust pipe has cooled down before removing it.
PROCEDURE

 89425
1.INSTALL EXHAUST GAS TEMPERATURE SENSOR
89425A
2.INSTALL NO. 2 EXHAUST GAS TEMPERATURE SENSOR
89425B
3.INSTALL NO. 3 EXHAUST GAS TEMPERATURE SENSOR
18460
4.INSTALL MONOLITHIC CONVERTER ASSEMBLY LH
Install a new gasket to the turbocharger.
- HINT:
-
Make sure that the claw of the gasket faces downward.
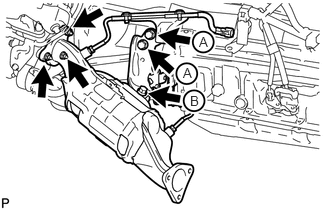
Install the monolithic converter LH with 3 new nuts.
- Torque:
- 47 N*m (479 kgf*cm, 35 ft.*lbf)
Temporarily install the No. 2 manifold stay with the 3 bolts.
Tighten the 2 bolts labeled A in the illustration first, and then tighten the bolt labeled B in the illustration.
- Torque:
- 43 N*m (438 kgf*cm, 32 ft.*lbf)
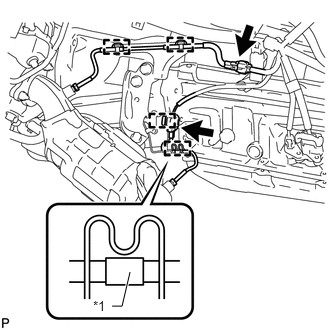
Attach the 4 clamps and connect the 2 exhaust gas temperature sensor connectors.
| *1 | Tape |
- HINT:
-
Make sure that the tape is in the position shown in the illustration.
37140
5.INSTALL FRONT PROPELLER SHAFT ASSEMBLY
18450A
6.INSTALL MONOLITHIC CONVERTER ASSEMBLY RH
Install a new gasket to the turbocharger.
- HINT:
-
Make sure that the claw of the gasket faces the transmission.
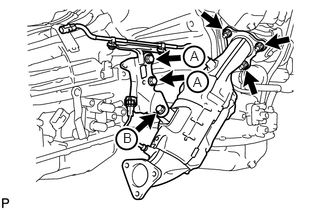
Install the monolithic converter RH with 3 new nuts.
- Torque:
- 47 N*m (479 kgf*cm, 35 ft.*lbf)
Temporarily install the manifold stay with the 3 bolts.
Tighten the 2 bolts labeled A in the illustration first, and then tighten the bolt labeled B in the illustration.
- Torque:
- 43 N*m (438 kgf*cm, 32 ft.*lbf)
Attach the 4 clamps and connect the 2 exhaust gas temperature sensor connectors.
89425C
7.INSTALL NO. 4 EXHAUST GAS TEMPERATURE SENSOR
17450B
8.INSTALL FRONT NO. 2 EXHAUST PIPE ASSEMBLY
Install a new gasket and the front No. 2 exhaust pipe to the monolithic converter LH with 3 new nuts.
- Torque:
- 48 N*m (489 kgf*cm, 35 ft.*lbf)
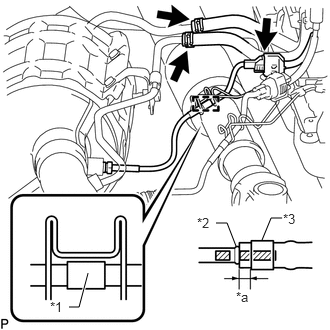
Attach the clamp and connect the exhaust gas temperature sensor connector.
| *1 | Tape |
| *2 | Stopper |
| *3 | Clip |
| *a | 2 to 7 mm (0.0787 to 0.276 in.) |

|
Paint Mark |
- HINT:
-
Make sure that the tape is in the position shown in the illustration.
Install 2 new clips to the 2 air hoses.
Connect the 2 air hoses to the front No. 2 exhaust pipe.
- NOTICE:
- ·
Align the paint marks of the front No. 2 exhaust pipe and air hose and push on the air hose until it contacts the stopper.
·Make sure the clip is 4 to 10 mm (0.157 to 0.394 in.) from the end of the air hose when installing the clip.
·Make sure that there is no slack in the air hose, and that it is not twisted or bent.
·Take care not to damage the inner or outer surface of the air hose when installing it. If the air hose is damaged, replace it with a new one.
17450
9.INSTALL NO. 5 EXHAUST PIPE ASSEMBLY
Install a new gasket and the No. 5 exhaust pipe to the front No. 2 exhaust pipe with 2 new nuts.
- Torque:
- 48 N*m (489 kgf*cm, 35 ft.*lbf)
17410
10.INSTALL FRONT EXHAUST PIPE ASSEMBLY
Install a new gasket and the front exhaust pipe to the monolithic converter RH with 3 new nuts.
- Torque:
- 48 N*m (489 kgf*cm, 35 ft.*lbf)
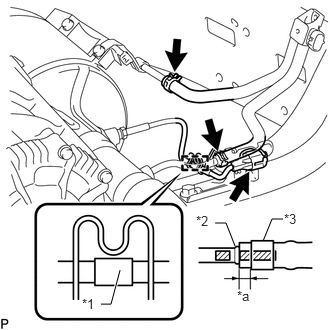
Attach the clamp and connect the exhaust gas temperature sensor connector.
| *1 | Tape |
| *2 | Stopper |
| *3 | Clip |
| *a | 2 to 7 mm (0.0787 to 0.276 in.) |
|
|
Paint Mark |
- HINT:
-
Make sure that the tape is in the position shown in the illustration.
Install 2 new clips to the 2 air hoses.
Connect the 2 air hoses to the front exhaust pipe.
- NOTICE:
- ·
Align the paint marks of the front exhaust pipe and air hose and push on the air hose until it contacts the stopper.
·Make sure the clip is 4 to 10 mm (0.157 to 0.394 in.) from the end of the air hose when installing the clip.
·Make sure that there is no slack in the air hose, and that it is not twisted or bent.
·Take care not to damage the inner or outer surface of the air hose when installing it. If the air hose is damaged, replace it with a new one.
17420
11.INSTALL CENTER EXHAUST PIPE ASSEMBLY
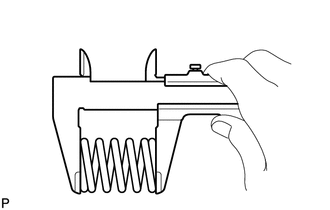
Check the free length.
Using a vernier caliper, measure the free length of the compression spring.
- Free length:
43 mm (1.69 in.)
If the free length is less than the minimum, replace the compression spring.
Connect the center exhaust pipe to the 3 exhaust pipe supports.
Install 2 new gaskets to the No. 5 exhaust pipe and front exhaust pipe.
Install the center exhaust pipe with the 4 bolts and 2 compression springs.
- Torque:
- for center exhaust pipe and front exhaust pipe : 43 N*m (438 kgf*cm, 32 ft.*lbf)
- for center exhaust pipe and No. 5 exhaust pipe : 48 N*m (489 kgf*cm, 35 ft.*lbf)
17430
12.INSTALL TAILPIPE ASSEMBLY
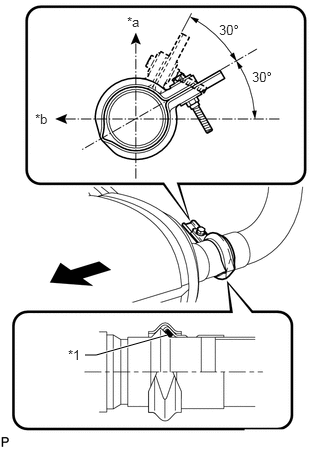
Connect the tailpipe to the 2 exhaust pipe supports.
| *1 | Gasket |
| *a | Top |
| *b | LH Side |

|
Front |
Install a new gasket to the center exhaust pipe.
Connect the tailpipe to the center exhaust pipe with a new clamp.
- HINT:
-
Install the clamp within the angle range shown in the illustration.
Tighten the bolt.
- Torque:
- 32 N*m (326 kgf*cm, 24 ft.*lbf)
89467B
13.INSTALL AIR FUEL RATIO SENSOR
14.INSPECT FOR EXHAUST GAS LEAK
51442
15.INSTALL NO. 2 ENGINE UNDER COVER
Install the No. 2 engine under cover with the 6 bolts.
- Torque:
- 29 N*m (296 kgf*cm, 21 ft.*lbf)
53785B
16.INSTALL FRONT FENDER APRON SEAL REAR LH
53784
17.INSTALL FRONT FENDER APRON SEAL REAR RH
18.PERFORM CATALYST RECORD OF DPF THERMAL DETERIORATION CLEAR FUNCTION