AE80F AUTOMATIC TRANSMISSION / TRANSAXLE OIL COOLER INSTALLATION
PROCEDURE

 32910
1.INSTALL OIL COOLER ASSEMBLY
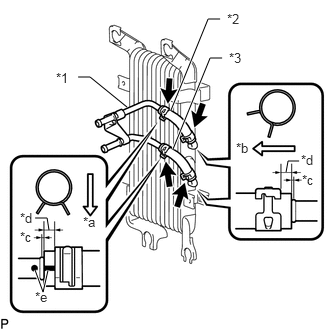
Install the oil cooler inlet hose to the oil cooler assembly, and slide the clip to secure the hose as shown in the illustration.
| *1 | Air Cooled Oil Cooler Tube |
| *2 | Oil Cooler Inlet Hose |
| *3 | Oil Cooler Outlet Hose |
| *a | Lower Side |
| *b | Vehicle Rear Side |
| *c | 0 to 3 mm (0 to 0.118 in.) |
| *d | 2 to 7 mm (0.079 to 0.275 in.) |
| *e | Matchmarks |
Install the oil cooler outlet hose to the oil cooler assembly, and slide the clip to secure the hose as shown in the illustration.
Install the air cooled oil cooler tube to the oil cooler outlet hose and oil cooler inlet hose, and slide the 2 clips to secure the hoses as shown in the illustration.
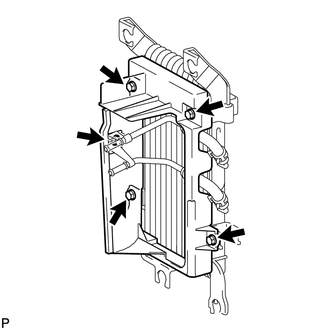
Install the rear transmission oil cooler air duct with the 4 bolts.
- Torque:
- 4.9 N*m (50 kgf*cm, 43 in.*lbf)
Connect the air cooled oil cooler tube to the transmission oil cooler air duct with the bolt.
- Torque:
- 4.9 N*m (50 kgf*cm, 43 in.*lbf)
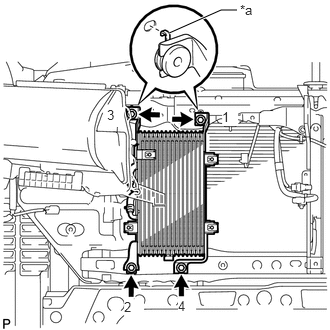
Temporarily put the oil cooler assembly on the radiator support.
| *a | Claw |
- NOTICE:
-
Securely attach the 2 claws of the oil cooler assembly into the holes of the radiator support.
Install the 4 bolts in the sequence shown in the illustration.
- Torque:
- 12 N*m (122 kgf*cm, 9 ft.*lbf)
32917
2.INSTALL TRANSMISSION OIL COOLER AIR DUCT
Install the transmission oil cooler air duct with the 4 bolts.
- Torque:
- 4.9 N*m (50 kgf*cm, 43 in.*lbf)
32907A
3.INSTALL OIL COOLER TUBE
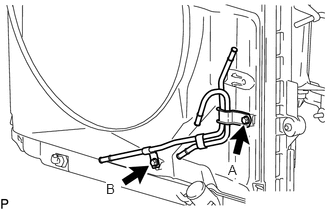
Temporarily install the oil cooler tube to the fan shroud with bolt A. Install bolt B and tighten it to the specified torque. Then tighten bolt A to the specified torque.
- Torque:
- 5.0 N*m (51 kgf*cm, 44 in.*lbf)
32941H
4.INSTALL INLET NO. 4 OIL COOLER HOSE
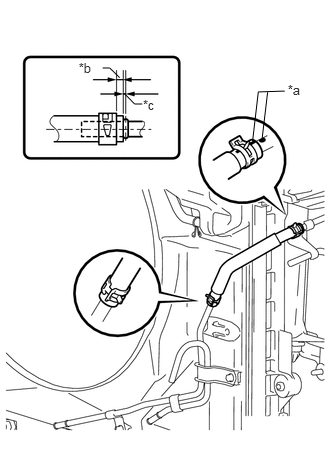
Install the inlet No. 4 oil cooler hose and slide the 2 clips to secure the hose as shown in the illustration.
| *a | Paint Mark |
| *b | 2 to 7 mm (0.079 to 0.275 in.) |
| *c | 0 to 3 mm (0 to 0.118 in.) |
- NOTICE:
-
Make sure the pinching portion of each clip is facing the direction shown in the illustration and the paint marks are aligned as shown in the illustration.
32941A
5.INSTALL INLET NO. 2 OIL COOLER HOSE
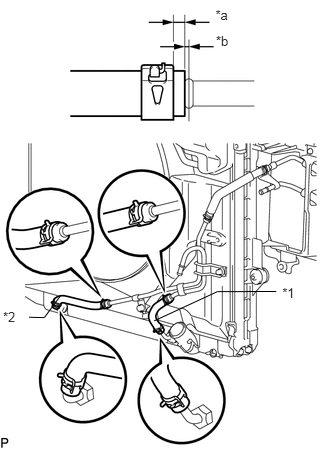
Install the inlet No. 2 oil cooler hose and slide the 2 clips to secure the hose as shown in the illustration.
| *1 | Inlet No. 2 Oil Cooler Hose |
| *2 | Inlet No. 3 Oil Cooler Hose |
| *a | 2 to 7 mm (0.079 to 0.275 in.) |
| *b | 0 to 3 mm (0 to 0.118 in.) |
- NOTICE:
-
Make sure the pinching portion of each clip is facing the direction shown in the illustration.
32941G
6.INSTALL INLET NO. 3 OIL COOLER HOSE
Install the inlet No. 3 oil cooler hose and slide the 2 clips to secure the hose as shown in the illustration.
- NOTICE:
-
Make sure the pinching portion of each clip is facing the direction shown in the illustration.
32942
7.INSTALL OUTLET NO. 1 OIL COOLER HOSE
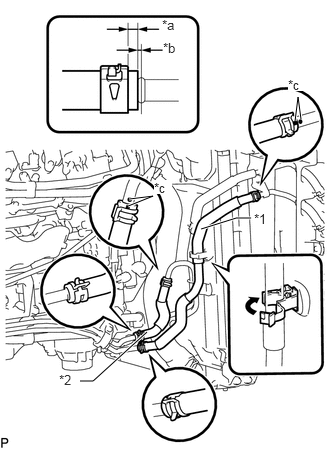
Connect the outlet No. 1 oil cooler hose and slide the 2 clips to secure the hose as shown in the illustration.
| *1 | Outlet No. 1 Oil Cooler Hose |
| *2 | Inlet No. 1 Oil Cooler Hose |
| *a | 2 to 7 mm (0.079 to 0.275 in.) |
| *b | 0 to 3 mm (0 to 0.118 in.) |
| *c | Matchmark |
- NOTICE:
-
Make sure the pinching portion of each clip is facing the direction shown in the illustration and the paint marks are aligned as shown in the illustration.
Attach the hose to the flexible hose clamp and close the clamp as shown in the illustration.
32941
8.INSTALL INLET NO. 1 OIL COOLER HOSE
Connect the inlet No. 1 oil cooler hose and slide the 2 clips to secure the hose as shown in the illustration.
- NOTICE:
-
Make sure the pinching portion of each clip is facing the direction shown in the illustration and the paint marks are aligned as shown in the illustration.
9.ADD AUTOMATIC TRANSMISSION FLUID
52521
10.INSTALL FRONT UPPER CENTER BUMPER RETAINER
for Standard: (See page Vehicle Exterior>EXTERIOR PANELS / TRIM>FRONT BUMPER(for Standard)>INSTALLATION)
w/ Winch: (See page Vehicle Exterior>EXTERIOR PANELS / TRIM>FRONT BUMPER(w/ Winch)>INSTALLATION)
11.INSPECT FOR AUTOMATIC TRANSMISSION FLUID LEAK
Start the engine. Make sure that there are no automatic transmission fluid leaks from the areas that were worked on.
51442
12.INSTALL NO. 2 ENGINE UNDER COVER
51405A
13.INSTALL NO. 1 ENGINE UNDER COVER SUB-ASSEMBLY
53806
14.INSTALL FRONT FENDER SPLASH SHIELD SUB-ASSEMBLY LH
53805
15.INSTALL FRONT FENDER SPLASH SHIELD SUB-ASSEMBLY RH
53784
16.INSTALL FRONT FENDER APRON SEAL REAR RH
53782
17.INSTALL FRONT FENDER APRON SEAL FRONT RH